Categories
Tags
Author
Mobomo webinars-now on demand! | learn more.
We were thrilled to conduct a training at this years Drupal Gov Con on local Drupal development with containers. Check out our presentation!
One of our lead developers spoke at this year's Drupal Gov Con at NIH. Check out his presentation on Taxonomy Terms as Organic Groups.
 It is safe to say that at the moment, WordPress does not have the largest presence in the federal government. By large, Drupal is the preferred CMS in the federal government.
Recently, we spoke at WordCamp DC where we were able to outline some reasons as to why and how we can help WordPress grow throughout the federal government.
First, lets identify some of the problems keeping WordPress less popular. There are three main reasons that Drupal appears to be the popular CMS over WordPress.
WordPress developers frequently hear a lot of these arguments and concerns about WordPress.
We hear this a lot, but it’s misleading to say because WordPress also offers the following:
Often times, this seems like a moot argument. Whenever we hear people arguing about X framework versus Y framework it usually boils down to scalability. But are you ever going to reach those upper limits you are arguing for? And if so, why can’t WordPress handle “large volumes of content”? We developers have seen plenty of sites with thousands of pages and posts.
So can WordPress! WordPress.com is a single instance of the WordPress Multisite codebase and serves millions of websites and users.Edublogs.org hosts millions of sites on one WordPress Multisite installation with over 3 million users.
It’s true that over the years, there have a been a number of high profile vulnerabilities, but these vulnerabilities are almost always a result of using a poorly built plugin, or out of date plugin. WordPress itself is very quick to fix any discovered vulnerabilities. So installing free, low quality plugins or just the first plugin you see is not WordPress’s fault.
That’s a managerial decision, and that that needs to change. Same goes for not staying on top of your plugin updates. If you choose not to update your plugins, or you choose to keep a plugin that hasn’t been updated in years, then you take the risk of running something with security vulnerabilities.
Personally I think this is a perspective people have about websites in general. That once you build it the first time, you can just walk away from it and not think about it again and we wish that were the case. But like your cars, you need to maintain it to keep it running smoothly.
Yes that’s true, but WordPress, just like everything else has grown and changed. WordPress hasn’t been a “blogging” platform for years. Our WordPress engineer Kyle Jennings uses WordPress as an application framework to build user centric web apps.
A lot of these arguments above seem to be related to WordPress’s approach to addressing the same issues that Drupal has addressed,but at the end of the day these discrepancies don’t actually exist. And because WordPress also offers user friendliness and intuitive design, that have in our opinion blown Drupal out of the water, we think the real discrepancies lay with Drupal.
In 2015, the U.S. Digital Services teamed up with 18f to create an official front-end framework for government websites called U.S. Web Design Standards (USWDS). It is basically Twitter’s Bootstrap but built for the federal government and focuses on accessibility compliances, making it easy and affordable for agencies to build or rebuild their websites.
Our WordPress developer, Kyle Jennings built a WordPress theme named Benjamin with these standards. Benjamin makes extensive use of the awesome WordPress Customizer to provide a ton of flexible and thoughtful settings as well as a live preview of your changes. Here is a quick overview of settings:
So by using Benjamin and Franklin, agencies can quickly and easily spin up their own websites, that are branded with federally ordained style guidelines as well as easily customize their sites to meet their needs at any given time.
In case you missed the top reasons why the federal government is moving to Drupal be sure to read and let us know which content management system you prefer!
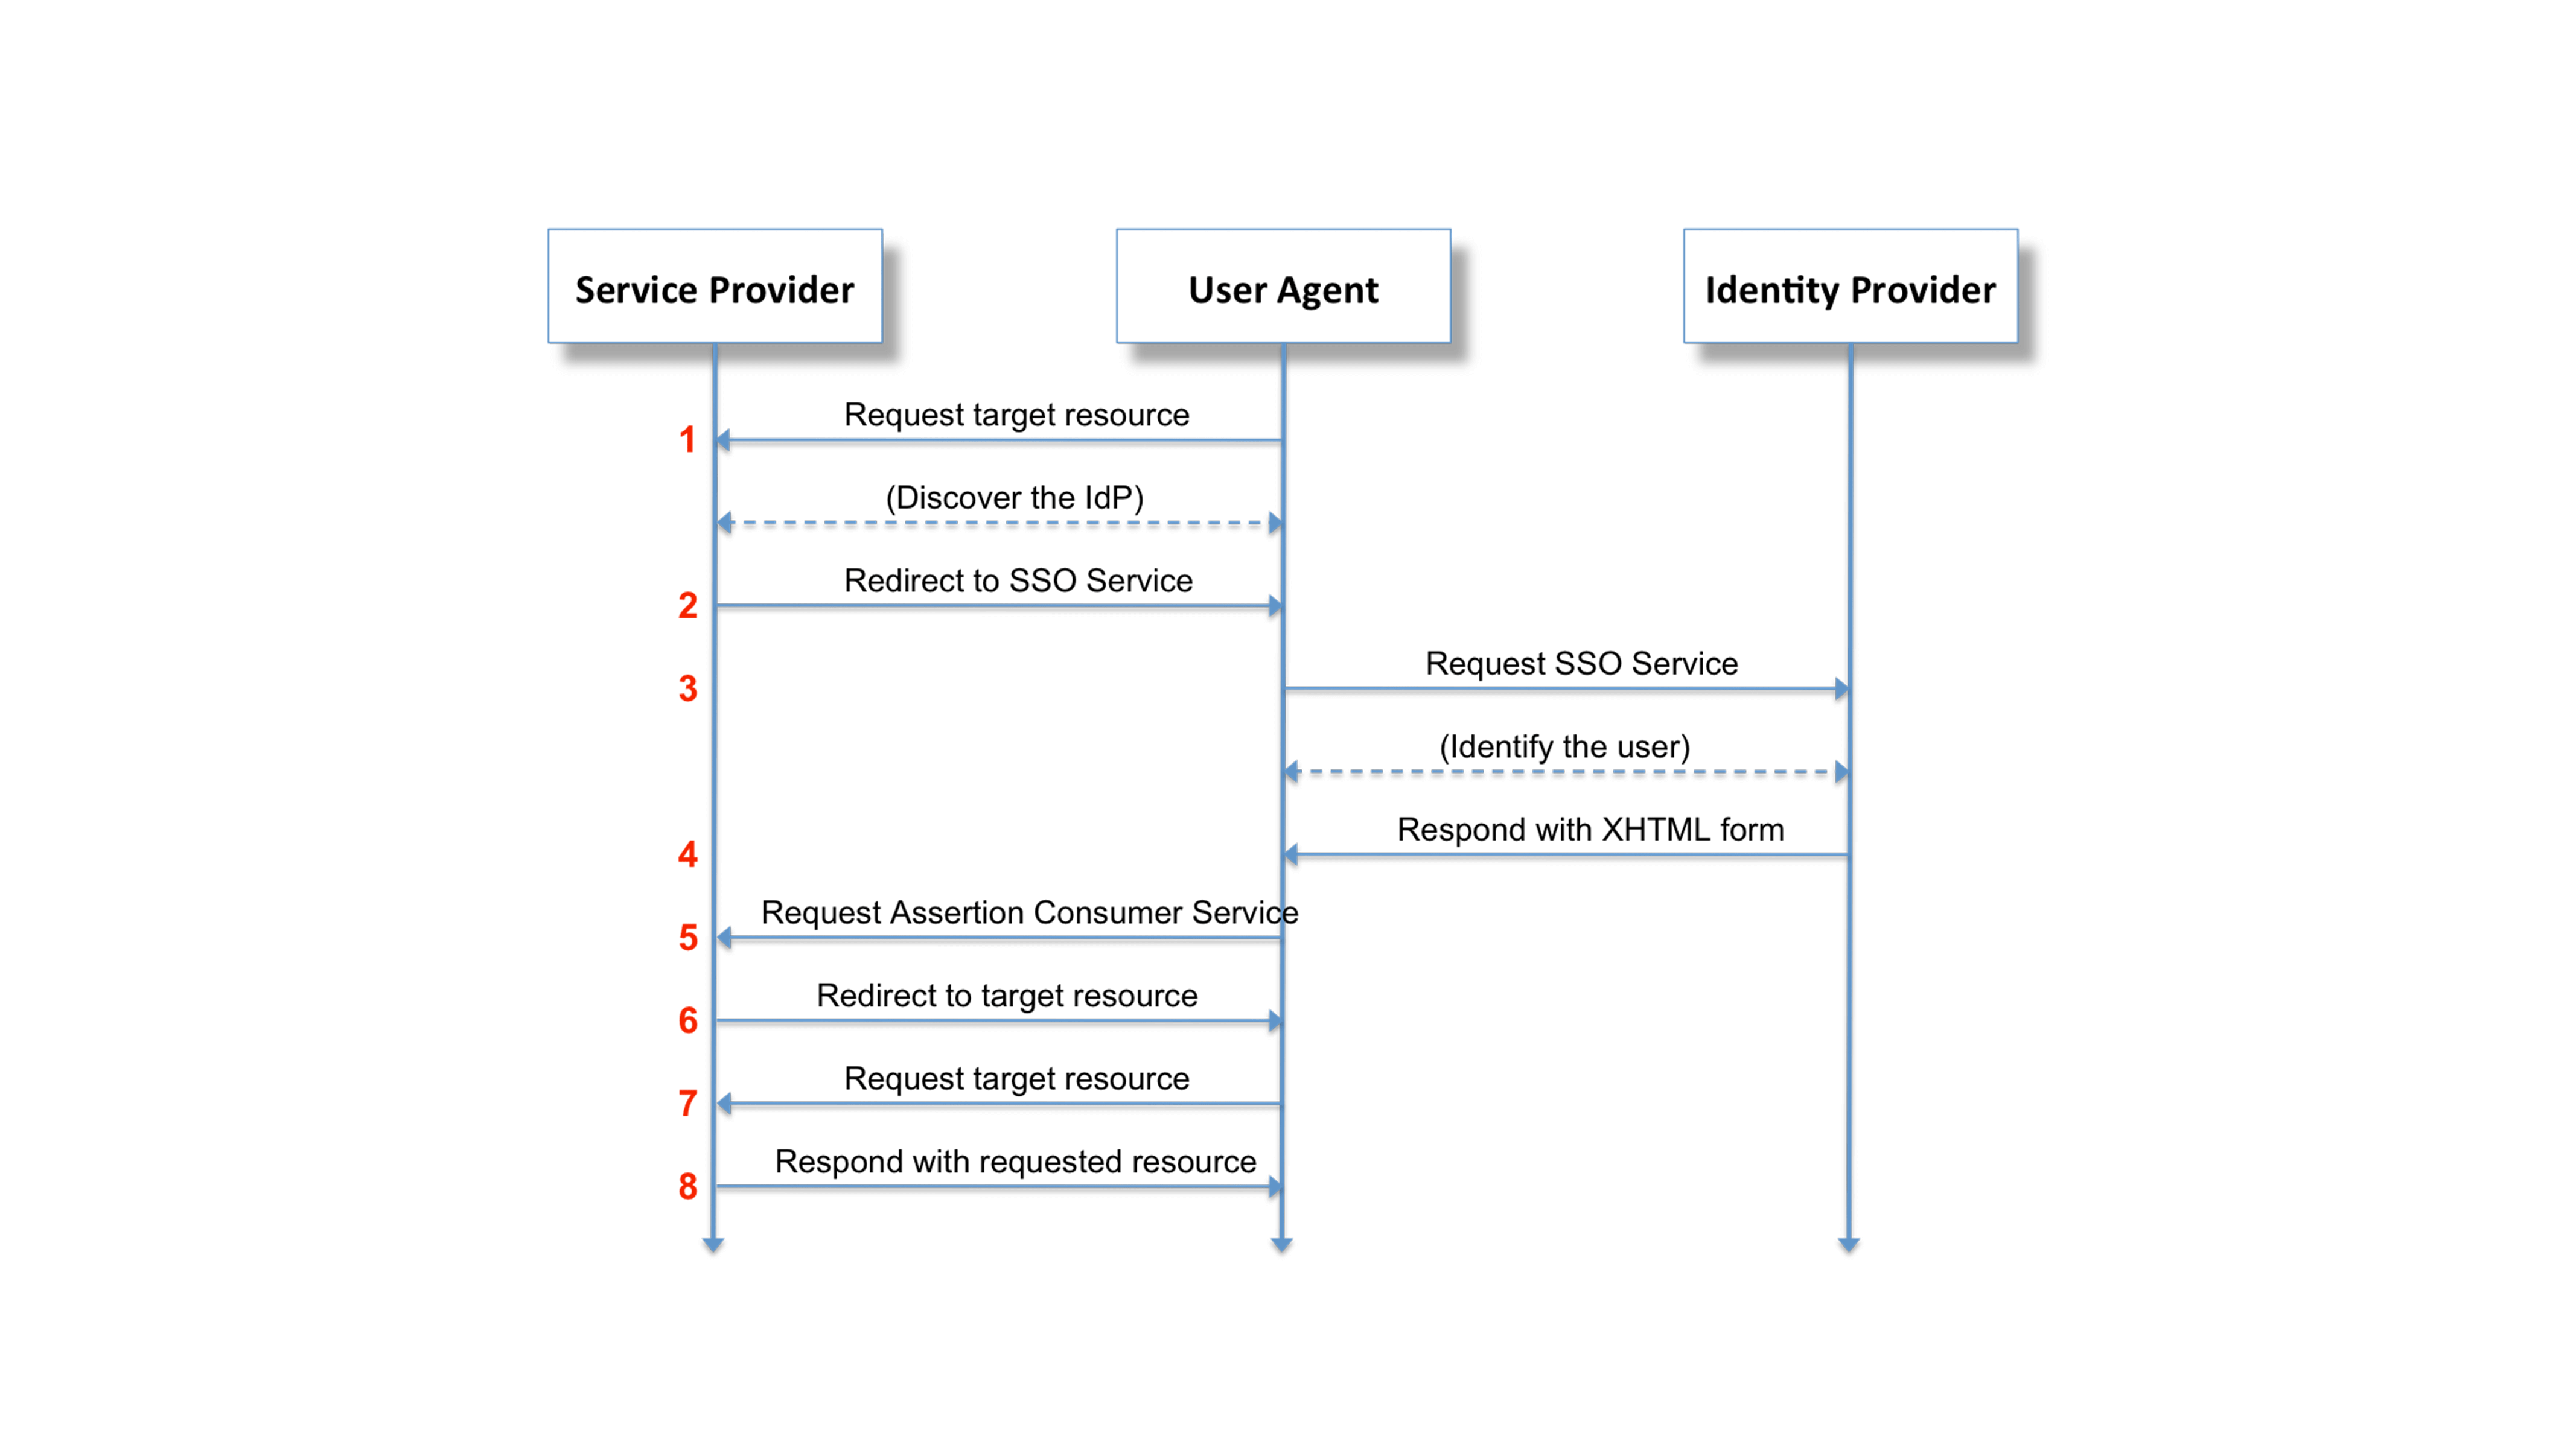
In the old days before Drupal 8, SAML authentication in Drupal was a bit of a painful experience. The only real option was using the simplesamlphp_auth module, which involves running a full instance of SimpleSAMLphp alongside your Drupal installation. It is a working solution, but running a separate application just to authenticate against a SAML identity provider is somewhat wasteful. Drupal is already a very capable web application. Why not handle authentication from inside of a Drupal module and call it a day?
The SAML Authentication module was the first SAML module for Drupal 8, and now that it's been backported to Drupal 7, there's no reason to install SimpleSAMLphp ever again!
Another reason that we chose to backport the samlauth module is that we have a number of Drupal 7 and Drupal 8 sites that we manage through Aegir. Since the Drupal 7 version is a 1:1 backport of the Drupal 8 version, all of the same configuration options are available, which makes it very straightforward to centrally manage all of the configuration.
While the backport of the 1.x branch is feature complete as it stands right now, there is definitely more work that can be done. The 8.x-2.x branch expands on the 8.x-1.x branch with new features and more flexible configuration options. These improvements should be backported to the 7.x-2.x branch eventually. At that point, since we'll have feature parity between the Drupal 7 and Drupal 8 versions, an upgrade path from Drupal 7 to Drupal 8 might be a good idea.
In the coming weeks, we will talk about the work we're doing to manage SAML configuration through the Aegir interface. In the meantime, testing, feedback, and patches are always welcome over in the samlauth issue queue.
In our last post, we created infrastructure for injecting custom configurations into Nutch via nutchserver. In this post, we will be creating the script that controls crawling those configurations. If you haven’t done so yet, make sure you start the nutchserver:
$ nutch nutchserver
We’re going to break this us into two files again, one for cron to run and the other that holds a class that does the actual interaction with nutchserver. The class file will be Nutch.py and the executor file will be Crawler.py. We’ll start by setting up the structure of our class in Nutch.py:
import time
import requests
from random import randint

class Nutch(object):
    def __init__(self, configId, batchId=None):
        pass
    def runCrawlJob(self, jobType):
        pass
We’ll need the requests module again ($ pip install requests on the command line) to post and get from nutchserver. We’ll use time and randint to generate a batch ID later. The function crawl is what we call to kick off crawling.
We’re going to use argparse again to give Crawler.py some options. The file should start like this:
# Import contrib
import requests
import argparse
import random

# Import custom
import nutch

parser = argparse.ArgumentParser(description="Runs nutch crawls.")
parser.add_argument("--configId", help="Define a config ID if you just want to run one specific crawl.")
parser.add_argument("--batchId", help="Define a batch ID if you want to keep track of a particular crawl. Only works in conjunction with --configId, since batches are configuration specific.")
args = parser.parse_args()
We’re offering two optional arguments for this script. We can set --configId to run a specific configuration and setting --batchId allows us to track as specific crawl for testing or otherwise. Note: with our setup, you must set --configId if you set --batchId.
We’ll need two more things: a function to make calling the crawler easy and logic for calling the function.
We’ll tackle the logic first:
if args.configId:
    if args.batchId:
        nutch = nutch.Nutch(args.configId, args.batchId)
        crawler(args.job, nutch.getNodeID())
    else:
        nutch = nutch.Nutch(args.configId)
        crawler(args.job, nutch.getNodeID())
else:
    configIds = requests.get("http://localhost:8081/config")
    cids = configIds.json()
    random.shuffle(cids)
    for configId in cids:
        if configId != "default":
            nutch = nutch.Nutch(configId)
            crawler(nutch)
If a configId is given, we capture it and initialize our Nutch class (from Nutch.py) with that id. If a batchId is also specified, we’ll initialize the class with both. In both cases, we run our crawler function (shown below).
If neither configId nor batchId is specified, we will crawl all of the injected configurations. First, we get all of the config ID’s that we have injected earlier (see Part 1!). Then, we randomize them. This step is optional but we found that we tend to get more diverse results when initially running crawls if Nutch is not running them in a static order. Last, for each config ID, we run our crawl function:
def crawler(nutch):
    inject = nutch.runCrawlJob("INJECT")
    generate = nutch.runCrawlJob("GENERATE")
    fetch = nutch.runCrawlJob("FETCH")
    parse = nutch.runCrawlJob("PARSE")
    updatedb = nutch.runCrawlJob("UPDATEDB")
    index = nutch.runCrawlJob("INDEX")
You might wonder why we’ve split up the crawl process here. This is because later, if we wish, we can use the response from the Nutch job to keep track of metadata about crawl jobs. We will also be splitting up the crawl process in Nutch.py.
That takes care of Crawler.py. Let’s now fill out our class that actually controls Nutch, Nutch.py. We’ll start by filling out our __init__ constructor:
def __init__(self, configId, batchId=None):
    # Take in arguments
    self.configId = configId
    if batchId:
        self.batchId = batchId
    else:
        randomInt = randint(0, 9999)
        self.currentTime = time.time()
        self.batchId = str(self.currentTime) + "-" + str(randomInt)

    # Job metadata
    config = self._getCrawlConfiguration()
    self.crawlId = "Nutch-Crawl-" + self.configId
    self.seedFile = config["meta.config.seedFile"]
The batch ID is essential as it links the various steps of the process together. Urls generated under one batch ID must be fetched under the same ID for they will get lost, for example. The syntax is simple, just [Current Unixtime]-[Random 4-digit integer].
We’ll query the nutchserver for the current config and extract the seed file name. We also generate a crawlId for the various jobs we’ll run.
Specifically, we’ll need one to get the crawl configurations, one to create jobs, and one to check the status of a job. The basics of how to interact with Job API can be found at https://wiki.apache.org/nutch/NutchRESTAPI, though be aware that this page is not complete in it’s documentation. Since we referenced it above, we’ll start with getting crawl configurations:
def _getCrawlConfiguration(self):
    r = requests.get('http://localhost:8081/config/' + self.configId)
    return r.json()
This is pretty simple: we make a request to the server at /config/[configID] and it returns all of the config options.
def _getJobStatus(self, jobId):
    job = requests.get('http://localhost:8081/job/' + jobId)
    return job.json()
This one is also simple: we make a request to the server at /job/[jobId] and it returns all the info on the job. We’ll need this later to poll the server for the status of a job. We’ll pass it the job ID we get from our create request, shown below:
def _createJob(self, jobType, args):
    job = {'crawlId': self.crawlId, 'type': jobType, 'confId': self.configId, 'args': args}
    r = requests.post('http://localhost:8081/job/create', json=job)
    return r
Same deal as above, the main thing we are doing is making a request to /job/create, passing it some JSON as the body. The requests module has a nice built-in feature that allows you to pass a python dictionary to a json= parameter and it will convert it to a JSON string for you and pass it to the body of the request.
The dict we are passing has a standard set of parameters for all jobs. We need the crawlId set above; the jobType, which is the crawl step we will pass into this function when we call it; the configId, which is the UUID we made earlier; last, any job-specific arguments--we’ll pass these in when we call the function.
The last thing we need is the logic for setting up, keeping track of, and resolving job creation:
def runCrawlJob(self, jobType):
    args = ""
    if jobType == 'INJECT':
        args = {'seedDir': self.seedFile}
    elif jobType == "GENERATE":
        args = {"normalize": True,
                "filter": True,
                "crawlId": self.crawlId,
                "batch": self.batchId
                }
    elif jobType == "FETCH" or jobType == "PARSE" or jobType == "UPDATEDB" or jobType == "INDEX":
        args = {"crawlId": self.crawlId,
                "batch": self.batchId
                }
    r = self._createJob(jobType, args)
    time.sleep(1)
    job = self._getJobStatus(r.text)
    if job["state"] == "FAILED":
        return job["msg"]
    else:
        while job["state"] == "RUNNING":
            time.sleep(5)
            job = self._getJobStatus(r.text)
            if job["state"] == "FAILED":
                return job["msg"]
    return r.text
All of the job types except Inject require a crawlId and batchId. Inject is special in that the only argument it needs is the path to the seed file. Generate has two special options that allow you to enable or disable use of the normalize and regex url filters. We’re setting them both on by default.
Before we begin checking the status of the job, we’ll sleep the script to give the asynchronous call a second to come back. Then we make a while loop to continuously check the job state. When it finishes without failure, we end by returning the ID.
And we’re finished! There are a few more things of note that I want to mention here. An important aspect of the way Nutch was designed is that it is impossible to know how long a given crawl will take. On the one hand, this means that your scripts could be running for several hours at time. However, this also means that it could be done in a few minutes. I mention this because when you first start crawling and also after you have crawled for a long time, you might start seeing Nutch not crawl very many links. In the first case, this is because, as I mentioned earlier, Nutch only crawls the links in the seed file at first, and if there are not many hyperlinks on those first pages, it might take two or three crawl cycles before you start seeing a lot of links being fetched. In the latter case, after Nutch finishes crawling all the pages that match your configuration, it will only recrawl those pages after a set interval. You can modify how this process works, but it will mean that after awhile you will see crawls that only fetch a handful of links.
Another helpful note is that the Nutch log at /path/to/nutch/runtime/local/logs/hadoop.log is great for following the process of crawling. You can set the output depth of most parts of the Nutch process at /path/to/nutch/conf/log4j.properties (you will have to rebuild Nutch if you change this by running ant runtime at the Nutch root).
Now that we know the basics of Nutch, we can dive into our use case. We write scripts that do two things:
This post will tackle ingesting the configs. I will specifically be using Python for the examples in this post, but the principles should apply to any language.
In our project, we had 50+ sites we wanted to crawl, all with different configuration needs. We organized these configurations into a nice JSON api that we ingest. In our examples, we will be using Python’s Requests API to get the JSON. We’ll also need a way to create a unique UUID for each configuration, so we’ll use Python’s UUID module. You can use the package installer pip to get them:
$ pip install requests
$ pip install uuid
We’re going to use a class to handle all of the processing for injection. We’ll create a file for this, call it configInjector.py. The beginning of the file should look something like this:
import os
import uuid
import requests
from shutil import copy2

class ConfigInjector(object):
    def __init__(self):
        pass
We’re importing os and copy2 so we can create, edit, and copy files that we need. Next, we’re going to want to get the config itself, as well as an ID from the configuration node itself. We’ll make a new file for this, call it inject.py. This will be the script we actually run from cron for injection. It begins something like this:
import urllib2
import json
import argparse
import configInjector

parser = argparse.ArgumentParser(description="Ingests configs.")
parser.add_argument("confugUrl", help="URL of the JSON config endpoint.")
args = parser.parse_args()
For our imports, we’ll use requests and UUID like earlier as well as urllib2 to download our remote JSON and argparse to give our script an argument for where to download JSON. We’re also importing our own configInjector class file.
The argparse module allows us to pass command line arguments to the Python script. In the code above, we instantiate the argument parser, add our argument (configUrl), and set the results of the argument to args. This allows us to pass in a url for the location of our JSON endpoint.
Now that we have the foundation set up let’s get the data. We’ll use urllib2 to grab the JSON and json.load() add it to a variable:
response = urllib2.urlopen(args.confugUrl)
configs = json.load(response)
We’ll then loop through it and call our class for each config in the JSON:
for configId in configs:
    configInjector.ConfigInjector(configId, configs[configId])
Now that we are getting the configs, let’s fill out our class and process them. We’ll use the __init__ constructor to do the majority of our data transformations. The two major things we want to do is process and inject Nutch config settings and create regex-urlfilters.txt for each config.
First, we’ll do our transformations. We want to get our config options in order to plug into Nutch, so we’ll just set them as variables in the class:
class ConfigInjector(object, configId, config):
    def __init__(self):self.config = config
        self.configId = configId

        # Config transformations
        self.configTitle = self.config["configTitle"]
        self.allowExternalDomains = self.config["allowExternalDomains"]
        self.uuid = str(uuid.uuid3(uuid.NAMESPACE_DNS, str(self.configId)))
We’re setting three things in this example: a config title and UUID for reference and a configuration state for the Nutch config db.ignore.external.links. We’re using the static configId to generate the UUID so that the same UUID is always used by each individual configuration.
Next, we’ll need to create some files for our seed urls and match patterns. We’re going to create two files, seed-XXXXXX.txt and regex-urlfilters-XXXXXX.txt, where XXXXXX is the configId. For the seed files, we’ll create our own directory (called seeds), but for the regex files, we must store them in $NUTCH_HOME/runtime/local/conf in order for Nutch to find them (this is due to Nutch’s configuration of the Java CLASSPATH). First, we’ll set the filenames based upon configId (this goes in the __init__ function):
self.regexFileName = 'regex-urlfilter-' + self.nodeId + '.txt'
self.seedFileName = 'seed-' + self.nodeId + '.txt'
We also want to call the functions we are about to write here, so that when we call the class, we immediately run all the necessary functions to inject the config (again, in the __init__ function):
# Run processes
self._makeConfigDirectories()
self._configureSeedUrlFile()
self._copyRegexUrlfilter()
self._configureRegexUrlfilter()
self._prepInjection()
Next, we’ll setup the directories (the underscore at the beginning of the function name just tells python not to load this function when being imported because it will only be used internally):
def _makeConfigDirectories(self):
     if not os.path.exists('/path/to/nutch/runtime/local/conf/'):
         os.makedirs('/path/to/nutch/runtime/local/conf/')
     if not os.path.exists('/path/to/nutch/seeds/'):
         os.makedirs('/path/to/nutch/seeds/')
This simply checks to make sure the directories are there and makes them if they aren’t. Next, we’ll create the seed files:
def _configureSeedUrlFile(self):
     furl = open('/path/to/nutch/seeds/' + self.seedFileName, "w")
     for url in self.config["seedUrls"]:
         furl.write(url + "\n")
Basically, we are opening a file (or creating one if it doesn’t exist--this is how “w” functions) and writing each url from the JSON config to each line. We must end each url with a newline (\n) for Nutch to understand the file.
Now we’ll make the regex file. We’ll do it in two steps so that we can take advantage of what Nutch has pre-built. We’re going to copy Nutch’s built-in regex-urlfilters.txt so that we can use all of its defaults and add any defaults we would like to all configs. Before we do that, we have an important edit to make to regex-urlfilters.txt: remove the .+ from the end of the file in both /path/to/nutch/conf and /path/to/nutch/runtime/local/conf. We’ll add it back in the file ourselves, but if we leave it there, the filters won’t work at all because Nutch uses the first match when determining whether to fetch a url, and .+ means “match any”. For our use, we’re going to add this back on the end of the file after we write our regex to it.
We’ll copy regex-urlfilters.txt in this function:
def _copyRegexUrlfilter(self):
     frurl = '/path/to/nutch/conf/regex-urlfilter.txt'
     fwurl = '/path/to/nutch/runtime/local/conf/' + self.regexFileName
     copy2(frurl, fwurl)
Then, we write our filters from the config to it:
def _configureRegexUrlfilter(self):
     notMatchPatterns = self.config["notMatchPatterns"]
     matchPatterns = self.config["matchPatterns"]
     regexUrlfilter = open('/path/to/nutch/runtime/local/conf/' + self.regexFileName, "a")
     if notMatchPatterns:
         for url in notMatchPatterns:
             regexUrlfilter.write("-^" + url + "\n")
     if matchPatterns:
         for url in matchPatterns:
             regexUrlfilter.write("+^" + url + "\n")regexUrlfilter.write("+.\n")
     regexUrlfilter.close()
A few things are going on here: we are opening and appending to the file we just copied (that’s how “a” works) and then, for each “do not match” pattern we have, we are adding it to the file, followed by the match patterns. This is because, as we said before, Nutch will use the first regex match it gets, so exclusion needs to go first to avoid conflicts. We then write .+ so that Nutch accepts anything else--you can leave it off if you would prefer Nutch exclude anything not matched, which is its default behavior.
As a quick side note, it is important to mention that designing it this way means that each time we inject our configuration into Nutch, we will be wiping out and recreating these files. This is the easiest pathway we found for implementation, and it affords no disadvantages except that you cannot manually manipulate these files in any permanent way. Just be aware.
Now that we have our files in place, the last thing we have to do is inject the configuration into Nutch itself. This will be our first use of the Nutchserver API. If you have not already, open a console on the server that hosts Nutch and run:
$ nutch nutchserverOptionally, you can add a --port argument to specify the port, but we’ll use the default: 8081. Then we’ll prep the data for injection into the API:
def _prepInjection(self):
     config = {}

     # Custom config values
     config["meta.config.configId"] = self.configId
     config["meta.config.configTitle"] = self.configTitle
     config["meta.config.seedFile"] = '/path/to/nutch/seeds/' + self.seedFileName

     # Crawl metadata
     config["nutch.conf.uuid"] = self.uuid

     # Crawl Config
     config["urlfilter.regex.file"] = self.regexFileName
     config["db.ignore.external.links"] = self.allowExternalDomains

     self._injectConfig(config)
Note that we are creating both our own custom variables for later use (we named them “meta.config.X”) and setting actual Nutch configuration settings. Another note: urlfilter.regex.file takes a string with the filename only. You CANNOT specify a path for this setting, which is why we store the regex files in /path/to/nutch/runtime/local/conf, where the CLASSPATH already points.
Lastly, we’ll do the actual injection. The self._injectConfig(config) at the end of the _prepInjection function starts injection:
def _injectConfig(self, config):
     job = {"configId": self.uuid,"force": "true","params": config}
     r = requests.post('http://localhost:8081/config/' + self.uuid, json = job)
     return r
All we do here is set up the JSON to push to the API and then inject. Every configuration we send to the API must have a UUID as it’s configId (which we will reference later when creating crawl jobs). We set force to true so that configurations will get overwritten when they change upstream and then we pass in our configuration parameters.
We then use the requests python module to make the actual injection. This is significantly easier than using something like CURL. We post to a url containing the uuid and have the JSON as the body (requests has a handy json argument that converts Python dictionaries to json before adding it to the body). Lastly, we return the post response for later use if needed.
And that’s it! We have successfully posted our dynamic custom configuration to nutchserver and created the relevant files. In the next post, we’ll show you how to crawl a site using these configurations.
Let’s be honest, the documentation for Apache Nutch is scarce. Doing anything more complicated than a single-configuration crawl requires hours of prowling Stack Overflow and a plethora of sick Google-fu moves. Thankfully, I’ve already suffered for you!
A recent project involved configuring Nutch to crawl 50+ different sites, all in different states of web standard conformity, all with different configuration settings. These had to be dynamically added and needed to account for changing configurations. In the following few posts, I’ll share the steps we took to achieve this task.
Apache Nutch 2.x is an open-source, mature, scalable, production-ready web crawler based on Apache Hadoop (for data structures) and Apache Gora (for storage abstraction). In these examples, we will be using MongoDB for storage and Elasticsearch for indexing; however, this guide should still be useful to those using different storage and indexing backends.
The standard way of using Nutch is to set up a single configuration and then run the crawl steps from the command line. There are two primary files to set up: nutch-site.xml and regex-urlfilter.txt. There are several more files you can utilize (and we’ll discuss a few of them later), but for the most basic implementation, that’s all you need.
The nutch-site.xml file is where you set all your configuration options. A mostly complete list of configuration options can be found in nutch-default.xml; just copy and paste the options you want to set and change them accordingly. There are a few that we’ll need for our project:
http.agent.name - This is the name of your crawler. This is a required setting for every Nutch setup. It’s good to have all of the settings for `http.agent` set, but this is the only required one.org.apache.gora.mongodb.store.MongoStore for Mongo DB.elastic.host and elastic.port or elastic.cluster - this will point Nutch at our Elasticsearch instance.There are other settings we will consider later, but these are the basics.
The next important file is regex-urlfilter.txt. This is where you configure the crawler to include and/or exclude specific urls from your crawl. To include a urls matching a regex pattern, prepend your regex with a +. To exclude, prepend with a -. We’re going to take a slightly more complicated approach to this, but more on that later.

Nutch’s crawl cycle is divided into 6 steps: Inject, Generate, Fetch, Parse, Updatedb, and Index. Nutch takes the injected URLs, stores them in the CrawlDB, and uses those links to go out to the web and scrape each URL. Then, it parses the scraped data into various fields and pushes any scraped hyperlinks back into the CrawlDB. Lastly, Nutch takes those parsed fields, translates them, and injects them into the indexing backend of your choice.
For the inject step, we’ll need to create a seeds.txt file containing seed urls. These urls act as a starting place for Nutch to begin crawling. We then run:
$ nutch inject /path/to/file/seeds.txt
In the generate step, Nutch extracts the urls from pages it has parsed. On the first run, generate only queues the urls from the seed file for crawling. After the first crawl, generate will use hyperlinks from the parsed pages. It has a few relevant arguments:
-topN will allow you to determine the number of urls crawled with each execution.-noFilter and -noNorm will disable the filtering and normalization plugins respectively.In its most basic form, running generate is simple:
$ nutch generate -topN 10
This is where the magic happens. During the fetch step, Nutch crawls the urls selected in the generate step. The most important argument you need is -threads: this sets the number of fetcher threads per task. Increasing this will make crawling faster, but setting it too high can overwhelm a site and it might shut out your crawler, as well as take up too much memory from your machine. Run it like this:
$ nutch fetch -threads 50
Parsing is where Nutch organizes the data scraped by the fetcher. It has two useful arguments:
-all: will check and parse pages from all crawl jobs-force: will force parser to re-parse all pagesThe parser reads content, organizes it into fields, scores the content, and figures out links for the generator. To run it, simply:
$ nutch parse -all
The Updatedb step takes the output from the fetcher and parser and updates the database accordingly. Updatedb markes urls for future generate steps at this point. Nutch 2.x supports several storage backends thanks to it abstracting storage through Apache Gora (MySQL, MongoDB, HBase). No matter your storage backend, however, running it is the same:
$ nutch updatedb -all
Indexing is taking all of that hard work from Nutch and putting it into a searchable interface. Nutch 2.x supports several indexing backends (Solr, Cassandra, Elasticsearch). While we will be using Elasticsearch, the command is the same no matter what indexer you are using:
$ nutch index -all
Congrats, you have done your first crawl! However, we’re not going to be stopping here, oh no. Our implementation has far more moving parts than a simple crawl interface can give, so in the next post, we will be utilizing Nutch 2.3’s RESTful API to add crawl jobs and change configurations dynamically! Stay tuned!
The ATARC Mobile Customer Experience Project Team has been examining ways that Federal agencies can better utilize customer experience technologies and techniques such as a user centered design approach to improve the internal and public-facing mobile applications that serve employees and citizens of the United States.
They have identified a number of principles that agencies should leverage to properly engage mobile audiences. Brian Lacey, CEO of Mobomo, presented the user centered design strategy that we used for USO, a recent mobile app that launched in the spring of 2017 as part of a series of deployments to over 200+ USO centers.
USO was seeking to design, develop, and deploy a cross-platform mobile application that introduces an additional channel for United States military service members and their families to better engage with USO centers and programs.
Specifically, this mobile application needed to foster greater discoverability of the USO locations, where they provide services and programs offered by the USO through its distributed locations and online. The initial launch was on an iOS native application platform. It was key that our design process focus on the USO end user(s) in order to create a platform that people would enjoy using the most.

It’s important to create a design for the people that use your product - always keep the user at the center of the design focus. A gorgeous app with poor UX is not a gorgeous app, it is a recipe for user frustration! Design happens at the intersection of the user, the interface and the context.
We started the design process by defining the specific goals of the app. After working with the USO team and deciphering their goals, we were able to better define the overall strategy in which we would use to accomplish the goals they were seeking to achieve.
We defined the goals through stakeholder interviews and preliminary research which helped to better define the main purpose of the app, and the general baseline for the approach that we would use during the process.
As the design phase progressed, user interviews and site visits occurred which gave our team insight in determining the user personas or better known as the ideal end user that would be utilizing the USO mobile platform.
By conducting user personas, this helped us to uncover the end user's wants and needs in which we based the design of the app that you see today.

Each user persona has slightly different needs, and being able to narrow in on those specific needs while not neglecting the other persona’s needs creates a balance in the design for the user experience. For example, The “enlisted personnel” persona wants to know what amenities are available and to be able to skip through the check-in line as quickly as possible.
While the “military spouse” persona wants to know what programs are at that specific location so that they can keep their kids entertained. Having a fast check-in is vital to this persona as they are probably dealing with multiple kids who are not as patient in waiting in line as others. The “caregiver” persona is looking for support programs and events so that they can share their similar experiences with other caregivers.
For the case of this project, the USO key user persona’s were identified as the following:
The caregiver
The enlisted personnel
The military spouse
While identifying these different persona’s Mobomo was able to build the experience map and its key features which allows the users to have the ability to quickly check-in and find programs that most closely relate to them, and their physical location.
 After the experience map and user personas were created, Mobomo began to develop screen sketches, the data architecture, and overall flow for the mobile application. By building these out early in the process we were able to identify possible data fails early on and come up with ways to mitigate these potential issues for the future.


Wireframes are generated from the app architecture and the app flow diagrams as the basic development process begins. These basic designs are tested in the app and built out around the user experience. As a result of the user experience driving the design and development we are able to successfully accomplish USO organizational goals, of creating more user data and simplifying the check-in process.
By accomplishing both of these issues while driving the app around the user we’ll be able to ensure the app’s longevity while still being a useful tool for both the user and for the organization.

Mobomo focuses on what method of communication is best to get feedback from the end users versus what is assumed to be the best method- this is why Mobomo has been successful with human centric design feedback and making adjustments based on the actual user feedback.
Like most, USO is big on user engagement, the surveys and direct email were specific to USO. They wanted to be available in a variety of different ways to receive feedback on how they can be improving as well as what other services they can improve upon to offer to the end user.
As we were building the app, feedback from end users became an important facet for the USO as an organization. They like that there is a survey in the hands of potentially all of their end users which can help them improve their service.
The survey is specifically about the user’s experience at a particular USO. That information is fed back to that location through a different mechanism.
The user has the option for General USO Feedback, so that directs them to an email address that lets the user give the USO as an organization feedback. And then finally there is an direct email link for the user to give feedback on the App itself and how the app can improve to better serve that specific person.

Since launching the iOS app, the next phase will be adding more enhancements to the iOS app, features could include: Program check-in, calendar integration, event signup, push notifications, and USO news.
Aside from enhancements to the iOS app, we are looking forward to expanding USO’s mobile presence by including an Android application into their digital presence. You can find the iOS app in the App store. Check out the full USO app!
 We specialize in interface design and we take pride in our process but there is a lot of work done behind the scenes before the design is complete. When you work as a digital interface designer, you spend your day interacting with many tools and files. Sometimes you find yourself doing repetitive tasks which can become annoying after awhile but being methodical and organized can definitely help. We have talked about design etiquette and how to keep your files and folders organized which can help improve your workflow - but what about shortcuts on tools…Let’s talk ways you can customize Photoshop to save you time and hopefully improve your workflow.
‘Actions’ are one of the tools you can use to help automate things in Photoshop. "An action is a series of tasks that you play back on a single file or a batch of files” —menu commands, panel options, tool actions, and so on. For example, you can create an action that changes the size of an image, applies an effect to the image, and then saves the file in the desired format”. Source Adobe Support  There are many ways you can take advantage of this tool, for example, instead of having to manually copy and paste the style of a layer - you can have it attached to a keyboard shortcut in an action. There are some tools that don't have an option for a keyboard shortcut, having actions allows the user to give a keyboard shortcut to a specific tool to use it later.
  Not all the tools in photoshop have keyboard shortcuts. Actions can be used manually in ‘Batch’ or you can utilize Droplet which are small applications that automatically process all files that are dragged onto their icon. More about actions
Artboards make working with multiple files easier - in combination to smart objects linked to CC libraries, you can have everything you need without needing extra .psd or .psb files in your computer. You can access them from the cloud, no matter where you are and no matter what device or application in the adobe family you are using. This is helpful when dealing with images that are going to be used in different social media sites. 
You can have an event, such as opening, saving, or exporting a file in Photoshop that triggers a JavaScript or a Photoshop action. Photoshop provides several default events, or you can have any scriptable Photoshop event trigger the script or action. See the Photoshop Scripting Guide for more information on scriptable events. Source Adobe Support Scripts are similar to actions but they allow access to elements not accessible by actions and this gives more flexibility and automation to some tools. There are many useful scripts for example Template Generator, Lighten / Darken Color and many others, just search for “Photoshop Scripts” and you’ll get many results, or create your own! Related: https://www.ps-scripts.com/
Add-ons allow complex tasks to be done with a single click, you can add special effects to a picture, modify layer names in batch, and more, there are many available paid and free plugins available from Adobe’s Creative page. Do you have suggestions or is there a particular tool that you would be interested in learning more about to improve your workflow? Reach out!