Mobomo webinars-now on demand! | learn more.

For the last three years, Presently users have been taking advantage of our integration with SharePoint. Today we're excited to offer SharePoint 2010 integration. If you're using older versions of SharePoint, don't worry; we will be keeping our old webpart in place so that you can continue to use Presently with older versions.

Overview

Here is an overview of some of the features of the new Presently SharePoint 2010 integration:

  • Put a Presently feed on virtually any SharePoint page, thanks to easy installation with SharePoint web parts package.
  • View and switch seamlessly between Presently feeds.
  • Post messages, links and files.
  • Access Profile information for other members.
  • Access Group info for all groups.
  • Leave and Join Groups.
  • Follow/Unfollow other users.
  • Admins control where Presently feeds appear using SharePoint's built-in webpart controls and templates.
  • Document list integration for posting files from your SharePoint document lists.

Screencast

Maggie, our QA Manager put together a terrific screencast that will walk you through the installation for the Presently SharePoint 2010 Webpart.

How To Install the Presently Sharepoint 2010 Webpart from Intridea on Vimeo.

Why Presently?

Presently is an award-winning enterprise collaboration tool; our team of developers, designers and user interface design experts work hard to make sure that Presently users are having a real-time, dynamic, and immersive social experience. Microsoft's SharePoint is a fundamental tool for millions of enterprise users; that's why we made sure that Presently integrated with SharePoint almost three years ago, and it's why we are introducing integration with SharePoint 2010 today.

Learn More and Signup!

If you're not already using Presently, sign-up or call for a quote today and learn how social and enterprise collaboration can work for your company.

Categories
Author

Today we're announcing SparkBin, a new Intridea product entering private beta for Google Apps customers that offers you a better way to gather ideas from within your company.

Your employees have great ideas. Unfortunately, it's too easy to overlook that spark of genius when it's trapped in an e-mail or a conversation. SparkBin is a tool for aggregating all those ideas, ensuring they don't get lost in the shuffle. It's also a way for your team to receive immediate feedback on their ideas.

SparkBin is entering private beta today. We'll be letting companies in over the coming weeks until we're ready for the public launch. Register for access and keep track of all of those ideas that have been kicked around in the company communication channels.

Gather Ideas Quickly and Effectively

Submitting ideas is seamless. It only takes a few seconds to submit an idea to SparkBin, and that frictionless experience will drive your employees to submit more ideas more frequently.

Works with Google Apps

SparkBin is integrated directly into Google Apps, so your employees don't have to set up new accounts or worry about remembering yet another password. They can simply log in and see the ideas from everyone else in your Google Apps domain.

Increase Engagement

SparkBin offers a leaderboard that displays the top ideas submitters for the week, month, and all time. Ideas are only counted when someone other than the submitter likes it, so this encourages broad engagement and friendly competition inside the company to become a "King of Ideas".

Easy Organization

Ideas in the SparkBin are organized by tags, so you can organize them any way you like. Want to group ideas by product, business unit, or department? No problem!

We've been using SparkBin internally to gather ideas and have found it to really helps to get people talking. We're excited to begin sharing this with others, and look forward to feedback from a much wider audience!

Categories
Author

I love the new constraints feature of Rails 3 routing. It opens up powerful new avenues for handling certain scenarios before a request is even delivered to the controller. One thing that bugs me, though, is that making a new class for any non-standard request-based constraint is kind of a pain. Rather than this:

class SignedInConstraint   def self.matches?(request)     !request.session[:user_id].blank?   end end  root :to => 'controller#index', :constraints => SignedInConstraint 

I'd much rather be able to simply write:

root :to => 'controller#index', :constraints => lambda{|req| !req.session[:user_id].blank?} 

So I mentioned wanting to patch Rails to make this work in Presently and got a brilliantly pragmatic response from fellow Intridean Jeremy McAnally:

Update: As Jose Valim pointed out, this is actually built in to the Rails 3 source. While I wasn't aware of this feature, after calling matches? it will check for call. So you can do this with no core class modification...it just works!

scope :constraints => lambda{|req| !req.session[:user_id].blank? } do   # all my logged in routes end 

This post started out as a simple core class hack to enable some new functionality in Rails. Now it's been transformed into an announcement: Rails 3 supports lambda routing constraints by default! Bonus points to the Rails core team for thinking this through well before I tried to hack it.

Categories
Author

If you've upgraded to the recently released jQuery 1.5 you may have heard about the fancy new AJAX facilities that allow you to define things like this:

var jax = $.ajax({   url: '/some/url' })  jax.success(function() {   alert("It worked!");") });

Well, that new power is known as Deferreds and it can be useful in more places than straight-up AJAX callbacks. If you want an in-depth look at the Deferred API you can look at the jQuery Documentation or read this very in-depth look at the API. But we're here today to take a look at a few practical examples that will let you really get the most out of the new functionality.

A More Expressive setTimeout

I've always hated the Javascript API for setTimeout. In my opinion it just doesn't make sense to have the duration come after the function. Using Deferreds, we can write a very English-friendly syntax for timeouts.

$.wait = function(time) {   return $.Deferred(function(dfd) {     setTimeout(dfd.resolve, time);   }); }

Now, thanks to the Deferreds, I can write timeouts in my app like this:

$.wait(5000).then(function() {   alert("Hello from the future!"); });

This is just a small example, but it shows you how easy it is to write deferred functionality into your applications. For our next trick, let's get a little more complex.

Pretty Little Wrapper

A common thing I find myself doing in jQuery is writing a small wrapper for an API. I always hate how messy the callback code gets, let's see if we can clean it up a bit using Deferreds.

Twitter = {   search:function(query) {     var dfr = $.Deferred();     $.ajax({      url:"http://search.twitter.com/search.json",      data:{q:query},      dataType:'jsonp',      success:dfr.resolve     });     return dfr.promise();   } }

Now I can easily perform Twitter searches in my app like so:

Twitter.search('intridea').then(function(data) {   alert(data.results[0].text); });

The Advantages of Deferreds

Why would I want to use deferreds instead of standard callbacks? Well, for one, you can attach multiple callbacks to a deferred, giving you lots of flexibility in designing your application. Another way they're superior is by giving you built-in error handling. If you had a deferment that failed, you would be able to handle that as well:

function doSomething(arg) {   var dfr = $.Deferred();   setTimeout(function() {     dfr.reject("Sorry, something went wrong.");   });   return dfr; }  doSomething("uh oh").done(function() {   alert("Won't happen, we're erroring here!"); }).fail(function(message) {   alert(message) });

Deferreds are just a simple and powerful tool for you to use to make your code cleaner, more readable, and more functional. This is really just scratching the surface, so if you have any other fun Deferred tricks, I'd love to see them in the comments!

Update: From the comments, I see that it is appropriate to return dfd.promise() instead of the deferred object itself. The code has been updated to reflect as much.

Categories
Author

Development for the Designer

Designers and developers have a symbiotic relationship. While they may have complementing skill-sets, there are plenty of advantages to reaching across the aisle, so to speak. This two-part series discusses how designers and developers can benefit from becoming more familiar with each others skills and I'll offer some advice on how to get familiar with the "other side."

In this first post I'm going to talk about the world of the programmer, and how as a designer, you can start to get comfortable in that world.

The Disconnect

By nature, designers are a visual group of people. They think spatially and are affected by aesthetics to a greater degree than the average person, including most programmers. In many ways this mindset can make learning about computer science somewhat difficult. You don’t really think about pretty colors and shapes when thinking about computer science.

Snuggling up to the command line

To many designers, the command line seems to be a frigid, phlegmatic tool; dispassionate, mechanical and without personality. Despite the seeming lifelessness of the tool, we can't argue against the sheer power of the command line. Working from the command line doesn’t have to hurt, and in many ways can be much more productive than using a GUI. Since many designers use a Mac, we will focus on BASH commands (used by Unix, Apple’s underlying operating system).

Learn how your system is actually constructed

Browse your file structure and learn where directories are located on your machine. Doing this will give you a greater sense of how your system works, as well as what sorts of files might be hidden. Moving files and directories within by the command line can be much faster than using Finder to do so; this is especially true if you know the exact locations of where your files/directories exist. Here is a short list of helpful commands to get you started:

  • Change directory: cd
  • List files in a directory: ls
  • Create a directory: mkdir new_folder
  • Enter a directory: cd new_folder
  • Copy a file or directory: cp /original/file/path new_folder
  • Move a file or directory: mv /original/file/path new_folder

For more advanced commands, and in-depth documentation, I like using this site.

If you have an old computer kicking around that you don't care too much about, it would be a great tinkering box for learning the command line. I’ve been a fan of using the FreeNAS operating system, because you can pretty much install that sucker on any machine. It only needs 256Mb to run, and it is all command line unless you connect to it through your browser.

Programmed to love

As a designer, you have the ability to hold images and ideas in your mind. You know how you want your designs to look and how to work, but your brain starts getting cloudy when developers descend into nerd diatribe, sputtering about things like rake tasks, migrations, loops, classes and so forth. A change in communication might yield a change in perception when describing and discussing the inner workings of your design. Really when you get down to it, programming isn’t far off from one of those Create-Your-Own Adventure books.

Write in pseudo-code

Pseudo-code is just a way of thinking about and documenting the logical aspects of how code works, in laymen’s terms. Let’s say that I want a hover state for a navigation item, but I want an active state for the item when the user is on the page. You could use this pseudo-code to describe that interaction:

If the user rolls over the navigation link, Then make the navigation link turn red.
If the navigation link equals the current page, Then make the navigation link turn blue, Unless the user rolls over the navigation link, Then make the navigation link turn red.

Eventually, this mentality will allow you to start coding on your own and can help you understand the code written by the developers that you work with. If you want to start building tests like you hear all of those Ruby programmers talking about, look into Cucumber. You are able to write out tests much like you would write pseudo-code.

Drop your WYSIWYG and pick up an IDE

At some point you will have to face it; in order to do real development you have to write out code. There are programs that help with code completion and syntax coloring, in fact all of the good ones do. I would recommend picking up TextMate or RubyMine. TextMate takes up much less RAM, but doesn’t have all of the extensive assistance that RubyMine does.

Tutorials and Community

Aside from a few disgruntled developers, the majority of the programming/development community are some of the best people that you can come across. Asking questions in forums is a great way to get going, just make sure you know the topic doesn’t already exist. Most programmers are so excited about the work that they're doing, that they don't hesitate to make time to help new programmers. If you want to learn Ruby (and you do), check out these great resources to help you get started:

If all of this is still too advanced and you want to learn more about basic programming using a GUI interface, check out Scratch! While it may be marketed as software for kids, many entry-level college courses also use it to teach programming fundamentals.

You'll be a better designer for it

Although learning just for the sake of learning is valuable enough, there's something in it for you directly as a designer. Crossing the bridge that spans the divide between quirky, artsy designer and pragmatic, intellectual programmer is a big step. But you'll find that you have more in common than you may have guessed. As an artist, you think abstractly. You bring color, texture, and form to reality. A programmer also thinks with great abstraction. How else could they take your artistic vision and breathe life into it with a bunch of alien commands that abstract back to 0's and 1's? Programmers are all at once both incredibly logical and conceptual thinkers. Learning to program can be an intimidating process, but you'll be able to approach your design patterns and process with greater clarity and confidence, equipped with a more thorough understanding of the entire process. Daring to step out of your comfort zone will give you perspective.

"Perspective is necessary. Otherwise there are only two dimensions. Otherwise you live with your face squashed against a wall, everything a huge foreground, of details, close-ups, hairs, the weave of the bed-sheet, the molecules of the face." ~ Margaret Atwood (The Handmaid's Tale)

Categories
Author

I use the Chrome history tab when I forget about something I've looked up in the past. I initially thought that the data would be stored in a CSV or XML file and thought I could do some string munging for kicks and giggles. To my delight, when I looked in the "Application Support" directory for Chrome, I found several data-rich sqlite databases ready for mining. With a few Ruby tricks, I found some cool data. All the code this article covers is available on the chrome_spy project.

With chrome_spy, you can answer some of these queries:

  • what have I searched for recently?
  • which sites do I visit most frequently?
  • what urls do I type into the address bar frequently?
  • what have I downloaded and how big are the files?

And that's only the surface. Let's dive straight into the technical details.

Since the data is stored in sqlite, I decided to use trusty old ActiveRecord to wrap around the tables:

     require 'sqlite3'     require 'active_record'      ActiveRecord::Base.establish_connection({       :adapter => "sqlite3",       :database => File.expand_path("~/Library/Application Support/Google/Chrome/Default/History")     }) 

I've been using Chrome for a while now, so there were multiple archived 'History' databases (e.g. History Index 2010-07), but the most recent database is named 'History'. Rather than inspecting the schema on each of the tables, ActiveRecord has a module SchemaDumper that generates a very readable schema dump:

     puts ActiveRecord::SchemaDumper.dump 

From here, it's pretty straightforward to map the tables to ActiveRecord models. For each 'create_table' declaration, I declared a new model. For example, to define a model for urls:

     class Url < ActiveRecord::Base     end 

At this point, you should be able to query for Urls through the models:

     > Url.first      => #      > Url.where(:title => "Google").count      => 21      > Url.first.last_visit_time      => 12940646404770210  

Everything was looking peachy up until the last_visit_time. At first I thought it was an epoch timestamp, or a JS timestamp. After looking at a few other timestamps, I noticed that it's 17 digits long rather than the usual 10 digits. The frustrating part was that some fields used epoch timestamps, but other fields would use this 17-digit timestamp. I wrote a little helper module to clean up the typecast from these columns:

     module TimestampAccessors       def timestamp_accessors(*attributes)         attributes.each do |attr|           name = attr.to_s            # Some timestamps have 17 digits           # Since 10000000000 is year 2286, so I'm assuming that no dates are longer           # than 10 digits           define_method(name) {             raw = read_attribute(name).to_s.slice(0, 10)             Time.at(raw.to_i)           }            define_method(name+'=') { |t|             write_attribute(name, t.to_i)           }         end       end     end     ActiveRecord::Base.extend(TimestampAccessors) 

Then for every table that has timestamp columns, I can declare them in the model. For example:

     class Url < ActiveRecord::Base       timestamp_accessors :last_visit_time     end 

Let's retry that same query from before:

     > Url.first.last_visit_time      => Mon Jan 03 06:24:00 -0800 2011 

That's much better.

Some table names and column names don't follow Rails conventions, so there's a little extra work to specify associations and some tables. For example, the SegmentUsage model is backed by the 'segment_usage' table rather than 'segment_usages':

     class SegmentUsage < ActiveRecord::Base       set_table_name "segment_usage"     end 

Another example is when Visit uses 'url' as a foreign key to Url rather than 'url_id':

     class Visit  'url'     end 

With just these thin wrappers, we can easily come up with queries to answer the questions at the beginning of this article. To find the most recent searches, we can do:

     > ChromeSpy.recent_searches      => ["intridea", "thegist", "dimsum icons", ...] 

The definition for this method is just a simple ActiveRecord query:

     def recent_searches       KeywordSearchTerm.includes('url').order('urls.last_visit_time desc').map(&:term)     end 

At this point, you should take a break and share your search history with a friend. Context-free search terms can be hilarious and embarrassing. A few my girlfriend could not stop laughing at:

  • super meat boy
  • exercise mix tapes
  • huntsville bed intruder
  • factory girl
  • haml (she thought I repeatedly misspelled 'ham')

To answer the other questions at the beginning of the article:

Which sites do I visit most frequently?

   ChromeSpy.most_frequent_sites 

What urls do I type into the address bar frequently?

   ChromeSpy.most_frequently_typed_addresses 

What have I downloaded and how big are the files?

   ChromeSpy.recent_downloads 

While ChromeSpy may not be the most useful example, it shows how ActiveRecord can be applied outside of Rails. A similar thought process can be reused for other problems where quick data manipulations or reporting is needed. Whether those reports are useful, or just plain silly is entirely up to you. Now go forth and find some funny recent searches you've done!

Categories
Author

Location-based web application is very popular recently, so how to build a spatial app with rails. First you have to choose database to store your geo data, NoSQL is hot recently some of them is said to be scalable, high performance, one of them is MongoDB which is used by Foursquare(one of the most popular location-based service), it has built-in [geospatial index support](http://www.mongodb.org/display/DOCS/Geospatial+Indexing).

There are two popular ruby libraries for MongoDB: [Mongoid](http://mongoid.org/) and [MongoMapper](http://mongomapper.com/). We're going to use Mongoid which is completed rails 3 compatible(use ActiveModel).And of course we'll use rails 3.

So here we go:

**Install MongoDB in snow leopard:**

Download it from [http://www.mongodb.org/downloads](http://www.mongodb.org/downloads) , choose the package fit for your operation system. Uncompress the package put the mongodb folder under /opt/ and then add **/opt/monogodb/bin/** to **PATH**, after that you can execute mongodb command from terminal. Next step to finish setup mongodb is to create data folder in /data/db where your mongodb data stores.

Start mongodb daemon:

sudo mongod
Open mongodb console:

mongo

You will see something like (execute queries after '>'):

MongoDB shell version: 1.6.5
connecting to: test
>

Install rails 3:

sudo gem install rails

Create new rails 3 application:

rails new spatial_app --skip-activerecord

Edit Gemfile add follow lines:

gem "mongoid", "2.0.0.rc.6"
gem "bson_ext", "~> 1.2"

Run 'bundle install' to install mongoid.

Command to generate mongoid configuration file (it will generate config/mongoid.yml where config mongodb connection):

rails generate mongoid:config

Generate model to store spatial data:

rails g model Place

Edit your model file like this:

class Place
include Mongoid::Document
field :location, :type => Array
index [[ :location, Mongo::GEO2D ]], :min => -100, :max => 100
end

'include Mongoid::Document' will mapping the class to mongodb collections(http://www.mongodb.org/display/DOCS/Collections)

'field :location, :type => Array' will define a field with type Array named location.

'index' line define the spatial index . The min/max range is used to limit lat/lng value.

After that you need to run command to generate index in MongoDB:

rake db:mongoid:create_indexes

You can check the index on MongoDB console:

$ mongo
MongoDB shell version: 1.6.5
connecting to: test
> use spatial_app_development;
> db.places.getIndexes();

will see something include:

{
"ns" : "spatial_app_development.places",
"min" : -200,
"key" : {
"location" : "2d"
},
"max" : 200,
"name" : "location_2d"
}

Add data into collections(You may import geo data from external sources):

place_1 = Place.create(:location => [ 31.64, -88.3177778 ])
place_2 = Place.create(:location => [ 33.4334523, -88.297258])
...

Notice: the lat/lng value have to betweetn min/max defined in the place model otherwise the record will not be saved.

Methods to query nearest places in certain distance away:

Place.near(:position => [ 31, -88, 10 ])
Place.where(:location.near => [ 22.5, -21.33 ])

Query places within bounds:

Place.where(:location.within => { "$center" => [ [ 50, -40 ], 1 ] })

So that's most of things you need of model side to build a spatial application, to go deeper you may need to checkout [Google Map API](http://code.google.com/apis/maps/documentation/javascript/tutorial.html) and find base GEO data to get start, but that's too much for this post :).

Categories
Author

When you're building a web application, there's always the question of how to handle the site-wide administration. You probably have a small list of people at your company that should be able to access it. If you're like Intridea, you also use Google Apps to handle e-mail etc. Using OmniAuth it is trivially simple to set up a simple "admin login system" for your Rails 3 app. Here's how to do it.

Step One: OmniAuth Up and Running

First we'll need to include OmniAuth in our Gemfile. Just add it like so:

gem 'omniauth' 

Next, we should configure OmniAuth for our Google Apps login. Note that you can add this even if you're already using a different Google Apps strategy for OmniAuth. Create the file config/initializers/omniauth.rb and put this in it:

Rails.application.config.middleware.use OmniAuth::Builder do   provider :google_apps, OpenID::Store::Filesystem.new('/tmp'), :domain => 'yourcompany.com', :name => 'admin' end

This makes it so that going to /auth/admin from your application will have you authenticate through your company's Google Apps account (and ONLY your company's accounts will work).

Step Two: Routing

Next let's set up our routes for the admin panel. In this case I'm supposing that you want to scope everything to an 'admin' subdomain and also that all of your controllers are module scoped to admin (i.e. Admin::UsersController), but you could easily use namespace to make it a path prefix instead. In config/routes.rb, add:

match '/auth/admin/callback', :to => 'sessions#authenticate_admin'  constraints :subdomain => 'admin' do   scope :module => 'admin', :as => 'admin' do     root :to => 'users#index'     resources :users     # etc.   end end

What this has done is created an OmniAuth callback route and a group of routes that are constrained to the "admin" subdomain and will be prefixed with admin_ in the named routes. Now that we've got the routes set up, let's actually add the controllers!

Step Three: Controllers

First we'll want to make the callback active. Generate a "sessions" controller if you don't already have one, and add this code to it:

class SessionsController  '401 Unauthorized', :status => 401     end   end end

What we do here is take the e-mail that is provided to us by OmniAuth and store it in the session as the :admin_user. We then check to see if that e-mail has admin priveleges (using a method we'll write in just a moment) and redirect them to the root of the admin section if so. Next we need to add the admin? helper to ApplicationController:

class ApplicationController   def admin?     session[:admin_user] && (ENV['ADMINS'] || "").split(',').include?(session[:admin_user])   end   helper_method :admin?      def admin_required     redirect_to '/auth/admin' unless admin?   end end

This checks to see if our :admin_user is in a comma-separated list of approved administrators set at the environment level (a useful strategy for Heroku deployments, but you could do lots of things here such as load a list from YAML etc.). We've also written a method that will be used as a before_filter to require admin login.

Next up let's actually make our protected resources! If you don't already have it, generate a user admin controller:

rails g controller admin/users 

Next up let's just add a simple action to make sure it works:

module Admin   class UsersController  'Hello from the admin panel!'     end   end end

With that, you're done! When you go to admin.yourapp.com you should be redirected to log in using Google Apps. Once you've done that, if your name is on the comma-separated list you will be authorized to access the protected controller. This is a simple method that is independent of database storage so can be very useful in just about any application. When OmniAuth makes it so easy, there's no reason not to make your administrative login as smooth and painless as possible!

Categories
Author

The National Technical Information Service, U.S. Department of Commerce held its first webinar in a quarterly educational series on mobile applications for government on Wednesday, January 26th, 2011

The webinar consisted of a panel discussion around the steps to building mobile apps for iPhone, iPad, Android, Blackberry, and Windows Phone. In particular, it focused on actual case studies including the design, development, and deployment of mobile apps at various federal agencies. Panelists included:

  • Jody Engel, from the Office of Dietary Supplements, National Institutes of Health who described her experiences in creating MyDietarySupplements, an iPhone app that helps consumers track their vitamins, minerals, herbs and other products and get information on dietary supplements
  • Gwynne Kostin, the Mobile Director at GSA, who outlined the current state of mobile applications in the federal government and described how GSA is helping federal agencies provide mobile solutions to citizens,
  • LaShemma Simmons, a program manager at the National Technical Information Service, who is offering mobile strategy, design, and development services to other federal agencies through an easy-to-use interagency agreement,
  • Lane Cooper, who moderated the panel and is the Executive Director and Founder of BizTechReports, an independent reporting agency with offices in Washington, D.C., and San Francisco Bay Area that analyzes trends in business technology


Categories
Tags
Author

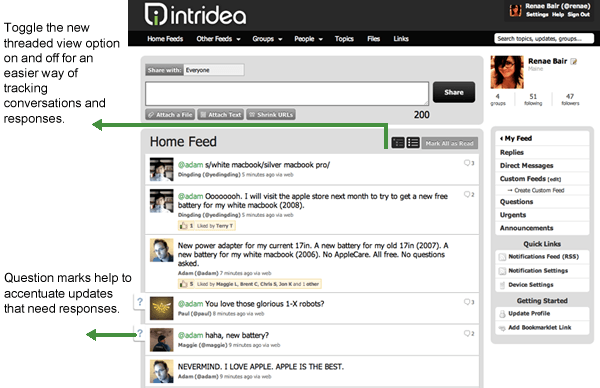
"Ch-ch-ch-ch changes!" It's a new year, and it's time for a change! That's why our Presently development team has been busy this month working on some exciting UI changes. Yesterday we released a new UI for Presently that includes several highly sought-after features, and we think you'll be excited about the enhancements.

Here is a broad visual of the basic UI changes:

As you can see from the screenshot above, we have significantly improved upon the UI: the colors are more subdued, questions are clearly called out by conspicuous question marks to the left side of the main updates window, and there is a cleaner look and feel. In addition, you'll notice the new option to switch between threaded and non-threaded views. Here is what the threaded view looks like:

Here are some of the major changes for Presently that we think you'll be excited about:

  • Option Display Mode
    View updates in list mode or threaded mode.
  • Inline Reply
    When viewing updates in threaded mode, you can reply inline to updates, making it easier to track and view conversations.
  • File Uploader
    We rewrote the file uploader so that it doesn't depend on Flash.
  • 140 Character Limit
    Now the 140 character limit can be changed in the Settings by an Admin!
  • Follow All
    Remember the old days when you had to click to follow each person individually? Those days are no more. We present to you the incredibly handy "Follow All" button!
  • Profile Information
    Each user's profile page now displays pertinent user information like Skype numbers, email addresses, birth dates, expertise and more.
  • Skype Integration
    Now you can click on a user's Skype name within Presently and it will launch the Skype application and make the call to the user you selected.

And there's more! We didn't stop at UI changes; our team has also done a lot of work behind the scenes to enhance the application's overall performance and logic. Expect a more robust, sleek and peppy user experience!

Maggie, our QA Manager, put together a screencast to visually introduce you to the upgrades!

Present.ly Tour With New UI from Intridea on Vimeo.

If you haven't used Presently yet, now is a great time to give it a try. It's the perfect tool for collaboration and communication between teams. You can sign-up now for a free web-hosted account and get started today, or you can contact us about installing Presently behind your company's firewall for added security. And if you're already a Presently user, we hope you'll enjoy the improvements!

Categories
Author
Subscribe to