Mobomo webinars-now on demand! | learn more.

Trending 40 Red Hot Companies

We are thrilled to be named one of DC’s Fastest Growing Companies for 2016 by Trending 40!

Trending 40 is an editorial and event production of DCA Live Media LLC that recognizes and honors companies that have distinguished themselves as key contributors to DC’s community in tech, hospitality, real estate, life sciences, healthcare and non-profits. Companies are nominated and voted for by their peers from the DC corporate community.

Congrats to the other companies that made their list -

Categories
Tags
Author

Boulder meetup

As some of you know, Mobomo officially launched its Boulder presence this summer. One of the first things we wanted to do when we came to Boulder was meet our fellow techies - Boulder designers, developers, and project managers.

There is no shortage of events in Boulder that focus around the technology and startup communities. But we wanted to create our own immersive experience - one that didn’t rely too heavily on one specific craft. So, we created the Boulder Digital Experiences meetup.

We’re off to a great start! Our first meetup focused on the strategies behind the development of responsive websites and mobile applications. If you came to our Boulder Startup Week talk, you’ll be familiar with the presentation. The makeup of attendees was across the board - from biz dev to just dev.

Our second meetup focused on Agile fundamentals. This time a slew of digital project managers from across the front range came to engage in a discussion around the challenges and benefits of agile processes.

While we think of our next topic, we’d love to get some feedback from you. What are you interested in hearing about? (Did we mention our meetups are hosted at local breweries - with free beer and pizza)?

It’s been an exciting few months. While we prepare for 2017, we’re looking for a full-stack developer to join our Boulder team. If you’re interested, please shoot us a message! 

Categories
Author

Coester app

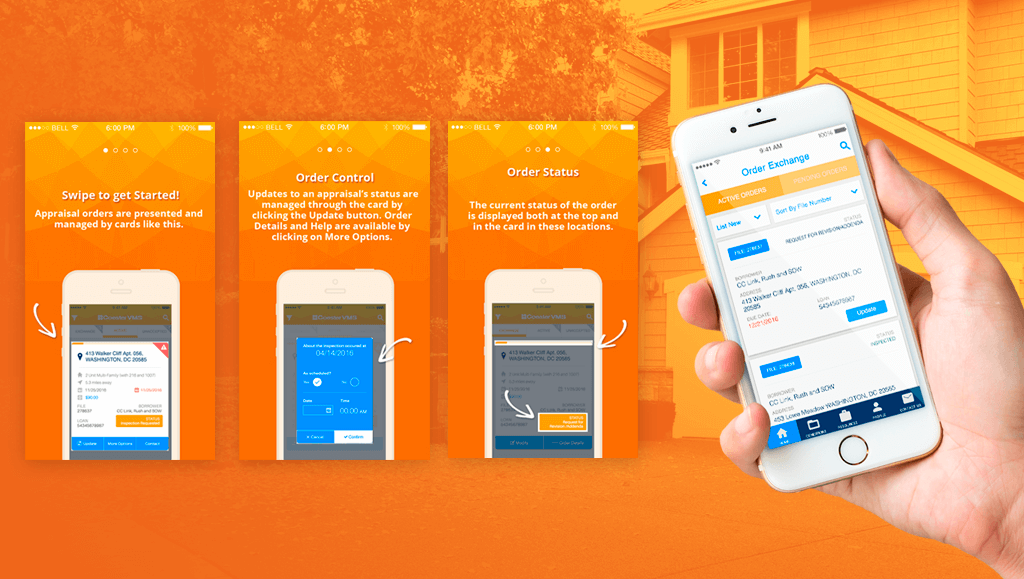
Did you hear? We recently launched a product for Coester! For starters, Coester is a full service end-to-end appraisal management company, providing excellent service with the best appraisal management technology in the industry.

Coester came to Mobomo looking to create native applications for iOS and Android. They were wanting the app to expand their appraisal management solution by offering their appraisal partners a mobile application to accept,track, and update their appraisals with CoesterVMS. The initial issues they were facing was lack of mobile support for their existing online appraisal management service. There was a clear need for native mobile platform integration to increase utilization and convenience of the partner appraisers in the field.

After our initial consultation, we hit the ground running, eager to create a solution! Our recommendation was to develop native mobile applications on both major platforms on both phone and tablet breakpoints. The need for an API became apparent due to needing to integrate applications with CoesterVMS’s existing system, which they had the capabilities and agreement to develop, alongside the Mobomo’s team application development. The strategy was to target what the key stages in the appraisal process management would be for the partner appraiser user and how a mobile platform could enhance that process, eventually becoming the user’s default chosen platform to engage with the service.

Teaming with the CoesterVMS API development team, a tiered development schedule, targeting specific components of the application, was mutually formulated and adopted in order to ensure that the API team was able to develop and provide the necessary support for the Mobomo development team.

Phase 1

The first phase was to establish the complex and specific information architecture and workflows for the appraisals as they moved through the system to the different user swimlanes. This included thorough requirements gathering, definition of project goals, and application architecture construction.

Phase 2

The second phase was to establish the end designs of the system and development to these designs in conjunction with the project requirements formerly defined.

Here are some quick steps to get started with the Coester App:

Once the user logs in, establishes account with CoesterVMS. Confirmation by email.

This was a unique project from start to finish, it is quite different because we developed the applications as modern technology for what is essentially a logistics service for the appraisal industry. The application targeted the assignment, status tracking, updating, and reporting of partner appraiser’s appraisals.

The final product that we launched will be used for CoesterVMS partner appraisers to accept, track, and update their appraisals from a native mobile platform. This will allow the users to engage with the system in real-time from the field.

Do you have a concept that you want to turn into a product? Get in touch, we love working on different challenges to create solutions!

Categories
Tags
Author

Screens of PockitShip

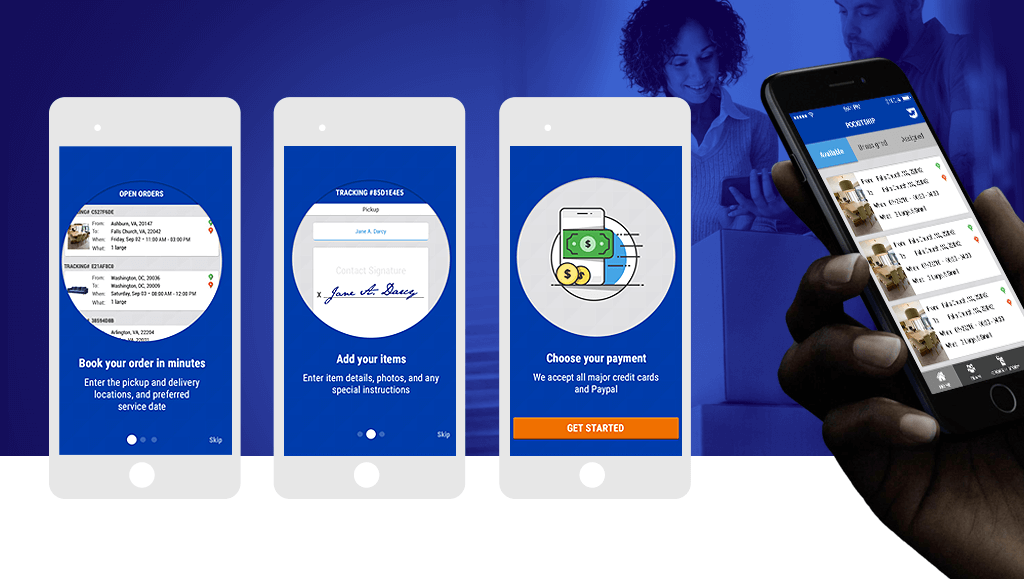
Recently, we launched an awesome product for PockitShip! Just to give you some background, PockitShip is an on-demand pickup and delivery company that specializes in shipping large items. They utilize technology to facilitate orders via their website, but when they wanted a product that would expand their reach and streamline the order process for all mobile users. Phase one was completed with the launch of an MVP in October 2016, their platform is on both iOS and Android applications.

PockitShip services include:

Pick Up & Delivery Services: PockitShip provides traditional moving services, as well as more unconventional shipping services like: pick up / delivery from retail stores, items purchased or sold via Craig’s List, and home-to-home delivery.

Same Location Moving: PockitShip provides in-home moves between floors or from one unit to another in the same building.

Haul Away: PockitShip will pick up items and deliver them to a landfill or donation center.

Based on the services that they offer, it only made sense that PockitShip wanted  to increase visibility and overall use of their services on a mobile platform. The primary hurdle they faced was limited reach with their singular medium for engagement. We recommended a mobile first strategy - creating mobile applications on both major platforms (iOS and Android) for drivers and customers to further increase engagement of PockitShip’s services, we worked closely with UX and development teams to deliver a sustainable, user-friendly workflow for both drivers and customers.

Phase 1

The initial phase outlined a workflow to comprehensive user stories. The development phase began in tandem with wireframe designs.

When a customer opens the application, they will find no account is necessary to begin using the application. Upon initial use of the application the customer will:

Drivers will need a PockitShip-approved account before they can begin using the application. Driver’s are able to sign up for an account within the application. The driver account sign up process includes:

For drivers that already have a PockitShip-approved account, they’ll find a similarly seamless workflow characterized by the customer application. Upon log in:

This product is unique in that it brings the traditional shipping service into a more interconnected arena, increasing the ease-of use and accessibility to the shipping industry. Allowing for an easy e-commerce solution for the shipping industry. The final product will be used for placing and tracking shipment (customers) and moving items (drivers).

Do you have an e-commerce issue you can't seem to solve? Get in touch for a free consultation.

Categories
Tags
Author

Ionic 2 applications come with quite a bit of theming built in by default, like utility attributes, Sass variables, and even a grid layout based on flexbox. But, there are times when you may need to get even more granular, using modular CSS utility classes. This is where Basscss can help. Basscss is a low-level CSS toolkit, giving app developers an additional layer of tools when it comes to styling their applications. Let’s take a look at how you could setup Basscss to work with your Ionic 2 project.

Dependencies

First, you need to have the dependencies installed. You’ll need npm, and after you have npm installed, you can use it to install Cordova and Ionic:

npm install -g cordova

npm install -g ionic

Next, create an Ionic app using Ionic 2:

ionic start myNewApp --v2

You can then open the myNewApp directory, and check that your app shell is running with:

cd myNewApp

ionic serve

Basscss Install

We’re going to use the Sass version of Basscss, so it will integrate with Ionic’s existing Sass setup nicely:

npm install basscss-sass --save

If you open the package.json file in your project root, you’ll now see a line for basscss-sass in the dependencies block. If you open the node_modules/basscss-sass/scss directory, you’ll find a whole bunch of modules, and one root file named “basscss.scss” that imports the modules.

How do we go about importing these files into our Ionic app? Ionic 2 apps use node-sass for compilation, which we can determine by opening the file at:

node_modules/@ionic/app-scripts/config/sass.config.js

If you open this file, you’ll see a block for “includePaths”, which is how we can specify additional directories to include during compilation. However, we don’t want to edit this file directly; it’s in our node_modules directory and we wouldn’t want our changes to be overwritten, nor is this directory typically included in repos.

Instead, copy the entire contents of the sass.config.js file, and paste them into a new file located in your app root, in a new directory named “config”:

config/sass.config.js

Once you have the default sass.config.js file, add a new line to the includePaths array that points to the new basscss-sass directory:

node modules

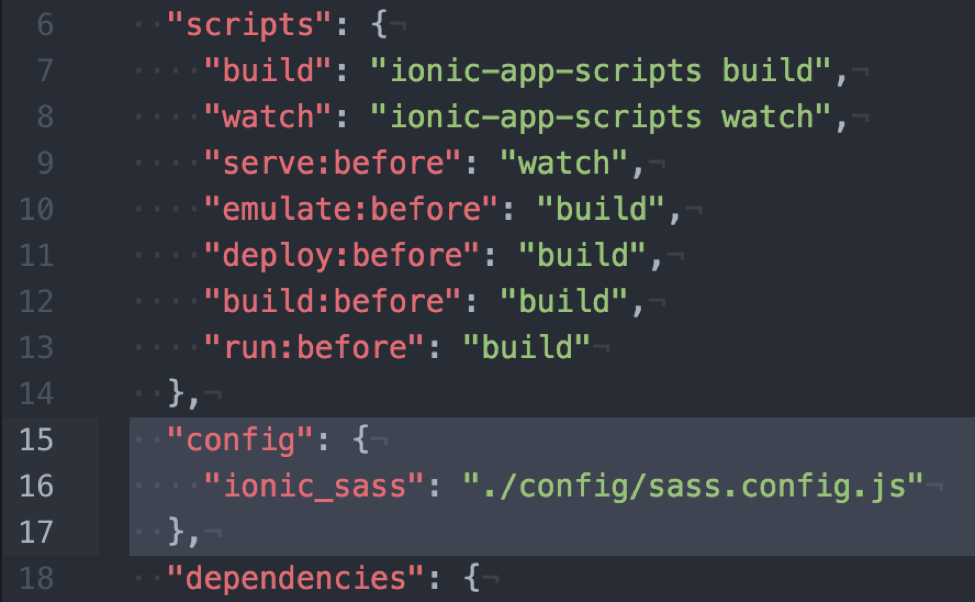
Next, we need to tell our app about our new custom config file. Back in our app’s package.json file, add a new block called “config” that specifies the location of our new config file:

Ionic-sass

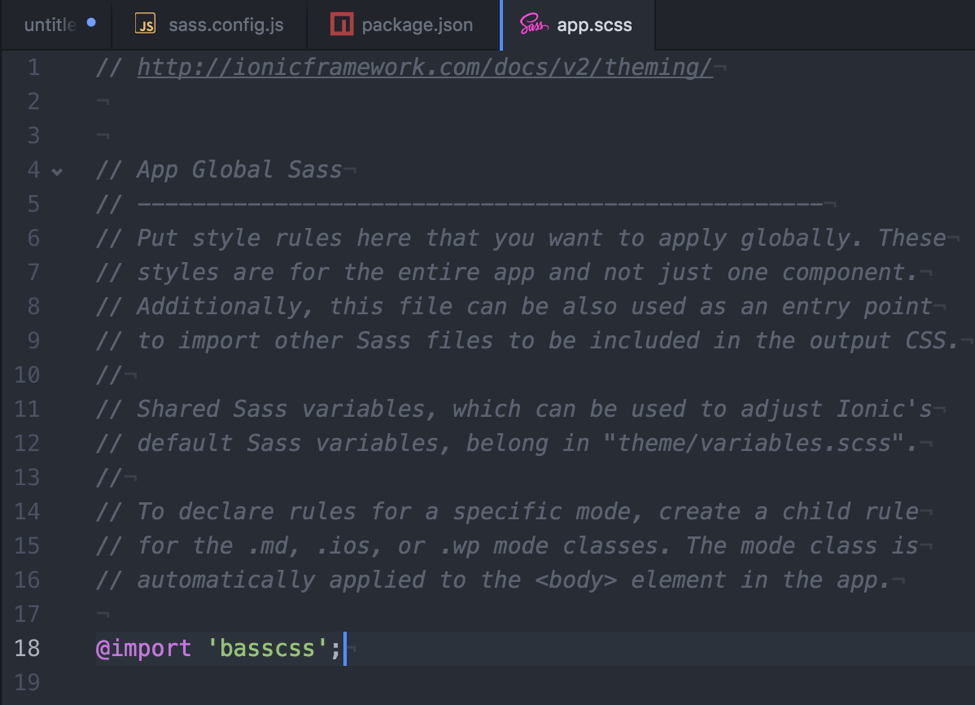
We can now import the Sass modules like normal in our app/app.scss file:
sass-modules

To test that everything is working, make sure you’ve launched your app in a browser:

ionic serve

And then add one of the Basscss classes to the H2 element in src/pages/home/home.html:

h2 code

You’ll see the browser window automatically refresh with the header element italicized.

The precedence with which we should use all the available styling options to make our app’s CSS as modular as possible should likely be:

Hopefully this helps you get setup with one of the most flexible modular CSS architectures for your Ionic 2 projects!

Categories
Author

code

You know the old saying: “This is how the world ends: not with a bang, but with a misplaced DROP TABLE.” Working directly with Drupal 7’s database is an arduous task at best.  It’s a sprawling relational system and it uses many space and memory saving tricks to be as speedy as possible.  Thankfully, there is a robust system of functions built into Drupal to help you change almost any setting from code--perfect if you want to automate changes upstream and features doesn’t do it for you.  Let’s go over a situation in which you may have been utilizing some of these functions.

Let’s say you finished your product (congratulations!), launched, and are onto fixing bugs and planning exciting new features for the future.  You’re knocking out bugs left and right like some high-flying Drupal ninja and you discover that using a field collection with conditional fields causes the field collection data to not save and all of your metadata is getting erased when certain conditions are fired.  With Cthulhu's hot breath on your neck, you talk to the client and realize a ray of hope: you don’t actually need a field collection there, a normal set of Drupal fields will do.  How do we go about creating the new fields, copying existing data, and deleting the old fields?

The first thing we do is create the new fields and attach them.  For this, we’ll need two functions: 'field_create_field()' and 'field_create_instance()'.  Both of these take an array of settings: field_name and type are we need for creating the field (also cardinality if you want to have multiple values for the field), field_name, entity_type, and bundle are required for creating the instances, though you will likely also want label, or it will otherwise default to the machine name.  So, we should have something that looks like this:


$name = [
  ‘field_name’ => 'photographer_name',
  ‘type’ => ‘text’,
];
field_create_field($name);

$instance = array(
  'field_name' => $name['field_name'],
  'entity_type' => node,
  'bundle' => article,
  'label' => 'Name',
);

field_create_instance($instance);


If you go check out node/add/article, you should see your new text field there.  Congrats!  Next, we need to get the data from the old fields and copy it into our new field.  For this, we’ll rely on the nifty function 'entity_load()'.  This takes two arguments, bundle name and an array of ids.  Since we are getting field collection items, we know the bundle name is ‘field_collection_item’.  We’ll need the IDs, but we’ll also need the field collection value that references the fields in each collection for later, so we’ll get them both at once.  It might be tempting to use 'entity_load()' to get them, but in this case you are quite safe using straight SQL, which also happens to be significantly faster.  That looks like this:


$entity_ids = array();
$field_collection_ids = array();
// Select the field collection id and the attached entity id from the db.
$query = db_query('SELECT field_producer_value, entity_id FROM field_data_field_producer');
$results = $query->fetchAll();
// Separate the ids
foreach ($results as $result) {
  $field_collection_ids[] = $result->field_scald_producer_value;
  // We need to reference the entity ID by the field collection value for simplicity later
  $entity_ids[$result->field_scald_producer_value] = $result->entity_id;
}
// It’s possible that you might get duplicate Field Collection IDs, so we make sure they are all unique
$field_collection_ids = array_unique($field_collection_ids);
// Load all of the field collection entities.
$field_collection_results = entity_load('field_collection_item', $field_collection_ids);


Now that we have all of the entity ids and field collection ids, we can get to the fun part: copying data! (You know you have been doing this too long when that is exciting.) What we want to do is loop through the field collection ids, load the the entity (that has the new field on it) by the id associated with the collection, copy the data from the collection to the new field, and save.  It seems like a lot, but it’s fairly simple:


foreach ($field_collection_ids as $field_collection_id) {
  // Load the entity the field collection is attached to
  $entity = entity_load('node', array($entity_ids[$field_collection_id]));
  // Copy the data from the collection field to the new field
  $entity[$entity_ids[$field_collection_id]]->photographer_name['und'][0]['value'] =
  $field_collection_results[$field_collection_id]->field_producer_name['und'][0]['value'];
  // Save!
  entity_save('node', $entity[$entity_ids[$field_collection_id]]);
}

A word of warning: depending on how many entities you are processing, this could take a long time.  As of Drupal 7.34, there is a memory leak in entity_save()--this means that each save will take slightly longer than the last. This is not a problem if you have only a few hundred fields, but when you get up into five and six digits, this script will take many hours. At that point, unless you have the time (and/or can run the script as a process in the background), you might want to consider investigating other options.

Okay, so the data is copied, the nodes are saved, and the elder gods have hit the snooze button.  Last thing you have to do is delete the old field.  We’re not going to do that, at least not yet. Instead, we’re going to delete the instances of the fields.  This will preserve the old field collection data, but remove the fields from the edit forms. This way, if something goes wrong, you don’t lose the data in the old fields and can try again if needed. You can go back at a later time, if you wish, after you have confirmed that everything is correct and delete the fields. Luckily, this is the easy part:


$instance = array(
  'field_name' => 'field_scald_producer',
  'entity_type' => node,
  'bundle' => article
);
field_delete_instance($instance);


And that’s it, crisis averted!  You no longer lose data and no longer have to worry about supernatural madness and death!  All you need to do now is run your script upstream with 'drush php-script' and watch the magic.

This sort of scripting can be daunting at first glance, but Drupal’s rich entity API can keep you from pulling out your hair or inadvertently causing an otherworldly alien intelligence from rising from the deep.  There are many more functions to take advantage of, and just about anything you can set with a click in the interface you can set in code, perfect for automation or locked down production environments.

Happy Drupaling !

Categories
Author

Wireframes

UX and UI are distinct parts of the design process, but they are so closely intertwined that one couldn’t possible exist without the other. Let’s start by defining the two so that we don’t get confused.

“User Experience” is a very broad term, but for the purpose of this discussion, let's define it simply as the engagement between the product and it’s user.  UX in the digital realm is constantly evolving as the user base expands and as technological advancements allow user engagements to become incredibly efficient.  Think of a simple question to lookup:  “When will the next president be elected?”  Not so very long ago, you would search for a website related to politics, and then you would dig through page after page, desperately looking for the answer.  Today, google will give you the answer immediately, and very efficiently, thus providing an amazing “user experience.”  It seems simple, but from a design perspective, maximizing UX is still an incredibly challenging process.  The success of your applications UX is ultimately dependent upon the purpose of the user, and when you have to accommodate a variety of purposes from a variety of users, it can be very difficult to create a slick UX.

Once the User Experience has been determined, then the “User Interface” or UI comes into play.  Lets use an example to understand UI: we are creating a website for a Pizza restaurant.  We want users to come to our website, see our menu and order a pizza.  A clear goal has already been established by the projected UX: we want you to order pizza.  The specific layout of the webpages will be the User’s interface.  In other words, the UI is the medium for ordering pizza, while the UX is how happy you are while using that medium.  Determining an efficient layout for our website is not an easy task; how do we get the user from the home page to successfully clicking the “place pizza order” button?

There are infinitely many control and style choices.  Early design documents are often so laden with features that their websites’ production could take years to complete.  This can happen if you bury yourself in the user interface.  Like the Yin and Yang, an oreo cookie, or whatever metaphor you choose, such is the natural relationship between UI and UX: the best UI design will occur when you are consistently mindful of the UX, that is, mindful of how the user will experience your site.

There are  few essential rules that go into the creation of intuitive applications.  UI designers are responsible for creating a cohesive style guide; they should maintain a consistent design language throughout the product. The pages of your product must communicate clearly with the projected designs of the UX.

Now that we have established the basics, what are the top UX/UI tools being used in the dev industry?

For a pre-test fee, UserTesting is a stress and hassle free tool. It can be utilized for user research and prototype testing.  Testing experts can recruit the target audience for your application, remotely administer user tests, and deliver the results within an hour.  The test records video footage of the user in order to gauge facial expressions and emotional responses to your application.

With Stylify Me you can copy the color hue of any website.  When you enter the URL in the top search menu it reveals the exact HEX values for that site.

With UXPin  you can design a website or app from start to finish. UXPin allows the user to develop lo-fi wireframes into a hi-fi prototype.  UXPin provides drag and drop tools for UX interactivity, creating codeless animations, and for designing UI Patterns.  UXPin works with Photoshop and Sketch so that you can convert static files into interactive prototypes without losing layers.

Sketch has very similar features to Photoshop, but Sketch was specifically designed as an image editor for digital design, while Photoshop has a broader set of tasks.  Sketch uses CSS logic from the start, which makes for an easier transition into development.  Sketch also has an auto-cropping feature and one-click exports into various formats.  Sketch has easy navigation and convenient developer tools.

Photoline is a little less well-known, it’s a little cheaper, but it still offers some useful features like photo manipulation, nondestructive layering, vector editing, and desktop publishing.  It also has multi-layered importing and exporting for EXR.

Optimizely is another tool that provides user testing, but it only does A/B testing.  A/B testing compares usage data from two different versions of your product.  A/B testing can help guide production decisions and early experimentation.

Once you have selected a color scheme, Color Safe helps you select the best contrast balance for readability.  Improving legibility through color contrast is essential for creating an amazing UX.

XMind is a free app that is used for brainstorming.  It uses open-ended “mind mapping” tools for creating diagrams.  Xmind is an excellent task manager for keeping organized.  The visual setup allows for quick comprehension, and for easily customizing your goals.

Mural is a digital whiteboard with efficient tools for collaboratively designing the UX.  Your team can use Mural to brainstorm and organize concepts.  It supports files from Youtube, Vimeo Slideshare, Google Drive, and Evernote.

Google made Resizer to help devs create responsive layouts. Google describes it as an interactive viewer.  Resizer is intended to test for Material Design breakpoints across desktop, mobile, and tablet.  Resizer can populate the website from any URL into a variety of layouts.  Then you can see which layouts work best for each screen size.

What do you think the future of design will look like?


Categories
Author

brainstorming with sticky notes

While agile development methodologies and practices have long been part of common practice in private tech and product companies, many U.S. government agencies are still getting their feet wet with fully embracing the concept and finding ways to make it work within their complex contracting arrangements with private vendors.

Under Mobomo’s contract working with the U.S. Geological Survey (USGS) under our contract with the U.S. Department of Interior (DOI), we’ve been fortunate to work for a client who not only understands agile development, but requires it for the development of the USGS.gov agency website, and the underlying AWS cloud-hosted, Drupal-based content management system (CMS), called Palladium.

We’ve been fortunate to work for U.S. Geological Survey (USGS), a client who not only understands agile development, but requires it for the development process. Having a willing client partnership is key to making our scrum processes successful. It’s an evolving path forward as we work with USGS to continue to improve on our roles of scrum master and development team as well as coach the USGS Web Re-engineering team in their role as product owners. But, the process is working! Not only is it working but we’re able to show how the scrum process is helping us to get closer to continuous development/continuous integration (CD/CI), allow us to deliver new features on a regular and frequent basis, and is saving the government money and time.

Our Path to Agile at USGS: Transparency and Building Trust 

When we first started this project, the only real semblance of agile processes was the Jira ticketing system. It served as a backlog, but there was no process in place to identify which tickets would be included in an upcoming release and no definition of what a sprint and release process looked like within the project scope. It was difficult to comprehend, there was a huge rush to get the first version of the CMS and the new rebrand of USGS.gov up and running - but it was also a bit unmanageable given the system that was in place.

First, we worked out a sprint cycle which has evolved from a sprint every two weeks to a schedule where we have two, two-week sprints that overlap. This allows for ongoing development during code freezes and more QA time. The schedule flows like this:


Monday Tuesday Wednesday Thursday Friday
Sprint A: Product Owner Planning Spring A: Team Planning

Sprint A development begins

Sprint A: Development/Test Sprint A: Development/Test Sprint A: Development/Test Sprint A: Development/Test Sprint A: Development/Test
Sprint A: Development/Test Sprint A: Development/Test Sprint A: Development/Test Sprint A: Development/Test

Code Freeze
Sprint B: Client Planning

Sprint A: Deploy to Stage/Test on Stage
Sprint B: Team planningSprint B development begins
Sprint A: Test on Stage

Send failed tickets back for rework

Dev on failed tickets

Sprint A: Test on Stage/Test on Stage with Client

Send failed tickets back for rework

Dev on failed tickets

Deploy fixed tickets to Stage

Sprint A: Dev on failed tickets/Test fixed tickets Sprint A: Dev on failed tickets/Test fixed tickets

Sprint A: Deploy to Production/Test on Production

Sprint A: Client confirms on Prod

The next step was to improve our communication requirements with our product owners. We were all onboard with using Jira as our ticketing system, reviewing tickets from the backlog to move them into sprints, and then pushing releases based on the completed tickets. But, too often, we found that tickets had to be re-opened after the release. The problem boiled down to communication. We needed a consistent format for how bugs and features were being communicated to us, so that we were fixing the right problems and building features based on user needs.

To solve this, we created templates for how a bug would be entered as a ticket in Jira. A sample format of questions would be as follows:

What is the URL?

How is it behaving now?

Steps to reproduce this issue.

How should it behave?

This was a huge improvement! But, we were still not where we wanted be on our releases. Next, we tackled how QA fits into our process, we revised our workflow to make QA an integral part of the process from the time a ticket is self-assigned by one of our developers, and we built out our Jira workflow to represent this new process.

Do you use agile scrum development? If you do, tell us what you think about our process!

[contact-form-7 id="12689" destination-link="https://mobomo.s3.amazonaws.com/uploads/2016/11/mobomo_brandbook_.pdf"]


Categories
Tags
Author

/are-you-getting-the-most-out-of-your-website A website can wear multiple hats for a company it can be your brand, your online presence, your salesperson, the first impression with a user or a potential customer and much more. There is no doubt that your website can play various roles that’s why it’s important to understand if your company website is effective, and if not, maybe it’s time to redesign your website.
Here’s a checklist of items you should consider to find out if you are getting the most out of your website.

Define your website goal:

Let’s start by discussing the importance of a website goal. Website goals can be used to tell what’s working and what’s not working. Knowing what you want to achieve out of each page of your website can help you in determining quite a few things such as what content you should prioritize, what the best organizational structure for content, what call to action should be pushed to users, and the overall purpose of your website.

All of these questions, revolve around your website goals, so how do you discover your website goals? Start with organizational goals, your website serves as some benefit to your organization in some way- so list out the ways that your website benefits your organization. Some examples of organizational goals for a website are:

Define success:

What does success mean to your website? How do you define success? Whatever metric that may be, be sure to define it and know how you want to measure it. Is it the amount of queries that come to your homepage? Or a specific landing page?  Make sure you have some sort of goal that can be measured so that you can check on that goal over a certain period of time, this will tell you if the content and goals you have in place are working

Define your audience:

Who are you trying to reach and sell your product or service to?

Each person on your target demographic list has a pain point that keeps them up at night- the challenge is getting to know what those pain points are. Start with your previous clients, what were some challenges that they faced? Why did they choose your company over another? Understanding previous clients or customers can give insight into what your target user may be looking for- throughout this process always keep in mind, what drives your target audience?

Articulate to your target audience what benefit your product or service does for them. Which benefits of your product or service would be most valuable to your target audience?

Who does your audience trust? Whether it be a more visible brand, a celebrity, industry experts- the more connected your brand is with those influencers the more your audience trusts your brand which means the more credibility you will receive to build your own brand awareness.

Define your obstacles:

So what makes your web design plan a reality? Getting through those initial obstacles. Here are some examples of obstacles that you will need to overcome to get your website design complete:

Next Steps:

Now that you have a strategy in place, how are you going to implement this strategy to get the results that you are hoping for? If you realize that you are not getting the most out of your website, reach out to us, we love working with new people.

Categories
Author

What is the Features module?

The Features module does have a purpose.. But what exactly, do you need it, what is the structure? All valid questions surrounding Drupal's module. The primary purpose of the module is to copy configuration setups from one Drupal site to another. The Features module offers a well-known method of bundling configuration in a new module that can be installed on other sites--a feature. See the full Drupal 8 configuration setup.

The Features module is an important tool to use on any Drupal 7 or prior projects. To put it simply, Features allows for configurations to be packaged as a reusable component from one environment to another. It might seem like a hassle to add yet another module to your development process, but you will find Features very handy and rewarding as your site grows in size.

Do I need it?

The main advantage of using Features is being able to have configurations in code so it can be tracked under version control. Since everything in Drupal 7 is stored in the database, configurations changes such as Content Types or Views needs to be moved upstream some way. Creating those changes manually is not such a big issue when your site is small and there’s only one developer working on it. However, when there are several developers working at once on a large scaled site, having to manually create config changes on all the environments is extremely inefficient and time consuming not to mention the possibility of human error. Using Features decreases the amount of inconsistencies across the board. By having configurations in files, the deployment process is also simplified.

Features Structural Organization

There are many different ways to organize the components within Features. You can categorize them based on the kind of Drupal entities (Views, Content Types, Blocks, etc). The downside to that is you might end up with a very long list of Features that makes it hard to keep track of, or Features that are not broken down specific enough and resulting in merge conflicts every time changes occur. One approach is to group feature around Content Types and Pages. It’s much easier to identify what Feature to export if you know that a certain Block for staffs will be under the staff profile Content Type. There may also be components that does not necessarily fit into one place. For example, fields that are used in several different Content Types can be moved to a feature for shared components.

Other Tips

Make sure to revert Features once your code has been pushed up. Also, you should go and double check everything is at the state you want. I have encountered times when Features did not import something properly even though all the correct components were selected. It is also wise to name your features with something identifiable to your project as the base name and place them all in a Features folder in modules for easy access.

Drupal 8 comes with content management system in core so there won’t be a need for Features in the future. However, Drupal 7 is here to stay for awhile and it is definitely an essential module for development.

Categories
Tags
Author
Subscribe to Mobomo