Mobomo webinars-now on demand! | learn more.

Back in the good ol' days of PowerPC Macintosh computing, and WAY before USB there was a marvelous (albeit proprietary) technology called Apple Desktop Bus or ADB for short. You might remember killer keyboards like the "Apple Adjustable Keyboard" seen here:

One of the great features of those older keyboards was the ability to power on the machine right from the keyboard itself. In 1998 Apple changed the keyboard for their brand new iMac line to utilize the increasingly popular USB format. The "Apple USB Keyboard" model number M2452 was the last keyboard (USB or otherwise) to ship with a power button.

If anyone's ever had a Mac that they wanted to be able to cold boot remotely (for instance from another room) you'll join me in shedding a tear for that last tidbit of information. No more power button on the keyboard?!?! I've been curious for the past several years if there was a way to remotely boot a machine via a USB button or some other method involving the LAN port with the "Wake on LAN" feature, but without some help from Apple it seems that no one has been able (or perhaps been allowed?) to solve this problem yet*. That is... until now!

If you keep your desktop Mac's AC plugged into a UPS that has USB support capable of issuing a shutdown command, then what I'm going to describe might sound familiar. Imagine you're at work and streaming some killer tunes from home from the 2TB music collection on your 27" iMac i7 with 16GB of ram and a 400GB OWC SSD (hey, we can all dream right?) when there is a sudden and extended power failure. Luckily for you your iMac is plugged into a shiny new APC UPS. However, after 20 min or so the UPS runs out of battery and needs to safely shut down your $2500 iPod. Since there isn't a way to power on your iMac remotely or know when power will be restored you're a sad panda for the rest of the day while trying to code in a noisy office. That is unless you enabled the preference in Energy Saver that says "Start up automatically after a power failure". If you have that checked then as soon as power is restored to your home, your iMac will boot again and you can return to rocking out.

For all of this to work though, the UPS has to forcibly remove power from the machine to simulate an all out power failure. This is achieved by the UPS issuing a special kind of shutdown just before yanking the virtual plug, Christina Aguilera's favorite kind in fact... a dirty one ;-)

If you look at the man page for shutdown you'll notice a bunch of optional flags. The two that we're concerned with are -h and -u.

      -h      The system is halted at the specified time.    -u      The system is halted up until the point of removing system power,   but waits before removing power for 5 minutes so that an external UPS   (uninterruptible power supply) can forcibly remove power.  This simulates   a dirty shutdown to permit a later automatic power on. OS X uses this mode   automatically with supported UPSs in emergency shutdowns.      

To allow me to simulate what a UPS does and be able to power on my mac from another room, I picked up a $10 Wireless Remote Control Electrical Outlet with an RF keychain remote that has an on/off switch:

When it comes time to shut down the Mac make sure to go through and close out all apps, save all documents and get the system to the point where only the Finder is running. Then issue the following terminal command:

$> shutdown -u -h now

Wait until you're sure the machine has shut down and then click the "off" button on the RF remote (you'll have a 5 minute window). You've now simulated a power failure in a totally safe way. You can come back hours/days later and "restore power" to the machine by pressing the "on" button on the RF remote and the Mac will boot! I even created an automator action to run the shell script via applescript with administrator privileges so I can just use Alfred (my new favorite launcher utility) to call the "Shutdown Dirty.app" that I made.

The AppleScript code that I used is:

do shell script "shutdown -u -h now" user name "Jon Kinney" password "noway"   with administrator privileges

Please note: this does pose some what of a security risk by embedding your system password in essentially a plain text file, but I really didn't care. Use this solution at your own risk. Alternatively you can leave the bit about password out and it will prompt you in the OS X GUI.

The reason that I wanted to come up with this solution is that I have a recording studio in my basement and I put in conduit in the walls/ceiling so I could keep my Mac Pro and external hard drives in a server closet that I built under our basement stairs. The main reason for that is my 8-core Mac Pro puts out way too much heat to keep in the control room. It gets hot enough with the LCD monitors, studio monitors (speakers) and my high voltage track lighting. Not to mention that even though FireWire is supposed to be a hot swappable technology, every piece of FW audio gear that I've ever owned says to shut down the machine before plugging or unplugging it to avoid possibly frying your FW ports on your computer and/or your audio interface. Now I can shut down and boot from the comfort of my studio chair :-)

*Note: Apple's only modern hardware designed to be booted remotely is the Xserve server, which supports Lights Out Management (LOM).

Categories
Author

2010 was a big shift in work environment for me. I migrated from an office to a completely distributed and remote team at Outspokes and then to Intridea later in the same year. Many of my daily tools stayed the same, but there's been plenty of additions to streamline my work. Here's an overview of my most used tools for web development.

Chrome

I switched to Chrome as my personal use browser, but stuck with Firefox because of Firebug and other extensions. Chrome was snappy in daily use, consumed less resources, and just plain felt better than Firefox. Once I learned about the available "Web Inspector", the switch was complete. Nowadays, I only open other browsers briefly for testing.

Skype

Instead of holding meetings in person, Skype is now always open for conference calls. Meetings are scheduled in Google calendar, and if screen sharing is needed, then we pop open a GoToMeeting.

Presently

I used Yammer briefly while at Outspokes, but none of us got into it very much. At Intridea, there was so much more knowledge and information that needed to be shared between projects and team members that I saw the real value of micro-blogging for the first time. On a remote team, it's also a great way to share a virtual water cooler and hang out with your co-workers.

Propane

Campfire client for OSX. I don't use Campfire for all my projects, but when a client requests it, then I can keep separate tabs. The integrated file upload and download is nice too.

Textmate

I grew up on Emacs, and I still use it frequently, but Emacs and Vim are both kind of clunky and doesn't fit in with the rest of the Cocoa environment.

Gitx

Simple way to stage and unstage changes. I know there's fancier apps that integrate with Github, but for the time being, this app has just the right amount of features for me.

Cloudapp and Skitch

I use Cloudapp for ultra-quick screenshots and file uploads. When I need to draw a few arrows and text, I open up Skitch and drag the image up to the Cloudapp menulet. I know Skitch has built in sharing, but the Cloudapp one feels more polished to me. Both are great apps I use all the time.

Divvy

Divvy lets me quickly tile a bunch of windows. It's just a single feature, but it's an awesome single feature.

Pixelmator

I don't do very much graphics work, but it's nice to have an app that lets me whip up a quick background, or tweak an existing image asset.

HTTPClient

Great way to test APIs and inspect HTTP headers.

MultiFirefox

When I do need to test multiple versions of Firefox, MultiFirefox is a kickass simple utility for launching different versions with different profiles.

VirtualBox

For IE testing, I've tried Fusion, Parallel, and VirtualBox. Out of the 3, I think VirtualBox has been the least buggy and simplest. It might not have bells and whistles, but honestly, I just want to boot Windows and load shudder IE6 and 7. As an added bonus, there are libraries for controlling VirtualBox programmatically.

Do more with less

I'm open minded about trying new apps, but more tools doesn't always mean more productivity. These apps represent a greatest hits list for the past year. It's not a comprehensive list, but if any of these apps disappeared, I'd really be hurting.

Categories
Tags
Author

Mashable is one of the world's largest blogs focused exclusively on Web 2.0 and Social Media news, with more than 15 million monthly pageviews. We've worked with them to create mobile applications for the iPad and Android platforms. Today, Apple's Mac App Store launched and we're proud to have an application that we've built as one of the launch titles - Mashable! for Mac.

Mashable! for Mac gives you to the ability to read the latest news from many Mashable news categories, right on your desktop in its own dedicated application -- without opening your browser. You get a simple but intuitive interface that lets you navigate easily through the news categories and filter down to what articles you want to read. You are also able to view the comments for each article and post your own comments without leaving the article or the application.

You can also take your Mashable reading offline, since you don't need an Internet connection to read articles that you've already fetched. Mashable! for Mac is just a terrific way to read Mashable on your desktop. There will be many more great features coming in the near future.

If you wish to download the app, make sure that you're running the latest version of Mac OS X (10.6.6). Next, look for Mashable in the Mac App Store. We'd love to hear your feedback.

Intridea offers services for application development on all major platforms, which include Mac, iPad, iPhone, Android, BlackBerry, and Palm webOS. If you need help with your mobile application feel free to contact us for a quote.

Categories
Author

While iOS projects have the advantage of multiple NIB files, this is not the default for development on OSX. When working on a Mac or iOS project with more than one person, you quickly learn that attempting to merge conflicted Interface Builder files or XCode project files can only result in tears. But just because you can't work on the same NIB doesn't mean that the productivity of the entire team should be blocked by the one person editing MainMenu.xib. Cocoa allows you to chop your UI into separate NIBs and control them with multiple NSWindowControllers. Once you separate out different windows from MainMenu, you're much less likely to conflict with your team. As an added benefit, your UI will feel snappier because NIB loading will be delayed until it's actually needed. I'll demonstrate this technique by separating the Preferences window from the main window, a common and easy case for refactoring.

Code

For starters, let's create a new NSWindowController subclass for driving our Preferences window. We'll name it PreferencesController.

The header:

#import <Cocoa/Cocoa.h> @interface PreferencesController : NSWindowController { } @end 

The implementation:

#import "PreferencesController.h" @implementation PreferencesController  - (id) init {   if(self = [super initWithWindowNibName:@"Preferences"]) {   }   return self; } 

The only difference from a generic NSWindowController is the custom constructor. This controller will try to load a NIB named "Preferences.xib" when it's -showWindow: method is called. In the Xcode sidebar, right click Resources, Add File, User Interface, and choose "Window XIB". Name this xib "Preferences.xib".

Interface Builder

Next comes the error-prone step. If you don't add all the right connections in Interface Builder, then your new window will act erratically. It might not show up, it might not be in focus, it might not close, or it might explode your Mac (unlikely, but not impossible). First, add an NSObject to your Document and change the 'Class' to 'PreferencesController'

Preferences Controller Identity-2

To test that our NIB is loading properly, let's connect the 'Preferences' menu item to the showWindow: action.

Menu Item Connections

We're almost there, but if you run the app now, you'll notice that the Preferences window doesn't focus properly. While our "MainMenu.xib" has a reference to PreferencesController, we forgot to let Preferences.xib know that its owner is of type PreferencesController. Open "Preferences.xib", and change "File's Owner" to PreferencesController, and also set its "window" connection to point to the window.

Preferences Controller Connections

If you Build and Run the project now, you should be able to open the Preferences window from the menu and have the 2nd Preferences window loaded. Open and close the Preference window a few times for good measure too. If something is acting funny, the most likely culprit is a missing connection for "File's Owner" in "MainMenu.xib" or a missing connection for the menu. Go over the steps again and recheck your class identities and connections (cmd-5) in the inspector to make sure everything is wired correctly.

What's Next?

From here, whenever you need to make changes to the Preferences window, no changes need to be introduced to "MainMenu.xib". Controller actions can be specified on PreferencesController, and Interface Builder can access those actions by making connections to "File's Owner". For a demo, check out this account preferences demo. Hopefully, you can use this process in your project to cut down on nasty merges.

Resources

Categories
Author

When i came to Ruby 1.9, the first problem i met is the encodings. Gregory Brown said, in a training session at the Lone Start Rubyconf, "Ruby 1.8 works in bytes. Ruby 1.9 works in characters." In Ruby 1.8, you have to deal with those bytes and it does not provide any functions with encodings. But in Ruby 1.9, i think you must know about the encoding stuff to make you life easier. Let us talk about the fouce Encodings in Ruby 1.9 by examples.

The Source File Encoding

The source file encoding is the character encoding of a given source file. It is US-ASCII by default. When you create a String literal in your code, it is assigned the Encoding of your source. So you have to changing the source Encoding when you want to place any non-ASCII content in a String literal.

  
  $cat no_encoding.rb
  p "中文".encoding
  $ruby no_encoding.rb
  no_encoding.rb:1: invalid multibyte char (US-ASCII)
  
$cat encoding.rb #!ruby19 # encoding: utf-8 p "中文".encoding $ruby encoding.rb #

As you can see in the no_encoding.rb, the error came out as "invalid multibyte char (US-ASCII)" when there is an chinese string in the source file. That is because when nothing of encoding is specified, Ruby will default to ASCII. But after the encoding is specified by adding the encoding comment, it works.

The String Encoding

Each string has its own own encoding, which you can access with String#encoding method:


   ruby-1.9.2-head>string = "中文"
    => "中文"
   ruby-1.9.2-head>string.encoding
    => #

You could transcode the string into a different encoding by using String#encode:

  
    ruby-1.9.2-head>string_in_gb2312 = string.encode("GB2312")
     => "x{D6D0}x{CEC4}"
  

But the transcoding will fail if the encoding does not support all characters in your string:

 
    ruby-1.9.2-head>string_in_ascii = string.encode("us-ascii")
    Encoding::UndefinedConversionError: U+4E2D from UTF-8 to US-ASCII
 

The External Encoding

The encoding of the data in an IO stream is known by Ruby as the object's external encoding.The default external Encoding is pulled from your environment.


   ruby-1.9.2-head>Encoding.default_external
    => #

Here is how the exernal encoding works:


   ruby-1.9.2-head>f = File.open("example.txt")
    => #
   ruby-1.9.2-head>f.external_encoding
    => #
   ruby-1.9.2-head>content = f.read
    => "这是一些示范文本"
   ruby-1.9.2-head>content.encoding
    => #

if the file is not going to use the default extrenal encoding, you can override it:


   ruby-1.9.2-head>f = File.open("example.txt", "r:gb2312")
    => #
   ruby-1.9.2-head>f.external_encoding
    => #
   ruby-1.9.2-head>content = f.read
    => "x{E8BF}x99xE6x98x{AFE4}xB8x80x{E4BA}x9Bx{E7A4}x{BAE8}x8Cx83xE6x96x87xE6x9CxACn"
   ruby-1.9.2-head>content.encoding
    => #

The Internal Encoding

The encoding that the programmer wishes to use with the data in a stream is the internal encoding. The default internal encoding is nil unless set explicitly.


   ruby-1.9.2-head>Encoding.default_external
    => nil

We could specify our internal encoding when opening the file if the external encoding won't match the encoding we want to use internally.


   ruby-1.9.2-head>f = File.open("example.txt", "r:utf-8:gb2312")
    => #
   ruby-1.9.2-head>f.external_encoding
    => #
   ruby-1.9.2-head>content = f.read
    => "x{D5E2}x{CAC7}x{D2BB}x{D0A9}x{CABE}x{B7B6}x{CEC4}x{B1BE}n"
   ruby-1.9.2-head>content.encoding
    => #

Categories
Tags
Author

2010 has been a wonderful year for Intridea, especially as far as our blog is concerned. One of our commitments this year was to encourage all of our employees to contribute articles. We’ve been fortunate enough to bring you new tidbits every few days on a variety of topics relating to web and mobile development, in addition to some of the unique experiences we encounter as a heavily distributed team.

Mobile Devices

Since its release in April 2010, the Apple iPad actively excited our mobile developers. Eagerly, we updated several of our mobile applications, such as our crisis response application for the Gulf Coast oil spill, Oil Reporter, to take advantage of the new platform. But we’ve also been looking at other mobile platforms to see how we can take advantage of their unique qualities. Here are a few snippets from posts over the year:

Flexible Authentication with OmniAuth

Our Director of Product Innovation, Michael Bleigh, was hard at work this year writing a Ruby library to simplify all of the different logging-in strategies that today’s web applications try to leverage. Whether it’s Twitter, Facebook, or even FourSquare, the OmniAuth library handles it all with ease. The library was used heavily in the 2010 Rails Rumble competition. Here’s what Michael had to say about the tool earlier this year:

The Intridea Community

It hasn’t been all work and no play, however. We’ve also gotten to know our teammates a lot better over this past year. Our Community Manager, Renae Bair, has worked tirelessly to investigate the lives of Intrideans for our Intridea Insider series. But we’ve also discovered a few areas which we all seem to have in common.

This year, distributed Intrideans have made a concerted effort to travel frequently and meet up with each other at events in the community. Check out our Flickr page to see the photos that capture those experiences.

It’s been a wild year, but we’re really looking forward to continuing to provide you with new and varied articles covering mobile and web development. From all of us at Intridea, have a great 2011!

Categories
Author

From the Framework Programming Guide

  • Frameworks group related, but separate, resources together. This grouping makes it easier to install, uninstall, and locate those resources.
  • Frameworks can include a wider variety of resource types than libraries. For example, a framework can include any relevant header files and documentation.
  • Multiple versions of a framework can be included in the same bundle. This makes it possible to be backward compatible with older programs.
  • Only one copy of a framework’s read-only resources reside physically in-memory at any given time, regardless of how many processes are using those resources. This sharing of resources reduces the memory footprint of the system and helps improve performance.

Now that we've got a handle on what frameworks are let's set about building one. Open up Xcode and create a new project. We'll use the "Cocoa Framework" template which can be found under the "Mac OSX" group.

Our framework will return a random Cary Grant movie quote so we're going to name it "CaryGrantQuotes". This framework will have only one method which is defined in Quotes.m. Since it's such a simple framework, we can remove all of the frameworks listed under "Linked Frameworks" and "Other Frameworks" save for Foundation.framework.

Next, expand the "Targets" group located in the sidebar and expand "CaryGrantQuotes". Drag Foundation.framework to the group labeled "Link Binary With Libraries".

Header files are important because they tell an application what methods they can access. Headers that will not be directly accessible can be marked as "Project" but any header files that can be imported by an application need to be set to "Public". Since our project has only one header file, we'll need to set it to "Public". Under the group labeled "Copy Headers", right-click on the header files, select "Set role" ? "Public".

We'll need to modify our build settings so that the framework can be loaded properly by the enclosing application. Without getting into the gritty details of Xcode-specific environment details, the only ones you need to know about for getting this to work are @rpath and @loader_path. These will expand with the framework being loaded to point to the location on disk where the framework is located relative to the binary. Right-click on the CaryGrantQuotes item under "Targets" and select "Get Info". Adjust your settings to match those shown below.

Project settings

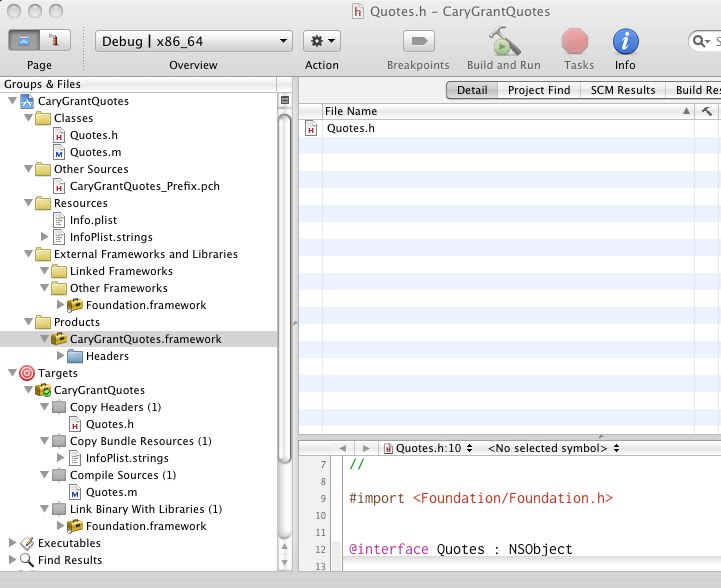
Your CaryGrantQuotes project should now match the image below.

Sidebar visual

Let's quickly build a Mac OSX application to embed our new framework in. We'll call it "MyProject" and all it will do is output a random quote to the debug console.

In the root of the newly-created MyProject directory, create a directory called "Frameworks" and open that directory using Finder. Tab back to the CaryGrantQuotes project in Xcode and build it.

Underneath the "Products" group, there should now be a "CaryGrantQuotes.framework" item listed. Right-click on that item and select "Reveal in Finder". Drag the newly-created framework into "MyProject/Frameworks" as shown in the image below.

Drag frameworks directory

We still have a few more tasks to perform before we can use this awesome new functionality. Under "MyProject", expand the "Frameworks" ? "Linked Frameworks" groups. Right-click on "Linked Frameworks", select "Add" ? "Existing Framework". This will take a few seconds to load as by default Mac OSX apps recursively search for all frameworks.

Since we are using our own framework, click on "Add Other…" on the bottom of the dialog, browse to the "MyProject/Frameworks" directory and select "CaryGrantQuotes.framework".

Next, expand "Targets" and right-click on "MyProject", select "Add" ? "New Build Phase" ? "New Copy Files Build Phase". Select "Frameworks" from the dropdown and close the dialog.

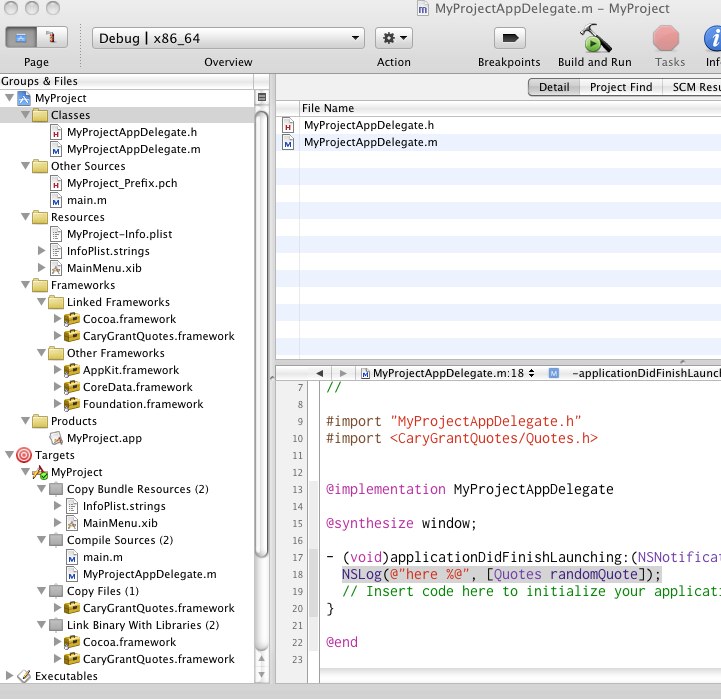
Now drag CaryGrantQuotes.framework from the "Linked Frameworks" group into this newly-created group which should be labeled "Copy Files". Then take this same group and drag it to a spot above "Link Binary With Libraries" (which should now contain the CaryGrantQuotes.framework item too).

MyProject sidebar visual

Nearly there! Now we need to let "MyProject" know where it can find this new framework. We do that by modifying the "Runtime search paths" value which will expand into @rpath when the binary is built.

MyProject rpath setting

Now all that remains is to add #import <CaryGrantQuotes/Quotes.h> to the top of MyProjectAppDelegate.m and we can use it how we see fit. To output a random quote to the debug console, stick this statement in applicationDidFinishLaunching:.

NSLog(@"Quote: %@", [Quotes randomQuote]);

Your debug console should now output a random Cary Grant movie quote, quite a useful feature. If, however, you receive the dreaded "Library not loaded; image not found" error, I suggest you get familiar with the command-line utility otool. Run the following command from the root of the "MyProjects" directory.

otool -l Frameworks/CaryGrantQuotes.framework/CaryGrantQuotes

The -l option shows you what libraries the framework is linked to as well as the path settings. The value of name under LC_ID_DYLIB should be @rpath/CaryGrantQuotes.framework/Versions/A/CaryGrantQuotes.

The entirety of the CaryGrantQuotes project can be found on github. Additional links and resources on embedding your own framework are listed below.

Categories
Author

It's the gift-giving season and it's likely some of you are thinking of giving someone or even yourself a mobile media tablet such as Apple's iPad, Samsung's Galaxy Tab or Barnes & Noble's NookColor. You may or may not be inspired by the fact that a growing number of bankers, executives, doctors and other professionals are getting such devices issued to them at work. However, can today's media tablets help such employees be productive, or is there something missing -- such as suitable stylus for those who find finger-based input onerous?

Thumbs Down for the Finger as Input Device

To facilitate enterprise use, I strongly believe that a mobile device needs stylus support, so I suggest waiting to see what 2011 brings. Don't get me wrong. I'm very fond of both my Apple iPad and my NookColor (Android), and find touchscreens addictive. But for some mobile tasks, using a stylus is much more productive than a finger. As a long-time fan of Palm's Vx PDA and the Treo 650, I found the stylus very useful. On the other hand, I'm not so enamored of the Palm Pre Plus due to the small screen and lack of a stylus. I find the device hard to use for my fingers, unfortunately making it a non-productive device at least for me. Now imagine having to either enter a lot of data on a mobile app, or select from a large number of options. Certain professions require this. Now imagine doing it every day. For example, when a colleague asked me to create two medical diagnostics apps for the iPhone and iPad for hospitals, I thought about how onerous these would be for daily use without a stylus. Another colleague discussed a simple image manipulation app for the iPhone, but if you've ever tried cropping a photo with your finger, you know how awkward that can get. Can you imagine the awkwardness of tasks such as signing digital documents, or worse, take notes with your finger? Note-taking, in my opinion, will become a very common activity on media tablets, if stylus support is included.

What's Coming

It's a fact that 2011 will bring a whole slew of media tablets for most or all of the top mobile operating systems, and stylus support would be nice for those who feel the finger is just not an accurate data input tool for the enterprise, or even for personal creative use. Never mind the fact that a stylus can have a finite number of predefined pressure or capacitive settings as necessary, unlike a finger. A stylus also doesn't get tired like a finger, after hours of use, day in and day out. At the moment, there are a number of stylus makers out there. I've personally only researched them for the iPad. What I've found so far might suffice for simple uses, but I haven't seen a for-iPad stylus yet that seems precise (pointy) enough for notetaking or drawing/ diagramming. An informal poll of tech-savvy people I know who have iPads or Android tablets suggests that they'd all like to use the devices for notetaking, and I don't imagine that'd be much different for all the professionals being issued tablets by employers.

Thumbs Up for the Stylus as Productivity Accessory

As a productivity techniques evangelist, I'm a long-time fan of mind maps-based diagramming -- something I just don't relish doing with my finger on media tablet. But as soon as a viable stylus is available, I may never diagram or write on paper again. What's missing, at least in the iPad arena, is a stylus sanctioned by Apple, unless I've taken a Rumpelstiltskin-like snooze and missed some important news. On the other hand, as mentioned in a recent All Things Digital article, a number of stylus makers are trying to persuade Android handset makers into supporting stylus-based touchscreen input. If Apple does not offer their own stylus solution with the next generation of iPads (rumored to be shipping in Feb 2011), or at least sanction a third-party stylus for the iPad before the end of H1 2011, Android tablets could potentially offer a huge advantage for enterprise use. As well, a stylus would open up the possibility of creative tasks on media tablets. For example, photo cropping or drawing, or the aforementioned mind mapping and diagramming. Combined with the popular Swype method of text input (over the virtual mobile keyboard), a stylus could be just the accessory to turn a media tablet from the expensive toy it's sometimes perceived as, collectively, to a high-productivity tool. Expectations of Apple's iPad outselling every other media tablet out there in 2011 may not come to pass if private and business users show that they want precision stylus support. So if you're undecided about which media tablet to purchase, you might want to skip Xmas, skip Boxing Day sales and wait until Q1 or Q2 2011, to see if any of the upcoming mobile devices have serious stylus support. On the other hand, if you just want to play popular games such as Angry Birds or Infinity Blade, there's something to be said for the addictive factor of using your fingers.

Categories
Author

During the past several weeks, Brendan and I have been developing an iOS app with Titanium - a tool to build native applications with web technology. During my development process, I had several questions and found that the most helpful resource was on the Titanium Q&A site. I want to list these questions and solutions, since I think these are common problems and could be of great help to any developer using Titanium.

# How to get height of Labels? #

Reference [http://developer.appcelerator.com/question/9951/get-label-height-when-height-property-is-auto](http://developer.appcelerator.com/question/9951/get-label-height-when-height-property-is-auto)

I want to display many elements vertically on a window,when I put an element,I need to know the top attribute first,the top is according to the height of previous element,may be a label.

# How to prevent dashboard editing #

Reference [http://developer.appcelerator.com/question/61881/dashboard---prevent-editing](http://developer.appcelerator.com/question/61881/dashboard---prevent-editing)

In the app,we use dashboard to group the features,and the default behavier of dashboard is that when you hold the dashboard icon for seconds(about 1 sec),the icons will being wobbling and you can change the order of icons and delete the dashboard item.
But our app don't allow users to edit dashboard,so we need to forbit it.

Is it works?No,when you want to edit dashboard,the icons are not wobbling,and you can't delete the items, but you can order the items,and the icon image is changed to selectedImage.The effect is not good,Is there any other attributes to present dashboard editing,I can't find.

After change the const,you can build the project directly in Xcode,if you want to build with Titanium,you can change that in Titanium SDK.

# How to pass data to local html #

Reference [http://developer.appcelerator.com/question/27781/pass-data-to-webview](http://developer.appcelerator.com/question/27781/pass-data-to-webview)

Our app display news for user,every news is on a local html,and pass news content to the html.But in the html,we can't get the currentWindow variable,so we need to find other way to do it.

# How to open links on webview in new window or safari? #

Reference [http://developer.appcelerator.com/question/89981/webview-links-to-open-in-a-new-window](http://developer.appcelerator.com/question/89981/webview-links-to-open-in-a-new-window)
There are links on the news view,when user click the links,the web page will be opened in the current window, so the content of current window is missing,you can't back to the content. We could like to open the web page on a new window,and user can back to the news.

Categories
Author

When Apple introduced the highly anticipated "Copy and Paste" feature for the iPhone, it came with a default menu editing implementation. With the release of iOS 3.2, this implementation has been updated to include configurable menus to ease the iPhone developer's job. It's simple and elegant. In addition to using UIActionSheet to provide a list of commands/actions to choose from, the UIMenuController is worth a try too.

While working with the UIMenuController I struggled for several hours and couldn't find any helpful information even after an exhaustive Google search. So I hope this blog post will help to save you some time and frustration if you are trying to do the same thing. Otherwise, I'm sure this post can help you understand how to use UIMenuController better.

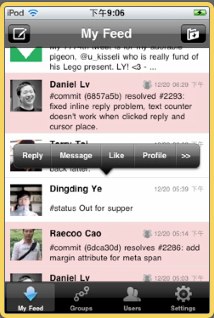
Below is an example of the UIMenuController after I found the best implementation; this is a screenshot from the Present.ly iPhone client which is currently in development.

Notice that the ">>" and "

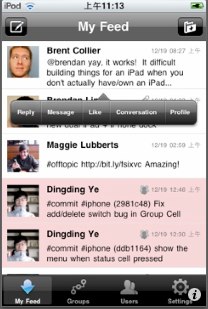
Before I arrived at the above implementation using ">>" and "

The font size is small and what's worse is that when you add a new item the title will automatically shrink. That's why I need ">>" to expand those less critical but still useful items. So my first version at adding the ">>" is as follows:

      - (void)setMenuItems {          ...          [self becomeFirstResponder];          UIMenuItem *expandItem = [[UIMenuItem alloc] initWithTitle:@">>" action:@selector(expandMenu)];          NSMutableArray *menuItems = [[NSMutableArray alloc] initWithCapacity:5];          for (NSInteger i = 0; i     

Unfortunately, this did not work because when I clicked the screen or an item in the menu, the menu would automatically hide. In the last section of "Display and Managing the Edit Menu", it says:

  • Dismissing the Edit Menu
  • When your implementation of a system or custom command returns, the edit menu is automatically hidden. You can keep the menu visible with the following line of code:
  • [UIMenuController setMenuController].menuVisible = YES;
  • The system may hide the edit menu at any time. For example, it hides the menu when an alert is displayed or the user taps in another area of the screen. If you have state or a display that depends on whether the edit menu is visible, you should listen for the notification named UIMenuControllerWillHideMenuNotification and take an appropriate action.
  • But either I couldn't find the "setMenuController" method or the [UIMenuController sharedMenuController].menuVisible = YES didn't work. So the next step I tried was with UIMenuControllerWillHideMenuNotification and UIMenuControllerDidHideMenuNotification and I set the menuVisible to YES there.

      - (void)willHideEditMenu:(id)sender {          LogDebug(@"Will hide edit menu: %d", [UIMenuController sharedMenuController].menuVisible);          [UIMenuController sharedMenuController].menuVisible = TRUE;      }        - (void)didHideEditMenu:(id)sender {          LogDebug(@"Did hide edit menu: %d", [UIMenuController sharedMenuController].menuVisible);          [UIMenuController sharedMenuController].menuVisible = TRUE;      }        - (void)viewWillAppear:(BOOL)animated {          [super viewWillAppear:animated];          [[NSNotificationCenter defaultCenter] addObserver:self selector:@selector(willHideEditMenu:) name:UIMenuControllerWillHideMenuNotification object:nil];              [[NSNotificationCenter defaultCenter] addObserver:self selector:@selector(didHideEditMenu:) name:UIMenuControllerDidHideMenuNotification object:nil];      }  

As I feared, it still didn't work because the flow is:

The property menuVisible is always TRUE in those methods. So I doubt after UIMenuControllerDidHideMenuNotification, the SDK will do more work such as set the menuVisible to false and then hide the menu. Maybe accessing the private library would help but Apple doesn't allow that.

Look at the flow again. It doesn't work but at least we know that it works when there is no menu in the screen and the menu is hidden after UIMenuControllerDidHideMenuNotification. Keeping these two points in mind I then updated the expandMenu method to let the menu show action delay for a while.

      - (void)expandMenu {          UIMenuItem *collapseMenuItem = [[UIMenuItem alloc] initWithTitle:@"    

Wow, it works as expected! Note that I take 0.5 as the delay period which I think is a reasonable value. You can also execute this method in the didHideEditMenu to be safer.

A few additional notes about the UIMenuController, for your benefit:

  • In order to show menus, you should implement canBecomeFirstResponder in your controller and then invoke [self becomeFirstResponse] before showing the menu.
          - (BOOL)canBecomeFirstResponder {          return YES;      }  
  • You can decide which methods can be executable by implementing canPerformAction:withSender:
          - (BOOL)canPerformAction:(SEL)action withSender:(id)sender {          BOOL retValue = NO;                    if (action == @selector(expandMenu:) )               [NSArray arrayWithObject:ColorTileUTI]];              retValue = YES;          else              retValue = [super canPerformAction:action withSender:sender];          return retValue;      }  

Hopefully my notes and observations will be helpful to other iPhone developers. Happy coding!

Categories
Author
Subscribe to