Mobomo webinars-now on demand! | learn more.

This past weekend I participated in Hack the Midwest, a Kansas City hackathon. The event was a huge success drawing a crowd of around 100 developers. As one of the visiting developer evangelists said, it was a great turnout for a New York hackathon, much less one in the midwest.

At the competition I built Qup.tv, a simple service that will send you email alerts when Netflix adds new titles to its streaming catalog. I was lucky enough to win top honors at the event, but this wasn't my first rodeo. With three Rails Rumbles, two Node Knockouts, and a Startup Weekend under my belt I'm beginning to get a sense of what works and what doesn't. So here's my list of things to keep in mind when competing in a hackathon:

1. Have a Layered Strategy

You will never accomplish everything you set out to complete at a hackathon. Something at some point will take ten times longer than it was supposed to, so you need to plan for having multiple goals any of which could end up being the final product. Your first stage should be something that you expect you can complete in well less than half the time allotted. For example, here was my layered plan for Qup:

  1. Users can sign in with their Netflix account and will receive emails of the latest Netflix releases
  2. Users can add items to their queue or watch them with one click from the email. For queueing, users should not have to be logged into Qup or Netflix
  3. Users can filter based on Netflix rating, Rotten Tomatoes score, and exclude genres they don't want updates about
  4. Track usage activity to be able to show which of the titles are most popular
  5. Add in support for Amazon Prime Instant Videos and/or Hulu

Even though my app won I only got through about half of what I thought I might be able to accomplish in 24 hours. I also ended up doing a decent amount of work tracking genres and usage activity which didn't show up in the final product at all because I didn't have time to polish and expose it. Which brings me to tip #2.

2. Cut Everything That Doesn't Work Well

It's a hackathon so judges will excuse a bug here and there, but regardless of how cool or important a feature is if it is likely to glitch more than 20% of the time you should cut it out of your final product. A smaller, less featured, but smoothly working project is going to win over a more featured but buggy project.

This applies to any kind of live demo in addition to a "go check it out" URL. Don't demo anything that the judges can't do themselves when they use the app (unless they don't get to use the app, in which case you'd better work hard to make sure your demo runs glitch free).

3. Style First, Substance Later

You can ignore this tip if you're working on a team with a dedicated designer (and how lucky for you if you are), but you should avoid the temptation to dive straight into the depths of coding when you start your project. Instead here are the things that you should do first:

  1. Create some kind of logo for your project
  2. Create the best looking landing page you can, even if it takes much longer than you'd like to spend on it
  3. Create accounts on Twitter, Google Analytics, UserVoice, etc. Anything you'll want to have at the end create at the beginning
  4. Buy domains, hosting accounts, etc. and get them all set up how they'll need to be

Why waste your time on all of these technicalities? Because the landing page is the first impression of your app that any judge will get, and if it doesn't impress them then you're already fighting an uphill battle. I spent perhaps the first hour and a half to two hours out of the 24 hour hackathon building the landing page for Qup, but that meant that I wasn't scrambling to make an ugly slapped-together mess pretty at the last second.

Integrate design and style as you go because when there's 45 minutes left you're always going to choose fixing a bug over polishing the interface.

4. Deploy Early, Often, Always

As soon as you have your pretty landing page and logo you should get your production environment up and running. If you can, use a Platform-as-a-Service like Heroku to take the operations burden off of yourself: you'll have enough to worry about on the app side.

Once you have a working production environment, make sure that you're deploying and smoke testing your code on a regular basis. There are almost always small (or large) problems that don't show up locally but do on a production box.

You'll notice that many of these tips have been about avoiding doing things at the end. That's because regardless of how carefully you plan you will be scrambling to fix earth-shattering bugs in the final minutes of the competition. It's tempting to put a tip like "don't deploy anything in the last two hours" because I've been burned multiple times by breaking something big while fixing something little at the last minute, but I won't. Instead you should be deploying SO FREQUENTLY that any fixes in the last minutes can be rolled back if they are deemed to be a bad idea.

5. In Presentations Show, Don't Tell, and Stop When You're Done

Your tech stack and the different ways you tackled the engineering challenges that your project presented are all very interesting. To you. Judges don't care, judges don't give a s**t. Instead keep your presentation focused only on the cool things your project does for the end user.

At Hack the Midwest we only had three minutes for presentations. Nearly everyone was running right up against the buzzer, so I was nervous. When it was my turn I gave maybe 20 seconds of exposition and then jumped right into the demo. I showed off my key features, anxious that any second I'd be cut off. In reality I probably still had a minute or more left. But rather than continuing to vamp about how I piped an RSS feed into an API queue fetch pool, I just stopped. I had already made my pitch, and I wouldn't do anything but hurt my chances from there.

Developers like to believe that code can speak for itself, and that's actually pretty true. However if your hackathon includes a presentation component you must speak for your code, so don't completely ignore a plan for presenting.

Do Something YOU Want

One last bonus tip is this: hackathons are about having fun, not winning. I've done seven of them and last weekend was the first prize of any kind that I've won. The beauty of the hackathon is that it gives you the opportunity to prove your mettle against yourself as much as against anyone else. It lets you say "what can I truly accomplish in X hours?". For me, this is a powerful drive and one that I'll gladly challenge myself with again and again. You can expect to see me in most every hackathon that comes around; I'm hooked.

Categories
Author

Twitter popularized the term "firehose API", to mean a realtime stream of data sent through a persistent connection. But even if you're not a realtime service, streaming APIs are great for pushing data from the backend to clients. They reduce resource usage because the server can decide when it's a good time to send a incremental chunk of data. They can also improve the responsiveness of your user experience. The same HTTP API can be reused to power multiple different apps. For example, you could write your web frontend with a Javascript frameworks like Backbone.js, but reuse the same API to power a native iOS application. Follow the jump to read about how streaming APIs work, and how you can write one with Rack::Stream.

TL;DR

Rack::Stream is rack middleware that lets you write streaming API endpoints that understand HTTP, WebSockets, and EventSource. It comes with a DSL and can be used alongside other rackable web frameworks such as Sinatra and Grape.

What's Streaming HTTP?

Normally, when an HTTP request is made, the server closes the connection when it's done processing the request. For streaming HTTP, also known as Comet, the main difference is that the server doesn't close the connection and can continue sending data to the client at a later time.

normal http

streaming http

To prevent the connection from closing, rack-stream uses Thin's 'async.callback' to defer closing the connection until either the server decides to close the connection, or the client disconnects.

Rack::Stream

Rack::Stream is rack middleware that lets you write streaming HTTP endpoints that can understand multiple protocols. Multiple protocols means that you can write an API endpoint that works with curl, but that same endpoint would also works with WebSockets in the browser. The simplest streaming API you can make is:

# config.ru # run with `thin start -p 9292` require 'rack-stream'  class App   def call(env)     [200, {'Content-Type' => 'text/plain'}, ["Hello", " ", "World"]]   end end  use Rack::Stream run App 

If you ran this basic rack app, you could then use curl to stream it's response:

> curl -i -N http://localhost:9292/  HTTP/1.1 200 OK Content-Type: text/plain Transfer-Encoding: chunked Connection: close Server: thin 1.3.1 codename Triple Espresso  Hello World 

This isn't very exciting, but you'll notice that the Transfer-Encoding for the response is set to chunked. By default, rack-stream will take any downstream application's response bodies and stream them over in chunks. You can read more about chunked transfer encoding on Wikipedia.

Let's spice it up a bit and build an actual firehose. This next application will keep sending data to the client until the client disconnects:

require 'rack-stream'  class Firehose   include Rack::Stream::DSL    def call(env)     EM.add_periodic_timer(0.1) {       chunk "nChunky Monkey"     }     [200, {'Content-Type' => 'text/plain'}, ['Hello']]   end end  use Rack::Stream run Firehose 

The first thing to notice is the Firehose rack endpoint includes Rack::Stream::DSL. This are convenience methods that allow you to access env['rack.stream'], which is injected into env whenever you use Rack::Stream. When a request comes in, the #call method schedules a timer that runs every 0.1 seconds and uses the #chunk method to stream data. If you run curl, you would see:

> curl -i -N http://localhost:9292/  HTTP/1.1 200 OK Transfer-Encoding: chunked Connection: close Server: thin 1.3.1 codename Triple Espresso  Hello Chunky Monkey Chunky Monkey Chunky Monkey # ... more monkeys 

rack-stream also allows you to register callbacks for manipulating response chunks, and controlling when something is sent with different callbacks. Here's a more advanced example with callbacks added:

require 'rack-stream'  class Firehose   include Rack::Stream::DSL    def call(env)     after_open do       chunk "nChunky Monkey"       close  # start closing the connection     end      before_chunk do |chunks|       chunks.map(&:upcase)  # manipulate chunks     end      before_close do       chunk "nGoodbye!"  # send something before we close     end      [200, {'Content-Type' => 'text/plain'}, ['Hello']]   end end  use Rack::Stream run Firehose 

If you ran curl now, you would see:

> curl -i -N http://localhost:9292/  HTTP/1.1 200 OK Transfer-Encoding: chunked Connection: close Server: thin 1.3.1 codename Triple Espresso  HELLO CHUNKY MONKEY GOODBYE! 

For details about the callbacks, see the project page.

Up until this point, I've only used curl to demonstrate hitting the rack endpoint, but one of the big benefits of rack-stream is that it'll automatically recognize WebSocket and EventSource requests and stream through those as well. For example, you could write an html file that accesses that same endpoint:

<html> <body>   <script type='text/javascript'>     var socket       = new WebSocket('ws://localhost:9292/');     socket.onopen    = function()  {alert("socket opened")};     socket.onmessage = function(m) {alert(m.data)};     socket.onclose   = function()  {alert("socket closed")};   </script> </body> </html> 

Whether you access the endpoint with curl, ajax, or WebSockets, your backend API logic doesn't have to change.

For the last example, I'll show a basic chat application using Grape and Rails. The full runnable source is included in the examples/rails directory.

require 'grape' require 'rack/stream' require 'redis' require 'redis/connection/synchrony'  class API < Grape::API   default_format :txt    helpers do     include Rack::Stream::DSL      def redis       @redis ||= Redis.new     end      def build_message(text)       redis.rpush 'messages', text       redis.ltrim 'messages', 0, 50       redis.publish 'messages', text       text     end   end    resources :messages do     get do       after_open do         # subscribe after_open b/c this runs until the connection is closed         redis.subscribe 'messages' do |on|           on.message do |channel, msg|             chunk msg           end         end       end        status 200       header 'Content-Type', 'application/json'       chunk *redis.lrange('messages', 0, 50)       ""     end      post do       status 201       build_message(params[:text])     end   end end 

This example uses redis pubsub to push out messages that are created from #post. Thanks to em-synchrony, requests are not blocked when no messages are being sent. It's important do the redis subscribe after the connection has been opened. Otherwise, the initial response won't be sent.

What about socket.io?

socket.io is great because it provides many transport fallbacks to give maximum compatibility with many different browsers, but its pubsub interface is too low level for capturing common app semantics. The application developer doesn't have nice REST features like HTTP verbs, resource URIs, parameter and response encoding, and request headers.

The goal of rack-stream is to provide clean REST-like semantics when you're developing, but allow you to swap out different transport protocols. Currently, it supports normal HTTP, WebSockets, and EventSource. But the goal is to support more protocols over time and allow custom protocols. This architecture allows socket.io to become another protocol handler that can be plugged into rack-stream. If you wanted to use Pusher as a protocol, that could also be written as a handler for rack-stream.

Summary

rack-stream aims to be a thin abstraction that lets Ruby developers write streaming APIs with their preferred frameworks. I plan to broaden support and test against common use cases and popular frameworks like Sinatra and Rails. If you have any questions or comments, feel free to submit an issue or leave a comment below!

Categories
Author

They say you can tell a lot about a person just from their bookshelf. Here is an inside look at our design team's current reading lists!

Our UX Designer, Ben Markowitz, draws much of his design inspiration from comic books:

"I enjoy comics for the intricacies in design and layout more than anything. Comics are a form of visual story telling which is much different from most other mediums; the artists (much like web designers) work elegantly within the constraints of the medium to create the most effective and moving experience for readers. Balancing artwork with content, they leverage limitations in usable space by using only the most poignant and effective elements to tell the story.

I approach UX design in a similar manner: define the optimal experience for users using the minimum set of design elements. This isn't minimalism, it's just responsible design. I aim to deliver a defined and powerful experience to the user by removing unnecessary complexity."

You know him as Chris Tate, our Director of UI, but we know him as Batman. His presence is sophisticated, his designs are rad, and his reading list? A thoughtfully cultivated set of inspirational pieces:

Here is Ted O'Meara, our Director of UX, whom we know as Superman (no, really).

As a graduate student at UMBC in the Human-Centered Computing program he focuses on developing software for the cognitively impaired. Ted's reading list is a reflection of his passion for creating accessible software through intelligent design:

  • Generative Art (Matt Pearson)
  • How We Decide (Jonah Leher)
  • Envisioning Information (Tufte)
  • Design Pattern TRABING?: Touchscreen-based Input Technique for People Affected by Intention Tremor (Evaluation, 2010, 267-272)
  • The design of a real-time, multimodal biofeedback system for stroke patient rehabilitation (MULTIMEDIA 2006, 763)
  • ...and Raising Unicorns.

Ask Ted about his tragic unicorn history at his next conference.

Jurgen Altziebler is our Managing Director of UX and he always means business. His seriousness is visible within his designs; nothing less than pixel-perfect will do for this designer.

His reading list might reveal his Austrian-born penchant for modern, light designs balanced with high functionality and subtle beauty.

  • Less and More: The Design Ethos of Dieter Rams (Gestalten)
  • Grid Systems in Graphic Design (Josef Muller Brockmann)
  • Designing Universal Knowledge (Gerlinde Schuller)
  • Ein Handbuch, Gestaltung, Typografie, etc. (Claire & Damien Gautier, Published by Niggli)

Javier Rios, our UI designer, is unambiguous and systematic. Maybe even a little crazy. (Ask him how many times he's been hit by cars while running!)

The practical, heuristic lineup of books in his reading list exemplify his approach to design: functional, clear designs that create a straightforward user flow path.

  • HTML5 for Web Designers (Jeremy Keith)
  • Responsive Web Designer (Ethan Marcotte)
  • Mobile First (Luke Wroblewski)
  • Designing For Emotion (Aarron Walter)

Style: The Main Ingredient

Based on their books alone I would conclude our design team is a group of calculated, discerning, artful design addicts. One thing can't be ignored though - they've got some serious style. It's that style that infuses every design they create, every user experience they develop, every carefully colored pixel on a page. As A Softer World once pointed out in their comic, "Everybody dies. Every single person. So, style counts."

Style counts.

Categories
Author

We're back with a debriefing on all the interesting stuff that happened at Saturday's exclusive Day of Foster.ly event.

The sold out event was held at the Artisphere, a posh urban arts center in Arlington, Virginia and was host to DC area's leading entrepreneurs, VCs and emerging startups.

Attendees were treated to a presentation from Aneesh Chopra, the first CTO of the United States, and an appearance from Congressman Jim Moran. The day's events passed by in a flurry as hundreds of entrepreneurs collaborated and innovated together through panels, study sessions, and parties.

Intridea's Managing Director of UX, Jurgen Altziebler, joined other development and design leaders on a panel where they shared insight on how to find and hire talent, how to work with clients, tips on project management, and how to get programmers and designers working together effectively.

Martin Ringlein, co-founder of nclud, advocated for hiring passionate people:

"When looking for new people, its all about passion, you can't teach that to people."

On the subject of project management, Jurgen shared:

"You can read all the books in the world about Project Management, but PM'ing is very much a human skill." - Jurgen

We really liked Nick Whitmoyer's advice to startups on logo creation:

"A lot of startups do 'styrofoam branding', where they get something for very cheap; it doesn't look good, and then it never biodegrades."

After an energetic day of knowledge sharing and collaboration between established entrepreneurs and fledgling startups, we were all treated to a night of live music and parties where many of us continued interesting conversations on technology, design, and strategy. We're looking forward to future Foster.ly events and to being a part of the innovation that's underway in the community of DC entrepreneurs.

Categories
Author

Jurgen and Anthony poke fun of the stylus tool and talk about fostering happy development teams in this exclusive interview at MoDevUX.


The short, 5 minute video gives a glimpse into how we work at Intridea and ends with some amusing banter on the state of touchscreens and the lingering use of the stylus.

Of note, Anthony explains how giving developers time to work on personal projects supports the company in more ways than one:

  • Allows our developers an opportunity to build up a library of open source work.
  • Many projects we do for our clients are massive in scope and individual developers don't always feel a sense of ownership or completion as frequently as they might like. Anthony explains, "Everyone in the organization needs to experience that level of execution." Encouraging developers to work on personal projects gives them more opportunities to feel that sense of ownership and completion. This philosophy is "always a positive outcome and never a waste of time", Anthony says.
  • It's training - developers learn new technologies to use in their projects. The knowledge they gain is put to use on client projects and spread to other developers, keeping all of us agile and bleeding-edge.

To see the full interview (and find out why we think the stylus is so "1999") watch the video and let us know what you think in the comments below or through Twitter! And be sure to check out the other interviews from the MoDevUX event on their YouTube channel.

Categories
Author

You stumble, you fall, you keep getting up until you can walk.

Failure is an integral part of the learning process for all species. Every interaction we have with the world gives us feedback that allows us to fine-tune our responses and behaviors and optimize our processes. This article examines how the design of software applications can be optimized to prevent excessive user errors and how to handle the implementation of error messages.

Learning to play a musical instrument is a great example of how our errors help us refine our processes until eventually we succeed (or choose to fail). I'm learning to play the piano and while it's audibly painful to struggle through the lessons I'm quickly gaining ground in my endeavor; after several weeks of frustrating practice sessions I'm onto Greensleeves now. I'm getting tearjerking reactions from my audience of one at home.

This music analogy demonstrates how we learn about any process or system. Every time I play off-key I'm immediately reminded I did something gut-wrenchingly terrible and that I need to fix it. This reaction is the foundation of many human-computer information models.

The user makes an error. The user recognizes the error. The user adjusts so that they don't make the error again.

Though musical instruments and human-computer information models train their users in a similar method, there's an important difference to be aware of: the piano doesn't care if I actually learn to use it or not; computer systems, however, need to be concerned with this. If I didn't care considerably to succeed in learning to play the piano I would not suffer through the cacophony of beginner mistakes for long. People generally aren't encouraged by high error rates. Chances are, your users won't tolerate high error rates either, so if you want them to use your application it's important to employ good design from the beginning. When your users do encounter errors (which they inevitably will), make sure the error handling isn't as painfully delivered as an ill-placed sharp note from a novice piano player.

The System

According to Donald Norman, a respected advocate of user-centered design and author of the book "The Design of Everyday Things", there are three parts to a system:

  1. The designer's mental model of the system
  2. The user's mental model of the system
  3. The system image (the system itself)

User error occurs when the designer has failed to render their idea of the system correctly to the user. There are three ways you can help your users navigate within your system:

  1. Understand your users and show them the path of least resistance
  2. Provide nets for users who fall outside of the main use case
  3. Gracefully degrade for user errors

User Awareness

As designers we can never fully grasp all the ways in which an application might be used. Launch days for products are almost always met with a flurry of feature requests and bug reports resulting from unexpected use cases.

Gerhard Fischer, a professor in the department of Computer Science at the University of Colorado at Boulder and a fellow at the Institute of Cognitive Science explained this in his research paper, User Modeling in Human-Computer Interaction:

A consequence of any smart behavior of systems is that agents (humans or computers) can guess wrong and perform hidden changes that users do not like. Current systems often lack the possibility or at least the transparency for users to turn off these “smart� features, which can get more in the way than help. As argued above, systems, even smart ones, are aware of only a fraction of the total problem-solving process their human partners undergo, and they cannot share an understanding of the situation or state of problem-solving of a human. [Fischer 2001. User Modeling in Human-Computer Interaction. 

You can't plan for every possible use case. Instead, determine what the main use case will be for the majority of your users and optimize your design for it. This is part of what Fischer, in a later paper calls "context-aware systems." Understanding your user-base, their background and objectives allows you to create a more optimized system for them to begin with.

Defining a main use case helps you send a clear message on how you want the user to interact with your application.Be sure to limit the secondary features that may distract from that main use case. Your main use case should be only a simple sentence: a subject and a predicate.

For this article let's say our example use case is:

"The user makes mail-order donuts."

Now, use your design skills to get them flowing through your application in a way that is optimal for the use case.

Provide Nets For Edge Cases

We have established a clear use case; the user makes mail-order donuts. But what happens if the user just wants to order icing or sprinkles from you? Or what if 22% of your users want to dip the donuts in gold and wear them as necklaces? You don't want your vision to be so narrow that you miss out on golden business opportunities.

It is important to be aware that users might want to interact with your service in these ways. Ways that you couldn't even dream of designing for. Therefore, your application needs to be able to accomodate for the unexpected user's demands; but how do you this while still designing only for the primary use case?

Nets

Many of your users who don't associate themselves with the main use case will still be able to see themselves benefiting from your system in other ways. Provide a net to catch them, and if appropriate, send them into a use case that is right for them. Employ intelligent metrics to gain data on your users' behavior and to identify places where you're losing users. Google Analytics provides some fantastic tools for tracking user errors; this Smashing Magazine article from 2011 offers a tutorial on how to take advantage of those tools.

Gracefully Degrade User Errors

Designing your application from the start to be context-aware is an important step. Putting nets in place to help you adjust the system to meet your users' expectations is another important step. But even if your system is optimized for a main use case and the nets are place, users will still encounter errors. It is inevitable.

In the process of Error -> Recognition -> Adjustment, we must do three things:

  1. Provide helpful error responses throughout the application
  2. Make errors seem less like failures on the user's end and more like cues for adjustment.

Error messages are often overlooked by designers or thrown in at the last minute without any styling or thought as to how they are presented and worded. Error messages are really your last tool in getting users to stay in your application - a vague 404 page, a failed form submission that doesn't explain exactly what caused the failure - these types of indiscretions will confuse and frustrate your users.

Use error messages to your advantage. Make them noticeable and make sure any part of your system where user input or action is required is equipped with proper error handling notices. Twitter Bootstrap is a beautiful UI Kit that will make this a lot easier for you; it offers you beautifully designed alerts that you can drop easily into your application. It provides simple, elegant error message styling:

And don't forget about rewarding your users for actions they complete successfully. After all, research shows that human brains respond more to success than failure! (ABC News article, Specific Brain Region Governs Problem-Solving Skills)

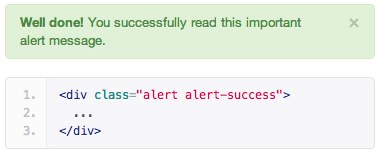
Twitter Bootstrap provides styling for success messages as well:

Well-designed and carefully explained error messages not only help teach users how to use the system as you intended, they also prevent users from feeling ignorant.

Designer Responsibility

The usability of a system depends on how well the designer does his/her job. The extent to which you understand your user-base, the methods you use to measure their actions, and the way you help them recover from errors directly effects the usability of your system. We all want to use beautiful, intuitive software. Now you can do your part to make that possible.

Categories
Tags
Author

Recently I was working on a project and wanted to be able to utilize Tidy to clean up some HTML output. I added the tidy_ffi gem to my project and voila, it worked! Or, to be more specific, it worked locally.

Once I pushed to Heroku I started running into trouble, namely that libtidy.so, the dynamically linkable native library that tidy_ffi depends upon, wasn't found. Uh oh.

Getting My Hands Dirty To Get Tidy

Before yesterday I knew about Heroku buildpacks in theory. I also knew that I really didn't want to have to use one to solve this problem. My first clue came in the form of a Stack Overflow post in which someone used Tidy on a Bamboo-stack application but was having trouble migrating it. Aha! Surely this will solve my problem.

So I rolled up my sleeves to do the kind of low-level work I usually try to avoid (while still trying to avoid as much of it as possible). I used heroku run bash to shell into a fresh Bamboo app that I created and then used SCP to copy out the libtidy.so file there. I added it to my repo, followed the instructions on the StackOverflow post, and pushed. And the app came crashing down.

Sha Sha

As it turns out, since the post was authored Bamboo and Cedar have diverged in their precise Linux installations. The versions are the same, the git SHAs are different. C'est la vivre. Now we turn to more complex solutions.

I knew that I would need to compile Tidy myself, but how? As it turns out, Heroku offers a tool called vulcan that allows you to create a build server in the cloud and compile binaries that are compatible with Heroku (because they're compiled on Heroku). After a few hiccups, I had my build server up and running, but now I needed to build from source!

Tidy is an old project. I mean, it's a really old project. It uses CVS as its versioning system. Unable to check out using CVS as per the project's instructions (I'm still not sure why this didn't work, but it probably has something to do with the fact that it was CVS), I instead downloaded a tarball from browsing the CVS repo on SourceForge.

Once I had the source, it was time to build it. Tidy doesn't have a typical structure for a buildable library, but after some experimentation I finally figured out the necessary incantations:

vulcan build -v    -s ~/Downloads/tidy    -p /tmp/tidy    -c "sh build/gnuauto/setup.sh && ./configure --prefix=/tmp/tidy --with-shared && make && make install" 

Some notes about what's going on here:

  • -s ~/Downloads/tidy was the directory into which I downloaded Tidy's source.
  • -p /tmp/tidy sets the prefix on the Heroku filesystem. Since Heroku apps can only write to /tmp this needed to be inside /tmp.
  • -c "..." I used the same prefix when configuring for make to build to the right directory. --with-shared gets Tidy to compile the .so files and not just .a files.

Once this command was run, vulcan downloaded a tarball containing the files I needed. Woohoo! I added this to my repo as lib/native/libtidy.so and I was ready to rock and roll!

Getting Up and Running

Further experimentation and frustration ensued trying to get everything just right but here's the Ruby code that finally got things working:

require 'tidy_ffi' if ENV['RACK_ENV'] == 'production'   TidyFFI.library_path = "/app/lib/native/libtidy.so"   require 'tidy_ffi/interface'   require 'tidy_ffi/lib_tidy' end 

Here we set the library path manually and throw in some extra requires that didn't autoload properly for some reason in production. After all that work my app was able to Tidy HTML like a champ!

So Long, Comfort Zone

While I'm comfortable plumbing the depths of any Ruby application I'm not actually well versed in solving problems like this. It was a chance to step outside my comfort zone and figure something out through trial, error, patience, and frustration. Knowing a little about how vulcan works is going to have me feeling more confident the next time I need a native library that isn't available by default on Heroku.

If you want to use Tidy on Heroku, you don't have to go through quite the same ardor that I did because you can download the Heroku-compatible libtidy.so file directly! Just add it to your repo, link it using the Ruby above, and have fun tidying up!

Categories
Author

Have a great idea? Do you daydream about founding a startup? Do you have the entrepreneurial spirit but don't know how to kickstart your vision?

Then join us on May 12th at the Artisphere in Arlington, Va for "A Day of Foster.ly" - an engaging event led by DC, Maryland and Virginia entrepreneurs, designed to empower startups, visionaries, innovative students and other aspiring entrepreneurs like yourself with the resources and information needed to get started and to succeed.

The event kicks off with a morning Study Hall session, (Study Hall is a collaborative co-working environment for entrepreneurial-minded people) and follows with an Entrepreneurship Research Expo, informative panels and demos, mentorship sessions with Angel investors and an exciting keynote from Aneesh Chopra, the first Chief Technology Officer for the United States. Finish the night with a seriously good after party in the ballroom featuring live music from Two Car Living Room and FatBackDC DJs Philippe & Steven, and exclusive movie screenings.

For those of you who may be interested in the nuts and bolts of running a web development company you won't want to miss the 4:30 pm panel, "Development & Design" in which Jurgen Altziebler, Managing Director of UX at Intridea, will be discussing tactics and sharing personal stories alongside other local industry-leading moguls like nclud, Sisarina, Viget and Whitmoyer.

Tickets are selling quickly, but there are a limited number still available for A Day of Foster.ly. Register today and set your future as an entrepreneur in motion.

Intridea partnered with Foster.ly this year to help bring events like this to the growing community of entrepreneurs in the DC area. We're excited to be a part of the work that Foster.ly is doing and we're looking forward to talking with many of you about design, development and strategy at A Day of Foster.ly and future Foster.ly events.

Categories
Author

Last week we sponsored MoDevUX, a mobile conference in Washington, D.C. led by vanguards in the mobile development and design industry. In addition to learning about emerging trends from the diverse crowd of presenters and attendees we also shared a bit of our own "secret sauce".

Anthony Nystrom, our Director of Mobile and Emerging Technologies, shared the stage with Jurgen Altziebler, our Managing Director of UX to tackle the topic of "Development and Design: When the Two Must Act As One".

Through cultivating a culture of quality in both design and development we've gained insights on the formula for success among teams of developers and designers. MoDevUX was an opportunity for us to share those insights with the greater mobile design and development communities.

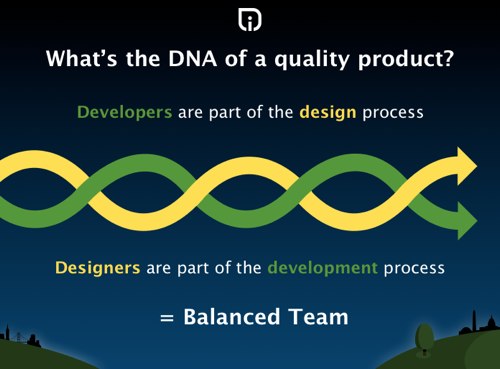
Designoper, Developer or Designer, the point is that recognizing each other's skills while sharpening your select personal skills is what a team is built upon. Certainly there are stars, however stars don't scale but teams most certainly do! And like any business that is looking to grow, it must rely upon teams that are less interested in their personal prowess and more interested in their unified presence.

Great Products: Under the Hood

If you're building a product you already know that it's important to know your industry, understand your users, define a clear vision and path of execution, and to be bold in your approach. But what role does your team of developers and designers play in the overall viability of your product?

We believe the DNA of any mobile or web product is embedded in the team(s) that are executing on the vision. Ultimately, every product is really just someone's good idea made accessible by teams of programmers and designers. Therefore, the most important factor in the success of your product is the team of experts building it. At Intridea we've been honing the process of creating these teams for years, and with great success! We do it in large part by making sure our teams of developers and designers are working together, not autonomously.

Building a Design & Development Team

Often, design teams work in isolation from development teams and in many cases design is outsourced to other agencies while development is done in-house or vice versa. But there's no doubt about it, a great product experience is the direct result of a good working relationship between the teams building the functionality (the developers) and the teams creating the aesthetic experience on top of that core functionality (the designers).

Of course, simply knowing that designers and developers should work hand-in-hand doesn't mean it's going to be easy. After all, designers and developers are different breeds and both groups work in distinctly mysterious ways. The trick to building solidarity in a product team is to hire the right kind of people in the first place.

While you might be inclined to seek out "rockstars" for your team, keep in mind that superheroes get bored easily, they're hard to find, and they don't scale. We have found that it's more advantageous to focus on hiring specialists who meet these requirements:

  • Have the skills (and attention span) to see a project all the way through (even that last 10%)
  • Are great at a couple of core things but are eager to learn beyond the bounds of their specialty (i.e., beware of "backend" developers who refuse to do "frontend" work)
  • Leave evangelism to theocrats: you want people who aren't afraid to use different technologies (whether they're cutting-edge technologies or older technologies that just happen to be the right tool for the job). Find people who love the challenge of creating something incredible regardless of the tools and processes used to get there.
  • Value form as much as function. It's important to see the inherent value in both a well-architected application and an easy-to-use, beautiful user interface.

In a symbiotic designer/developer relationship, both sides will, at some point, be faced with setting aside ingrained methodologies in order to collaborate effectively. What's actually happening in those cases is something like this: designers are learning something new about practice patterns in development, and developers are learning something new about user flow and experience from designers. When designers and developers work together in such a way, both teams gain something and will be more agile, productive and innovative on future projects.

Setting the Team Up For Success

Managing a product team is generally no easy task. Ask the design team to work in collusion with the programmers and it's sure to get even more challenging. Jurgen shared his strategy for creating a "balanced" team and setting them up for success on any project.

  • Team Building: This is an important first step. Assign an internal project (maybe a redesign of your company's website) to a developer and a designer. In this situation they will have to manage the project together, understand how the other one works, communicate in-depth about scope, features, and blockers on the project, and deliver a finished product.
  • Field Testing: Once you've ensured that the designer and developer can work together, pair them on a mid-sized client project. This adds a bit of necessary pressure because client deadlines are often more strenuous than internal deadlines. Additionally, a client project will introduce more variables for both sides. They'll have to think about things like client expectations, changes in scope and direction for both UI and architecture, and more.
  • Heavy Lifting: Now your designer and developer are battle-hardened and ready to lead the troops. Appoint this dev/design duo as the lead for larger projects that have multiple designers and developers. Their experience will aid them in helping other designers and developers work together, maximizing the results of the process.

But I Just Want A Good Product That Will Be Profitable

You have an idea. You need a product built. It sounds easy enough. Do you really need to spend all this time thoughtfully building the team behind the product?

In short, yes. Great products fail all the time; and not because there wasn't a good idea behind it. They fail because the teams building the products couldn't meet at that magic place - the precipice of awesome. (No, really - amazing things happen when designers and developers work together closely!)

Keep in mind, there isn't a lot of room for failure, especially in the mobile app market where users are educated and discerning and the competition is cutthroat. It's not even that users are "demanding" sexy interfaces and well-built applications - we're beyond that. Today, users just expect it. And if your product doesn't meet expectations your users won't even complain about it - they'll simply move on to another application that does it better.

These are problems that you rarely see when you have a team of designers and developers working closely on a product because simple issues like awkward user flow, unintended behavior within the interface, and architecture miscalculations are caught more frequently and earlier on in the process.

The Secret is in the Sauce

So there you have it - a sampling of our "secret sauce". TLDR: Hire smart people who value quality and aren't afraid to cross the "party lines".

Be sure to go through the complete slide deck from our presentation at MoDevUX, and check out our portfolio where you'll get to see some great examples of recent products and solutions built by our teams of designers and developers! Additionally, the full set of photos from the event is available on our Flickr page.

Do you have insights on helping designers and developers work together on projects? We'd love to hear it. Did you see our presentation at MoDevUX? We want to know what you thought. Leave your feedback below or reach out to us on Twitter.

Categories
Author

With the advent of high resolution “retina” displays, keeping bitmap images sharp and crisp on the web has meant using larger and thus more bandwidth-hungry images. At the same time, more and more people are browsing on mobile devices where bandwidth is at a premium.

One solution to this problem is scalable vector graphics (SVG) since they scale infinitely while keeping the file size low. However, now that web fonts are widely supported, symbol fonts like Dingbats or WebDings provide another option for tack sharp symbols used in icons or buttons. Fonts are also very flexible. For example, using CSS you can easily change the size, color, add drop shadows or other text effects.

But what happens when symbol typefaces don’t have the symbols you need? Well, make your own of course! Today I am going to show you how make your own symbol font using some freely available software and tools, which you can then easily embed in a web page and use in your design comps.

Here are a few things you will need before we get started:

  • Some SVG files - you will need some SVG symbols to embed in your font. I’ve included a zip file here with a few symbols to get you started. If you need more, the noun project is a great resource.
  • Adobe Illustrator - for preparing your SVG files (if you grab the ones I have included above, you can skip this step)
  • Inkscape - this is an open source vector drawing tool. It’s available for Windows or OS X. This tutorial will be showing the Mac version, but the Windows steps are almost identical.
  • The starter font file - download this blank font file from Github to use as your starting point.

Step 0: Prepare your SVG files in Illustrator

If you grabbed my sample SVG files you can skip this step, but if you are using your own vector images you will probably need to run them through Illustrator first. First, open your vector image and select it. Then from the menu select Object -> Compound Path -> Make. Finally, select File -> Save As for format select SVG (svg) and then save it somewhere you can easily find it. An SVG Options window will popup, just leave the default options and click OK.

Step 1: Get Inkscape ready

Open the starter font file in Inkscape. Go ahead and save it with a new name, I’m calling mine awesomesauce.svg. Next, from the Text menu, select SVG Font Editor. This will enable the font editor pallet on the right side. Your window should look like this:

Step 2: Font family name

In the SVG Font Editor on the right hand side of the window click on font 1 so it is highlighted. Then, in the Family Name text box, give your font family a name. Again, I’m using awesomesauce.

Step 3: Import a symbol

Now it’s time to add the first symbol to our font. From the File menu, select Import. Select the svg file you want to add to your font. I’m going to select intridea.svg (what symbol font would be complete without the Intridea logo?).

Step 4: Size the symbol

Now we need to size the symbol. It’s good to keep all your glyphs a similar size. Experimenting has shown me that keeping them about 750px high in Inkscape will keep them roughly the same height as a capital letter. In the top tool bar, click the Lock icon to lock the aspect ratio and manually enter the hight as 750px.

Step 5: Position your symbol

Positioning the symbol is also very important. Move the symbol to the bottom of the work area. You can do this easily by entering 0px in the Y box on the toolbar. Then, center the symbol (you should see a centered guide line to help you, and you can use the arrow keys for minute adjustments). Once you have it sized and positioned properly, it should look like this:

Step 6: Add a symbol

Now it’s time to add the symbol to your font. Make sure the symbol is selected by clicking on it (it should have a box around it). Over in the SVG Font Editor palette, click on font 1 then click the Glyphs tab. Then, select glyph 1 a so it is highlighted and finally, click the Get Curves from selection button. This will assign that shape to the selected glyph. In this example, the lower case a.

Step 7: Test your font

You can test if it worked by entering a lower case a into the Preview Text window. If it worked, you should see the Intridea logo in the preview area!

Step 8: Rinse and Repeat

If you are happy with your symbol you added, delete it from your work area and repeat steps 3 through 7 adding each symbol to a different glyph. When you are done, save your file and head to step 9.

Step 9: Convert to a TrueType Font

Next we need to convert this to a usable font. So head to http://www.freefontconverter.com/. Click the Chose File button and browse for your file you saved in step 8. From the Select a format to convert to: select ttf(TrueType) and click the Convert button. Your browser should download your new font file.

Step 10: Generate a @font-face kit

In this step we will generate a font-face kit that is compatible with almost all browsers. The downloadable kit features great instructions on using your font on the web. Head on over to the Font Squirrel font-face generator. Click the Add fonts button and select your TrueType font from step 9. Select the Optimal setting, agree to their terms and click Download Your Kit.

You did it!

Open up the folder you downloaded in step 10. In the folder, you should see a .ttf TrueType font. In my case, it’s called awesomesauce-webfont.ttf. Double click it to open the font and install it. Now your font is available anywhere in your OS to use in your design comps!

In the folder you will find an HTML demo file from Font Squirrel. In my example, it is called awesomesauceRegular-demo.html. Open this file in a browser. It will show your font as well as provide instructions on embedding your font in a web page. Also, be sure to check out Pictos for some more info on using icon fonts.

Categories
Author
Subscribe to