Mobomo webinars-now on demand! | learn more.

/design-etiquette As designers we know that our work is successful when it is not only beautiful but also when it is useful. That’s why when working we should always keep in mind other individuals that might need to access our design files - which means... stay organized! Our files should be structured and organized for easy access. In the end it doesn’t matter which software you are using but for the purpose of this article I will use Photoshop as an example so I’ll mention PSD files and smart objects. We have outline some basic design etiquette rules that should help you to avoid issues when someone like a developer is trying to access your files.

File Handling

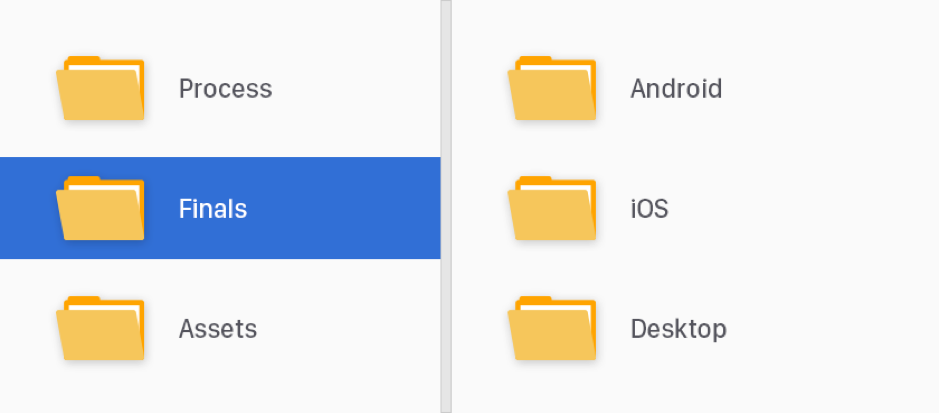
It is that time on the project when you have set aside a day or two to organize the files you’ve been working on so they are organized for the asset handoff (most times to the developer). So the first rule is to always have everything accessible and uploaded - set yourself a reminder for the end of the day to remind yourself to upload the latest to your file folder. Let’s start by saying that organizing files for asset handoff shouldn’t be that tedious and hopefully everything is in the cloud server where you and your colleagues saved it and that no one forgot to upload the last piece they were working on. As designers we work with project managers, developers, and clients during the course of the project - as we all know everyone tends to work differently and may be particular about file organization. The folder structure you use is mostly a personal preference especially when working alone but when others are involved it can be helpful to collaborate to find out if there are expectations of the folder structure. During this initial collaboration we find it helpful to discuss pros, cons, ideas as to how everyone expects it to work. Make sure you, as a designer communicate to the team to let them know how you’ll manage the files - and make sure to listen to feedback when deciding on naming conventions and exporting assets. /design-etiquette
File Naming

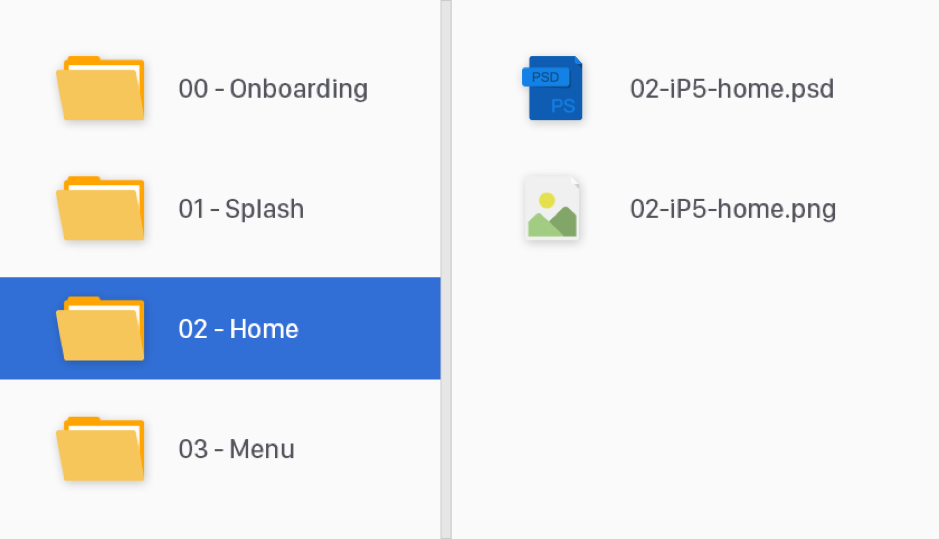
Choose a convention and stick to it.  When working on a project, decide early on how you’ll name your files and folders. Pick an order for the folders, use dashes or underscores (not both) and never use spaces and decide on using uppercase or lowercase. You should talk with the developers and learn what makes more sense, for example, when working on Android it’s recommended to use underscores. For some, dashes work better than underscores because it’s easier and quicker to edit the name of the file, improves the readability and if it is an exported asset dashes are recommended for SEO optimization. /design-etiquette
Layers

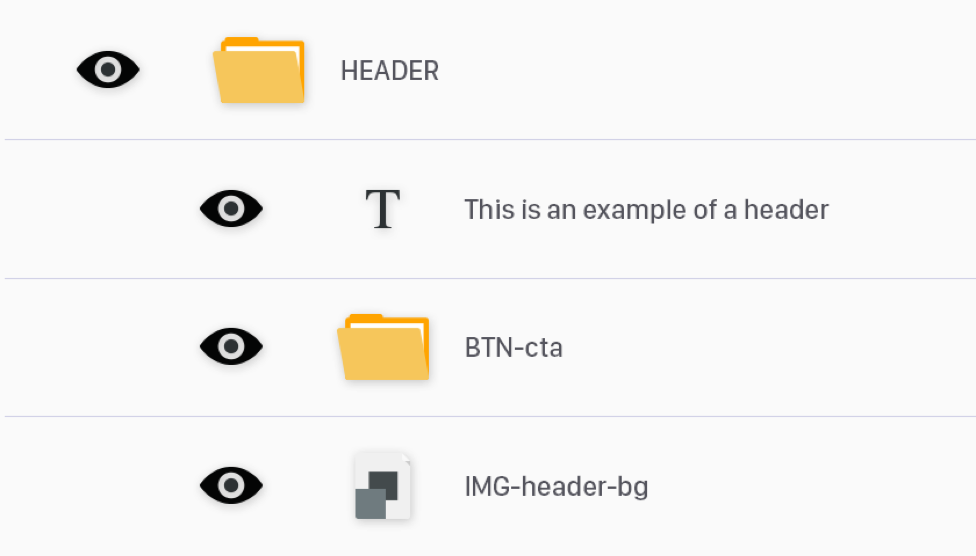
Always name your layers. It can be a group or an individual layer, no one should waste time hiding and unhiding layers to know if that shape “Rectangle 3” is the one you need to export. The last thing you want is to have to go back, rename and delete those unused or dated layers when preparing a file for a client or for a teammate. Don’t be a layer hoarder, there are many useful scripts and plugins that can help you with this task. It’s recommended to arrange everything by section, header, body, aside, footer, etc. It will make it easier to navigate the contents - before closing that file, collapse all layers, so the next person that opens it, can see the structure at first glance. Be smart, use non-destructive edits when working on images, that means use smart objects and masks, and don’t apply the same to 10 different layers optimize your workflow, group them and use just one mask if possible. Globalize common elements, use linked smart objects either to a .psb file or use CC libraries, and symbols in Sketch. Use blend modes carefully and know your strokes - it’s not the same effect if it goes outside, inside or centered. Tip*** be aware of the light source when using blending modes, you want to have a consistent light source it will make the components more realistic. /design-etiquette
Icons and Images

When working on icons, it’s best if you use a shape instead of bitmap or a smart object for a vector file can work as well. The reason being- a bitmap does not scale correctly so you will not get the proper pixelation which leads to poor visual quality. Try not to color them using blend modes, people should be able to get hex values from layer properties and that will make it faster to edit the color as well. When working with images such as stock photos make sure you purchase them especially if the product is ready for production.

Type

Use text-boxes when you’re writing a paragraph and make sure the box is not longer than the actual text. It can make it difficult to select things that are behind it and can lead into frustration and then it becomes a waste of time. Make sure you use proper alignments, headings and lists elements should have their own text-box. Use CC libraries character styles to maintain consistency. Be sure to include all the fonts used in your project that are (or should be) in the assets folder especially when using licensed fonts. These folders should be in the same directory as your design files.

Assets and exporting

Be aware of screen resolution and density. Your images should be optimized either for web, print or wherever your files will be used. When working with web images, they tend to be much larger in size, so image optimization should be a priority. This will allow for faster loading on a desktop, and remove the data concern from mobile users loading an image heavy site. There is online image optimization software but you should know how to get the best image from Photoshop. It is important to keep in mind that 80% of file quality will look closely to the same image at a 100% but the file size will be considerably smaller. As a designer, it is key to keep your files organized. This was only a short list of recommendations - be detail oriented. As mentioned before, it takes discipline but it will make everything faster and easier in the long run for you and others.  


Other sources that we found valuable for a second opinion of design organization are: https://www.smashingmagazine.com/2011/08/the-lost-art-of-design-etiquette/ https://www.photoshopetiquette.com    

Categories
Author

/iphone-app-store-checklist

Submitting your app to the App store can be confusing and oftentimes a difficult process to navigate. Developers run into obstacles all the time when submitting the app.

Our developers have a basic checklist which has saved many headaches and prepared us for the ultimate app approval:

  1. Company Name* : (If this is your first time uploading an app to the app store, and you enrolled as an individual developer, you'll be asked if you want to set a Company Name. Think carefully about this - once you set it, you can NOT change it without calling Apple and going through their phone support line. If you set a company name then all of your apps will show it.)
  2. Default Language*:
  3. App Name*:
  4. SKU Number: Developer can add this, just a unique combination strings is enough
  5. Availability Date*: (The date your app will become available on the App Store.): Date selector available, we can select current date
  6. Price Tier*: (Free / Tier 1 (0.99) / Tier 2 (1.99) / Tier 3 (2.99) etc)
  7. Discount for Educational Institutions*: (YES/NO)
  8. Custom B2B App*: (YES/NO)
  9. Version Information
  1. Version Number*: By default, initial version will be 1.0
  2. Copyright*:  The name of the person or entity that owns the exclusive rights to the app, preceded by the year the rights were obtained (for example, "2013 Mobomo LLC.").
  3. Primary Category*: (pick a category from the list)
  4. Secondary Category (optional): (pick a category from the list)
    1. Category List
  1. App Rating*:   (For each choose N) none, I) infrequent/mild, or F) frequent / intense)
    • . Cartoon or Fantasy Violence          
  1. Realistic Violence          
  2. Sexual Content or Nudity          
  • Profanity or Crude Humor          
  1. Alcohol, Tobacco, or Drug Use or References          
  2. Mature/Suggestive Themes          
  3. Simulated Gambling          
  • Horror/Fear Themes          
  • Prolonged Graphic or Sadistic Realistic Violence         
  1. Graphic Sexual Content and Nudity
  1. Metadata:
  2. . Description*:

(This is an example of what Gallup submitted)

Stay connected with your clients and manage your coaching sessions with the Gallup Exchange app.

Gallup Exchange is Gallup’s premier online service for executive, business and life coaches to expand their businesses by providing coaching services to a growing marketplace of global CliftonStrengths customers in need of coaching.

Use this app to:

  •       Read and respond to message from current and potential clients.
  •       View upcoming coaching sessions.
  •       Manage coaching sessions by paid and scheduled status.
  •       Review scheduled session details and client information.
  •       Receive notifications for new client inquiries.
  •       Receive notification reminders for upcoming coaching sessions.
  •       Modify Gallup Exchange profile details.

NOTE: You must be a coach on Gallup Exchange to use this app.

For more information, visit gallupexchange.com.

JOIN THE CLIFTONSTRENGTHS MOVEMENT

To date, more than 15 million people have discovered their CliftonStrengths! And thousands more are joining the movement every week.

These managers, leaders, students, teachers, coaches and individuals of every walk of life are uncovering the benefits of living a strengths-based life.

Now you can discover what makes you unique and powerful. Start focusing on what you do well -- your strengths -- instead of fixating on your weaknesses.

Learn more about CliftonStrengths at gallupstrengthscenter.com.

  1. Support Email Address:
  2. Support URL: A URL that provides support for the app you are adding. This will be visible to customers on the App Store.     
  3. Marketing URL (optional): A URL with information about the app you are adding. If provided, this will be visible to customers on the App Store.         
  4. Privacy Policy URL (optional): A URL that links to your company's privacy policy. Privacy policies are recommended for all apps collecting user or device related data, and required for apps that offer auto-renewable or free subscriptions, or as otherwise required by law.           
  1. App Review Information
    • . Contact Information: The person in your organization who should be contacted if the App Review team has any questions or needs additional information.
      1. First Name*
      2. Last Name*
  • Email Address*
  1. Phone Number *
  1. Review Notes (optional): Additional information about your app that can help during the review process. Include information that may be needed to test your app, such as app-specific settings and test registration or account details. The Review Notes field must not exceed 4000 bytes.
  2. Demo Account Information (Optional): The username and password for a full-access account. This account is used during the app review process and must not expire. Details for additional accounts should be included in the Review Notes field.
  1. EULA: If you want to provide your own End User License Agreement (EULA), click here. If you provide a EULA, it must meet these minimum terms. If you do not provide a EULA, the standard EULA will apply to your app.
  2. Images:
    • . Large App Icon: 1024x1024 Icon: A large version of your app icon that will be used on the App Store. It must be at least 72 DPI, in the RGB color space, and 1024 x 1024 pixels (it cannot be scaled up). The file type must be .jpeg, .jpg, .tif, .tiff, or .png. It must be flat artwork without rounded corners.
  1. Screenshots for 3.5” Retina screen: Screenshots for 3.5-inch iPhone and iPod touch Retina display must be 960x640, 960x600, 640x960 or 640x920 pixels, at least 72 DPI, in the RGB color space, and in the JPG or PNG format.
  2. Screenshots for 4” Retina screen: Screenshots for 4-inch iPhone 5 and iPod touch (5th generation) Retina display must be 1136x640, 1136x600, 640x1136 or 640x1096 pixels, at least 72 DPI, in the RGB color space, and in the JPG or PNG format.
  3. iPad Screenshots:iPad Screenshots must be .jpeg, .jpg, .tif, .tiff, or .png file that is 1024x768, 1024x748, 768x1024, 768x1004, 2048x1536, 2048x1496, 1536x2048 or 1536x2008 pixels, at least 72 DPI, and in the RGB color space.

Routing App Coverage File (Optional):Routing app coverage files are .geojson files which specify the geographic regions supported by your app. The file can have only one MultiPolygon element. MultiPolygon elements consist of at least one Polygon. Polygons contain at least four coordinate points. Polygon start and end coordinate points must be the same.


Are you having issues getting your app approved? Get in touch and we can help out!


Categories
Author

Keyboard

Descriptive and consistent naming makes software easier to read and understand. We use the Swift naming conventions described in the API Design Guidelines. We find Ray Wenderlich swift style guidelines valuable, below are some of his main takeaways that we incorporate into our work.

Prose

When referring to methods in prose, being unambiguous is critical. To refer to a method name, use the simplest form possible.

For the above example using UIGestureRecognizer, 1 is unambiguous and preferred.

Pro Tip: You can use Xcode's jump bar to lookup methods with argument labels.

AppDelegate

Class Prefixes

Swift types are automatically name spaced by the module that contains them and you should not add a class prefix such as RW. If two names from different modules collide you can disambiguate by prefixing the type name with the module name. However, only specify the module name when there is possibility for confusion which should be rare.

import SomeModule

let myClass = MyModule.UsefulClass()

Delegates

When creating custom delegate methods, an unnamed first parameter should be the delegate source. (UIKit contains numerous examples of this.)

Preferred:

func namePickerView(_ namePickerView: NamePickerView, didSelectName name: String)
func namePickerViewShouldReload(_ namePickerView: NamePickerView) -> Bool

Not Preferred:

func didSelectName(namePicker: NamePickerViewController, name: String)
func namePickerShouldReload() -> Bool

Use Type Inferred Context

Use compiler inferred context to write shorter, clear code. (Also see Type Inference.)

Preferred:

let selector = #selector(viewDidLoad)
view.backgroundColor = .red
let toView = context.view(forKey: .to)
let view = UIView(frame: .zero)

Not Preferred:

let selector = #selector(ViewController.viewDidLoad)
view.backgroundColor = UIColor.red
let toView = context.view(forKey: UITransitionContextViewKey.to)
let view = UIView(frame: CGRect.zero)

Generics

Generic type parameters should be descriptive, upper camel case names. When a type name doesn't have a meaningful relationship or role, use a traditional single uppercase letter such as T, U, or V.

Preferred:

struct Stack<Element> { ... }
func write<Target: OutputStream>(to target: inout Target)
func swap<T>(_ a: inout T, _ b: inout T)

Not Preferred:

struct Stack<T> { ... }
func write<target: OutputStream>(to target: inout target)
func swap<Thing>(_ a: inout Thing, _ b: inout Thing)

Language

Use US English spelling to match Apple's API.

Preferred:

let color = "red"

Not Preferred:

let colour = "red"


Categories
Author

App icon

Some may be familiar with app icons but for those who are not, an app icon is the icon graphically representing an app in your smartphone (for launching it, managing it or previewing it in the store). The artwork has to be a certain size, most of the time it is rendered at a dimension of 1024×1024 to be exact. It is fair to say that a design can determine the success of your product. When you have a design that is not good it will more than likely effect the success of your product. It is super important that you think about some of the design aspects before you launch your app - you want to make sure that your design is perfect and will stand out from the rest of the competition. There are some important aspects we want you to remember when thinking about designing your app icon. Lets focus on characteristics found in the design of an app icon and what you can do to make your app icon stand out from the rest.

Branding

Your brand is the single most important part of your company. Your brand identifies who you are, what your company believes in, the services or products that your company may offer and much more. Often times your logo (the symbol of your company) is used to represent the company in various situations like a letterhead or your social media “default picture”. It is important to remember that your app icon is not your logo. The app icon is the visual representation of your product (what is inside the app) that appears in a tiny space on your screen. We are not saying that the design of the actual app should avoid any of the company’s branding guidelines - you should follow its colors, graphic styles, text styles and even tone in order to best align to the bigger “brand” picture. The best advice we can give is... do not use your company logo for your app icon and make sure the app icon design is consistent with the look and feel of your application.

Be Concise

We have all heard the saying less is more, and this saying can very much so be applied to design as well. As we all know the size of the canvas is restricted and the renderings of the app icon can be as small as the settings panel. It is important to keep the core design elements relevant to the app, leave out excessive detail and do not try to apply two or more different concepts in the same space - your design will look over complicated, too busy and it will be confusing for the user. Think about your favorite app, I am willing to bet that it has good functionality and an appealing design. The app icon is the first impression that the user will have, they will see the app icon before they even open the app. It is important that your design is concise and can tell the user what the app will offer by their design illustration. 

Identity

There is nothing more disappointing than searching for a specific category in the app store to only find a million app icons that look the exact same, you feel like you are looking at the same app over and over again. Any app icon that can stand out in the app store as well as among installed applications will get the attention of the user. If you can catch the eye of the user, you have a better chance of the user downloading your app which then leads to the user engagement. Even though established patterns of navigation and screen flows ease the user experience, having a recognizable and unique appearance is what distinguishes apps from one another. Users would have no trouble identifying the apps they love most if they are presented with just a screenshot of the app icon because the user has a connection with that app and can instantly recognize the app icon as a result. The combination of color, layout, elements on the screen, and function is the main separation of the app identity. Bottom line, there are many elements that go into designing a great app icon for your company. When you are competing in the app store it is especially important to have your app icon stand out from your competitors. We take design very seriously and we understand the importance of your app needing the best in class design in order to succeed. Do you have questions about how your app is performing based on your current design? Get in touch so that we can give you a free design consultation.

Categories
Author

Flat design is no longer a trend but a design language that is best used for user interfaces in the digital realm. For some time interactions with the “black mirror” features a cleaner style that does not need resort to real world metaphors like raised buttons, textures, shadings and shadows. Everyone knows that the touchscreen is meant to be touched and most apps or websites contain certain actions that we as users are supposed to take. Flat design is a step ahead in terms of readability because screens are not always in the highest retina display resolution. It feels natural for the system to find its own graphic language that’s not mimicking physical objects but it has been observed that some users can have a hard time recognizing actionable elements within flat designed interfaces. A radical expression of this style may leave a bunch of users clueless about what they can do within the app or website. Operative systems’ design languages do offer some design elements like shadows in order to imaginarily place elements at different depths of the screen. The challenge of a purely flat interface design is making sure you (the designer) are making the user understand which items are meant for interactions - be deliberate with the shapes, colors, and margins.

How can we tell when something is actionable?

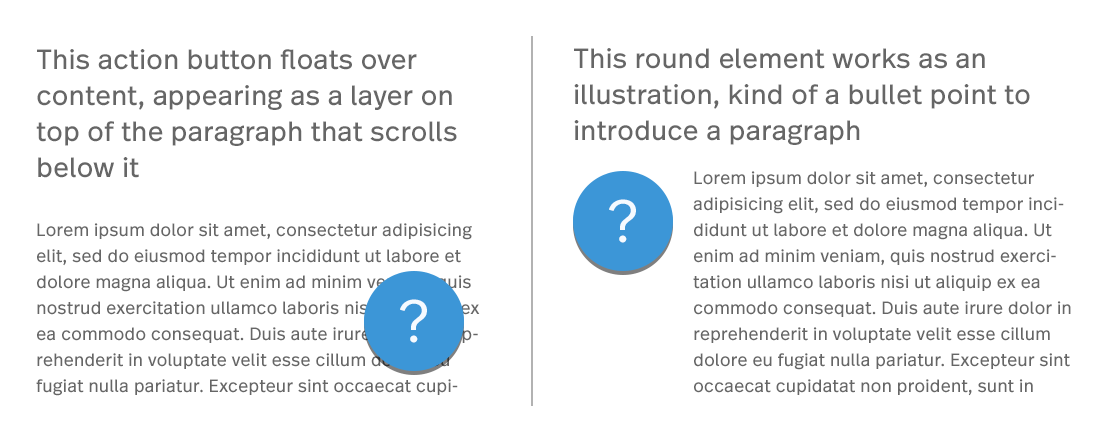
If we are going to keep the design strictly flat we will need color and context. For the most part the content, aside from images or videos, will be dark text over a white (or bright) background. Of course we are keeping it simple here, it could be the other way around (bright text over dark BG) or even color blocks where the text has enough contrast. But typically the first case is the better option for readability. Let's start by talking about buttons. The most clear call to action button is typically words that are on a button that indicate what your user should do by clicking on that button. The call to action is typically a word or short sentence expressing an action - enclosed in a flat colored rectangle shape (no matter how round or square its corners may be). Buttons   If the button has a strong color accent on the screen, its place as a CTA (call to action) is evident. As seen in the figure above it is possible to have style variations for secondary actions that we don’t want to emphasize, as well as disabled actions (as long as there is something the user can do to enable them). It’s important that the “air” around the word is enough for the element to be recognized as a button, but not that much for it to end up being a huge color patch on the screen (which starts to defeat the original purpose of playing along with content). We can see in figure 2 below that by using the exact same style but minimizing the margins around the word the element loses its button purpose. If it is used that way the call to action still poses an actionable property, maybe as a selectable item with on/off states or an item that is draggable:   Buttons Other buttons that are flat with no words may be useful for some situations even if they are less evident for the user. The trick for those is to have an action related to their context and visually be in the correct position. We can see in the next image below that the same round element can play different roles depending on its placement in relation to the content on the page. Google’s material design guidelines feature the “floating action button” which floats above the content carrying the main action intended for that screen. /user-interface-flat-design Icons have a similar two-face behavior. They can either be an active element to interact with and perform an action or an illustration supporting and decorating a message resulting in no user interaction whatsoever. /user-interface-flat-design Back to my original point, context is everything - once the context is in place, the user experience typically follows as to what action you should or should not take. Through users' past experience with navigating different digital platforms the user will quickly identify the icons on the top and bottom borders of the screen are a means of navigation. Normally icons over a certain size that are placed just above or to the left of a paragraph serve as an illustration element. Other positions and size ratios invite the user to interact as it becomes apparent they represent actions related to the piece of information that precedes. While not always depicted in color, we can see here the contrast color helps to distinguish them as something actionable: /user-interface-flat-design Tabs, fields and dropdowns pose less trouble- they do have a similar style because they have been a part of UIs for a long time. Their typology is strongly installed in users minds however, fields are the most striped down ones of the group, sometimes styled in a really minimalist manner. For example, imagine a line acting as a row with a label above it mentioning the expected input.   A rule of thumb for fields is that the labels should be aligned to the left since we type and read from left to right so the text input is prepared for the content it expects. That would be one of the main aspects that help reveal their function because as we can see in the following deliberately inflated examples the line dividing one type of element from the other can be very thin, coming all down to type style and alignment: /user-interface-flat-design Flat design is the standard today, but as technology evolves devices transform and new type of design interactions are needed. Due to graphic resolutions and computing power growing higher each product generation we are seeing subtle but powerful graphic effects starting to get into the mix. There’s always a learning curve for users, but as designers we should at the very least not stand in their way!
Categories
Author

Collaboration What is DevOps?

DevOps combines cultural philosophies, practices and tools to deliver products at a high velocity. Instead of inverting the traditional functional separation between developers, QA, and operations we enable cross-functional technology teams that promote collaboration rather than tension. By promoting team collaboration it results in valuing the repeatability of processes and eliminating single points of failure. It advocates thinking of infrastructure as part of the application and allows for more rapid and reliable software release cycles.

How does Mobomo do DevOps?

Mobomo extends the same agile, iterative development model we use for design and development into our DevOps architecture services. We embrace a fully automated, repeatable, testable deployment process that allows for rapid integration of code and 100% environmental consistency, mitigating the risk of surprises once your app is in production.

Benefits of DevOps: 

  • Faster time-to-market due to rapid release cycles. DevOps allows multiple releases per day.
  • Infrastructure can be demand-responsive and right-priced using cloud tools like auto-scaling and reserved instances.
    • Full transparency into cost-awareness allows for increased operational intelligence.
  • Dramatically lowers failure rate in production because testing is consistent across environments.

Processes

  • Allows application of Agile/Scrum development methodologies to infrastructure.
  • Continuous Integration/Delivery (CI/CD)
    • Code is deployed incrementally as often as possible using a fully-automated build/test/deploy process.
  • Test-Driven Development (TDD)
    • Developers write automated tests first before the code to satisfy them.
    • All tests are then run on each release to identify functional regressions.
    • Integrates developers more fully into the QA and release process.
  • Microservices and Containerization
    • Each modular component of an application is designed as a standalone service, avoiding the “monolith” approach.
    • Allows functionality to degrade incrementally in the event of a bug rather than the entire application failing.
    • Eliminates “spaghetti code” and makes applications more maintainable and future-proof.
  • Graceful Failure
    • Assume that failures will happen in production, so simulate them as part of application testing.
    • High Availability: Eliminate all single points of failure in infrastructure with load balancing, clustering and other tools. (Horizontal vs. vertical scaling.)
    • Automate disaster recovery so that infrastructure becomes self-healing.

Tools

  • Cloud-agnostic: Multiple engineers certified in Amazon Web Services; also experienced with Azure, Rackspace, and OpenStack.
  • Infrastructure: CloudFormation, Terraform, Docker, Vagrant
  • Provisioning: Ansible, Chef, and Puppet
  • CI/CD: Jenkins, TeamCity and CircleCI
  • Monitoring and Notifications: CloudAware, CloudCheckr, Nagios, DataDog
Categories
Tags
Author

Apple desktop Mobile apps have become such an ubiquitous item that it seems everyone imaginable has one, literally everyone… even Barilla pasta has an ‘iPasta” mobile app. The question is what sets mobile apps apart from the OK from the GOOD from the GREAT?

Designing a great mobile app is no simple task and it’s more than just what the app “looks like”. We have compiled a small list of helpful tips to think about while you make your next mobile app. 

Execute one thing, really well

Ok so obviously.. Right? Everyone wants and needs to execute something in order to be successful. Being able to have a functionality that you can execute on really well is the foundation for all great apps. Think about Netflix, Uber or Dropbox-  they do ONE thing really, really well. They each became extremely successful by not over complicating their purpose, Netflix: watch a movie/TV show, Uber: find a ride, and Dropbox: access your files from anywhere. Each started with a single purpose and each grew to become much more than that.

To be truly successful you need to focus your energy on making sure your product does one thing perfect. Whether that’s showing people where the cleanest water fountains are in the city, or rating their favorite libation. Our suggestion would be to start small and then add features to your core application once you have established what you are and what you want to be.

Solve a user problem

If your application doesn’t solve a need that people currently have it will never be successful. The market is flooded with apps that do little to nothing at all for the people who download them. If a user doesn’t see benefit, well more times than not the user will delete the app. Users are looking for something out of your app- you need to be able to give them something in return.

People have little to no time to spare on your product, so creating something that can save them time, or give them some time back will make a huge impact. Apps like Operator, which offer on-demand “concierge” type services for buying products are on the front line of a new wave of app design. By allowing people to shop with a simple text request you can save someone hours of site browsing, allowing them to spend their time doing things that matter most to them.

Consistency

Making sure that your app has the same feel throughout does several things. It ensures that a button designed on one screen looks and acts the same on every other screen it appears on. It adds a level of polish to your finished product that makes it more professional, and it establishes an interface pattern that allows users to recognize similar elements on different screens. Without consistency in your application users will get frustrated and annoyed.

User experience

At Mobomo, we take user experience seriously. We make sure that all of our designs are user centric. You need to account for things like empty states, error pages, users who are less savvy, physical and technical limitations,etc.

The best way to make sure your application meets these requirements is to ensure that your discovery and IA phases dive deep into what your users are expecting to get out of your product. Make sure that their needs are being met, and that your business needs are aligned with their expectations. Doing things like user testing and user interviews will help you to get to a place where you can truly understand what it is that your users want.

Lastly, make sure you’re listening to the people using your product. Take their feedback seriously, listen to what they’re saying and refactor your application to meet their needs.

Pleasing visual design

While visual design is far from the only part of your application, it still ranks as one the most important. An aesthetically pleasing product is like having a well manicured lawn in front of your house, it’s the first thing people see and can either drive them to explore further, or turn them away entirely. Recently the Nielsen Norman Group released an article stating that users are actually more tolerant of minor usability issues if the application or product is visually appealing.

Fast and reliable

Last on the list is the optimization of your application. Make sure that your code is written as concisely as possible, fixing any bugs that arise as soon as possible, and making sure any bitmap assets are as compressed as possible will help to keep your product running fast and smooth.

Now it will take a little more than just this list to create a well designed mobile app, but this is a pretty solid foundation, and one we follow here at Mobomo on our projects. We’d love to hear from you about your thoughts on the subject too, what steps you take and any tips you might have.

Categories
Author

CEO of Mobomo Named as Industry Chair of Advanced Technology Academic Research Center

Washington, D.C. --- Mobomo, LLC, headquartered in Washington, D.C., is a premier mobile-first web and mobile application design and development company that has extensive experience in working with federal agencies and commercial enterprises. Brian Lacey, CEO of Mobomo was recently named as the Industry Chair for the Advanced Technology Academic Research Center (ATARC) Mobile Customer Experience Working Group.

The ATARC Mobile Working Group is a technical working group of government, academia and private industry thought leaders collaborating on topics of interest to the Federal mobility community. The group’s goal is to provide the Federal Government with recommendations for methods to increase efficiency and reduce cost using cutting-edge mobile solutions.

“I am thrilled to be named an industry chair for ATARC. There is always work to be done to customer experience technologies and techniques to improve the public-facing mobile applications,” says Brian Lacey, CEO at Mobomo, LLC.

Mobomo specializes in working with government agencies helping enable technologies and improve the way they serve and engage with users. Not only does this benefit the user but agencies are seeing benefit through cost savings.


Categories
Tags
Author

Keyboard

A couple of days ago I was raving to a QA tester about one of our automated browser testing initiatives at Mobomo and how it could greatly benefit the quality assurance field as a whole as well as free up time for our manual testers. I was surprised to get a response along the lines of, “Yeah…  so we can automate ourselves out of a job.”

Regrettably, there are hundreds if not thousands of jobs that are lost per year due to automation - leaving many people in a frantic to either start looking for a new job or even a career. Based off my time in the software industry I have found the opposite for QA Testers. In my defense, I delivered a handful of informal reasons on "how automated testing protects QA testers" to reassure us all that we won’t be out of a job (or career) anytime soon.

If your company is taking an initiative to implement automated testing, they will most likely seek to upgrade your skills:

Manual testers generally have the best overall view of functionality for an application. They know the areas that are most prone to breaking, understand the general flow of the application, and they work with all team members in order to ensure the application is in a production-ready state. A reliable company will see the value these individuals bring to the table and will find it worth seeking the people with the most hands-on experience to begin their automated testing initiative.

Develop more skills, putting you into higher demand:

My ability to think like a programmer has been the most lucrative skill I have obtained so far. The capability has instilled logic that has allowed me to have a more clear understanding of the world around me. I am able to make better decisions in life and take action sooner by simply understanding the philosophy behind programming and overcoming the fear of learning it. Besides, burning glass reports that 49% of all jobs paying $58,000 or more requires some form of coding skills… if that isn’t demand, then I don’t know what is.

Efficient testing leads to more productivity:

In the realm of automated testing everything is written in code, meaning that a computer will interpret a set of instructions in a static state that will be executed at the speed of light. Now the human brain is roughly 30 times faster than the best supercomputer, but the combination of neural activity with deciphering instructions and using motor skills to fulfill these instructions severely hinders your ability to be productive. Now that tests are being written in code, you can execute tests without being present, freeing up your time to assist coworkers or close out other issues.

Tests-as-Code:

This allows you to dot your i’s and cross your t’s - making you more valuable to coworkers.

Since code is static by nature, the tests you have created over time won’t change unless you manipulate your code. This innate ability allows you to scale a suite of tests covering the whole application without having to worry about writing them again unless your application changes to the point where some tests may not be the best fit. If this situation happens you may try and upgrade your suite of tests ensuring that your application stays stable on every code change.

Hopefully I have reassured some of you on automation in the QA world. I recommend learning how to use selenium -  a free open-source tool for automated browser testing. Another great source is YouTube, where you can essentially find anything and everything on automated testing if you search correctly.

Remember, automated testing is one of the greatest opportunities for a QA tester - it’ll save you time, increase your skill set, increase your test accuracy, and ultimately keep you moving forward in your career.


Categories
Author

We were thrilled to do a Q & A with App Developer Magazine on Agile Scrum Methodology. Check out the piece below.

What is Agile Development Methodology?

Mobomo: The Agile Methodology is an alternative approach to project management that places emphasis on collaboration, iterative development and evolving requirements. It’s governing principles, commonly referred to as the Agile Manifesto, place focus on team interaction, customer involvement and adaptability to develop high quality products.

Who uses Agile scrum development?

Mobomo: While Agile is most commonly associated with software development, it’s leveraged across many industries in both the private sector and government and is not limited to just software. From General Motors and Spotify to NASA and the Department of Homeland Security, Agile can be applied to solve some of business’ most challenging needs.

What is the process of Agile scrum development?

Mobomo: Scrum is subset of Agile development that organizes a project in a consistent process that is repeatable each iteration of the project lifecycle. The most widely used Agile practice, Scrum is ideal for managing complex software and product development as it enables organizations to more easily adapt to rapidly-changing requirements. Scrum also provides a better framework for estimating tasks and measuring productivity, thus allowing for managing the project schedule more effectively.

What are the key positions and what are they responsible for during process? (Scrum master, product owner etc.)

Mobomo: Within the Agile Scrum framework, the key positions and their role within the project are as follows:
Product Owner: The Product Owner is the main stakeholder in an Agile Scrum project who is committed to ensuring the vision of the project is reflected in the final product delivered without impeding upon the Agile Scrum process. The Product Owner assists in transcribing the product vision into well-defined development user stories and prioritizing the user stories to be worked on by the Development Team.

Scrum Master: The Scrum Master is the facilitator for an Agile Scrum Team, managing the process by which information is exchanged amongst members of the team. The primary responsibilities of the Scrum Master are to help the team determine what can be achieved during each iteration cycle, manage the daily scrum meetings, keep the team focused by removing obstacles to their progress and protecting the team from outside distractions.

Development Team: The Development Team, or Scrum Team, is a collection of individuals responsible for all work delivered to the customer. The team works together each iteration, or sprint, to incrementally deliver working components of the product.

How do federal projects benefits from using Agile scrum development?

Mobomo: Within the Federal Government, implementing the Agile Scrum methodology for software development enables the government to solicit services using more broad requirements about the tools and technologies involved the development of the desired product as opposed to specific product requirements. This allows the Development Team to evaluate the business requirements of the product as part of the contract and identify the best technical solution to meet business goals, leveraging both licensed and open-source software. Agile Scrum also provides a more structured framework that supports efficient estimation of the tasks required to deliver the product used to effectively develop an accurate project schedule.

Lastly, the incremental development and delivery of the product to key stakeholders ensures that the end product meets or exceeds the expectations of the government customer. Ultimately, the key benefit is that the government is able to get a better software product through iterative development as opposed to a software product that merely complies to functional requirements that were not completely understood at the time of the RFP.

How does this methodology help to save the government money and time?

Mobomo: The Agile Scrum methodology directly benefits Federal customers both financially and with respect to project schedule in that the project team and the customer work together on estimating the level of effort required for delivery of the project. As a team, they and are able to shape the project requirements and technical approach to fit within the constraints of the contract’s period of performance and budget. The iterative development showing product progress every week provides a high level of transparency between the project team and the customer mitigates the risk of the project extending beyond the scope of the engagement and ensures the project team isn’t developing features that do not provide value to the product.

What type of projects use the Agile Scrum Methodology?

Mobomo: The Agile Scrum methodology can be applied to any project where the development of the final product can be managed through incremental development and delivery of the product to the customer. Whether it’s mobile applications, websites, microwaves, or automobiles, the principles of Agile Scrum can be applied to achieve positive results. The most common application of the Agile Scrum methodology is for the development of highly complex software products that require both a strong process-oriented management structure and flexibility of the development team to respond to fast changing requirements.

What are some tips to start using agile scrum development?

Mobomo: The best thing an organization can do to start adopting Agile Scrum for the development of their products is to have an open dialogue with their team to share the principles of the framework and illustrates the benefits of implementing Scrum. Without buy-in from the team, it would be extremely difficult to institute such changes effectively. Next, avoid trying to incorporate all of the Agile Scrum practices overnight. Agile Scrum is a framework through which a project is managed following the core principles of Agile. It is by no means a turnkey solution that works the same for every organization, rather a set of guidelines and tools to be leveraged for impactful results. Lastly, engage an individual or organization experienced in leading Agile Scrum projects on how they leverage Scrum for their needs and gain as much knowledge as you can from them.

In order to run a project using agile scrum methodology, do you need to be certified, if so what is the process?

Mobomo: It’s not necessary for every project manager in your organization to be certified Agile Scrum practitioners, nor is it necessary for anyone within the organization to be certified. However, it's highly beneficial to have a few members of your team familiar with the principles of Agile and specifically Scrum. There is a multitude of open source documentation and training materials available to the public. For certification, organizations such as Scrum Alliance manage online examinations and membership. There are also a number of organizations that offer formal training sessions with high success rates for individuals that complete the course and the certification exam.

What advantages does your project receive with agile scrum development? What are the disadvantages?

Mobomo: The advantages of your project adopting Agile Scrum to govern the development of your products include instituting a repeatable process that seeks to continually improve each iteration of a project and beyond to future projects, promote self-organizing teams who are able to delegate tasks amongst themselves in a way that conforms to their style so long as it doesn’t encroach upon the team’s ability to deliver each iteration, and maintains transparency between the project team and the customer. Agile Scrum also mitigates the risk of scope creep and delays to the project schedule by identifying obstacles proactively and remediating them accordingly. The disadvantages of Agile Scrum are that it requires a certain degree of maturity within the organization to empower its development teams to be self-organizing, which has the potential to negatively impact a project if the team isn’t closely monitored by an experienced Scrum Master. Additionally, an Agile Scrum project requires having a healthy backlog of tasks for the Development Team to ensure no lapses in productivity occur, which is dependent upon the Product Owner having a clear vision of the product and his/her ability to effectively communicate and prioritize the tasks accordingly.

How do you organize your tasks and then prioritize within the process?

Mobomo: Within Agile Scrum, the Product Owner works with the Development Team to translate the goals and needs of the product as identified by the key customer stakeholders into development user stories. The user stories are then organized within the product backlog based on priority and underlying dependencies to identify the order in which tasks need to be worked on. After the priorities are established, the Scrum Team estimates the level of effort required to complete the individual user stories and begin organizing them into iterative sprints based on the amount of time the team has available to work in each sprint.

What happens if an unexpected task occurs, how do you organize that task within the current sprint?

Mobomo: In the event that an unexpected task is identified by either the Development Team or the Product Owner during an active sprint, the task is communicated to the entire team who then conduct an assessment of the implications, priority and level of effort involved for the task. If the task warrants being addressed immediately within the sprint, the Product Owner will determine which task(s) that were originally scoped for the sprint will be removed to accommodate the new task being included. If the task does not warrant immediate attention, it is moved to the product backlog for prioritization and inclusion in a subsequent sprint.

Categories
Author
Subscribe to General